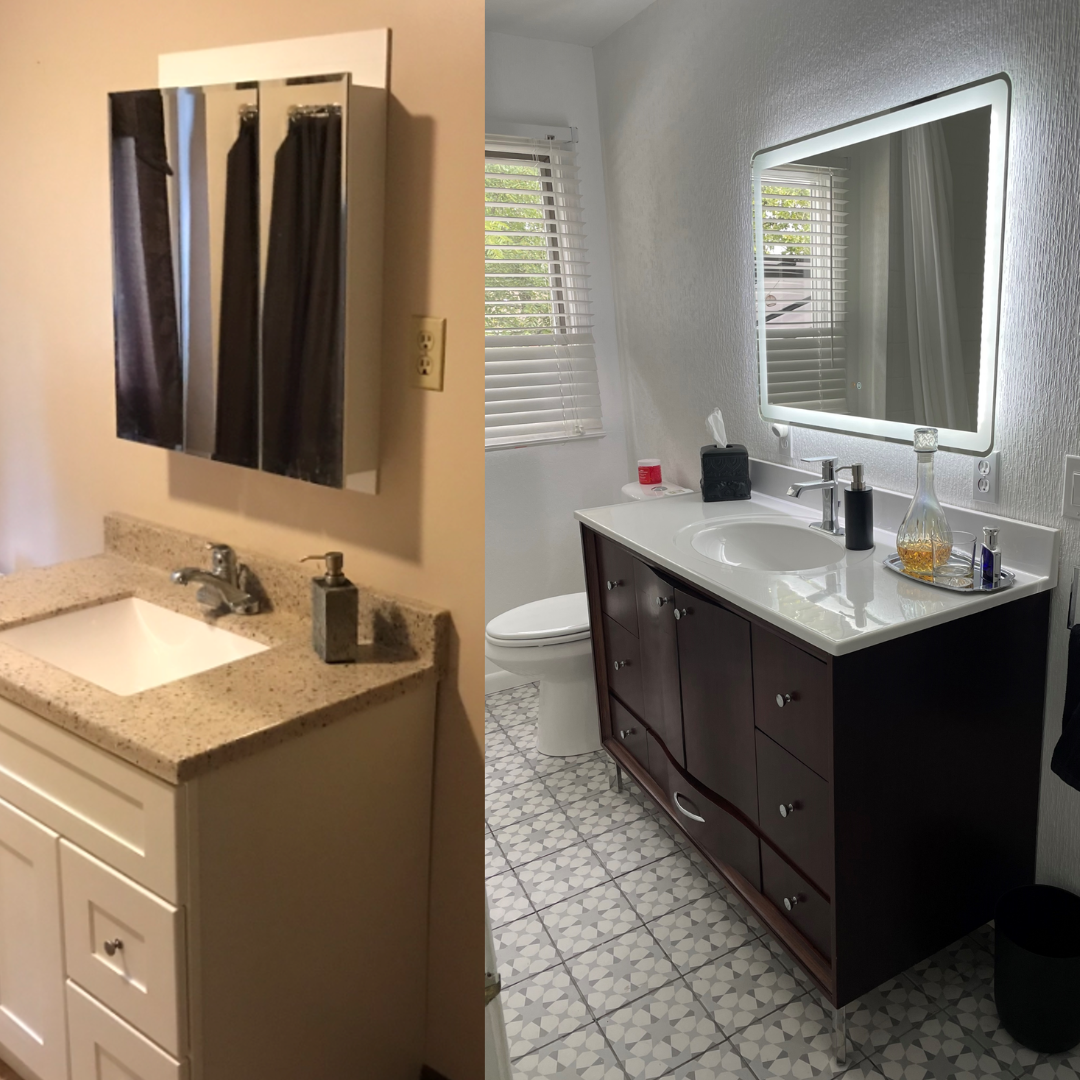
You may have noticed that I was absent for a few months recently… Well, I took the entire summer off to renovate my bathroom.
Yes, the entire summer.
What started as, “I’ll just make a few changes,” quickly turned into removing a popcorn ceiling, replacing my sink cabinet, tearing out a perfectly good shower surround, tiling an entire tub surround, replacing the floor, moving electrical outlets, adding storage, wallpapering the walls, and generally questioning several of my life choices along the way…
But here we are.
And I have to say, I absolutely love the result!
This wasn’t a major bathroom renovation in the traditional sense. I didn’t rip the room down to the studs or replace the bathtub. Instead, I focused on making the space more functional, adding desperately needed storage, updating the finishes, and making this long, narrow bathroom feel more modern and updated.
Here’s what I changed:
Removed the popcorn ceiling, #instantupgrade
Replaced the vanity
Replaced the mirror/medicine cabinet
Removed the existing tub surround
Installed tile throughout the tub surround
Raised the shower head
Replaced the vinyl floor with tile
Replaced the toilet with a chair-height model
Added another shelf to the floating-shelf area
Added more storage for bathroom necessities
Painted and wallpapered the walls (yes both!)
Moved the electrical outlets to accommodate a larger wall mirror
That sounds pretty reasonable, right?
Well…welcome to DIY. There were a few hitches along the way… Here’s the full story.
Before: A Bathroom with Good Bones but Lots of Problems
The biggest issue with this bathroom wasn’t that anything was horribly wrong. It was that almost everything was almost right.
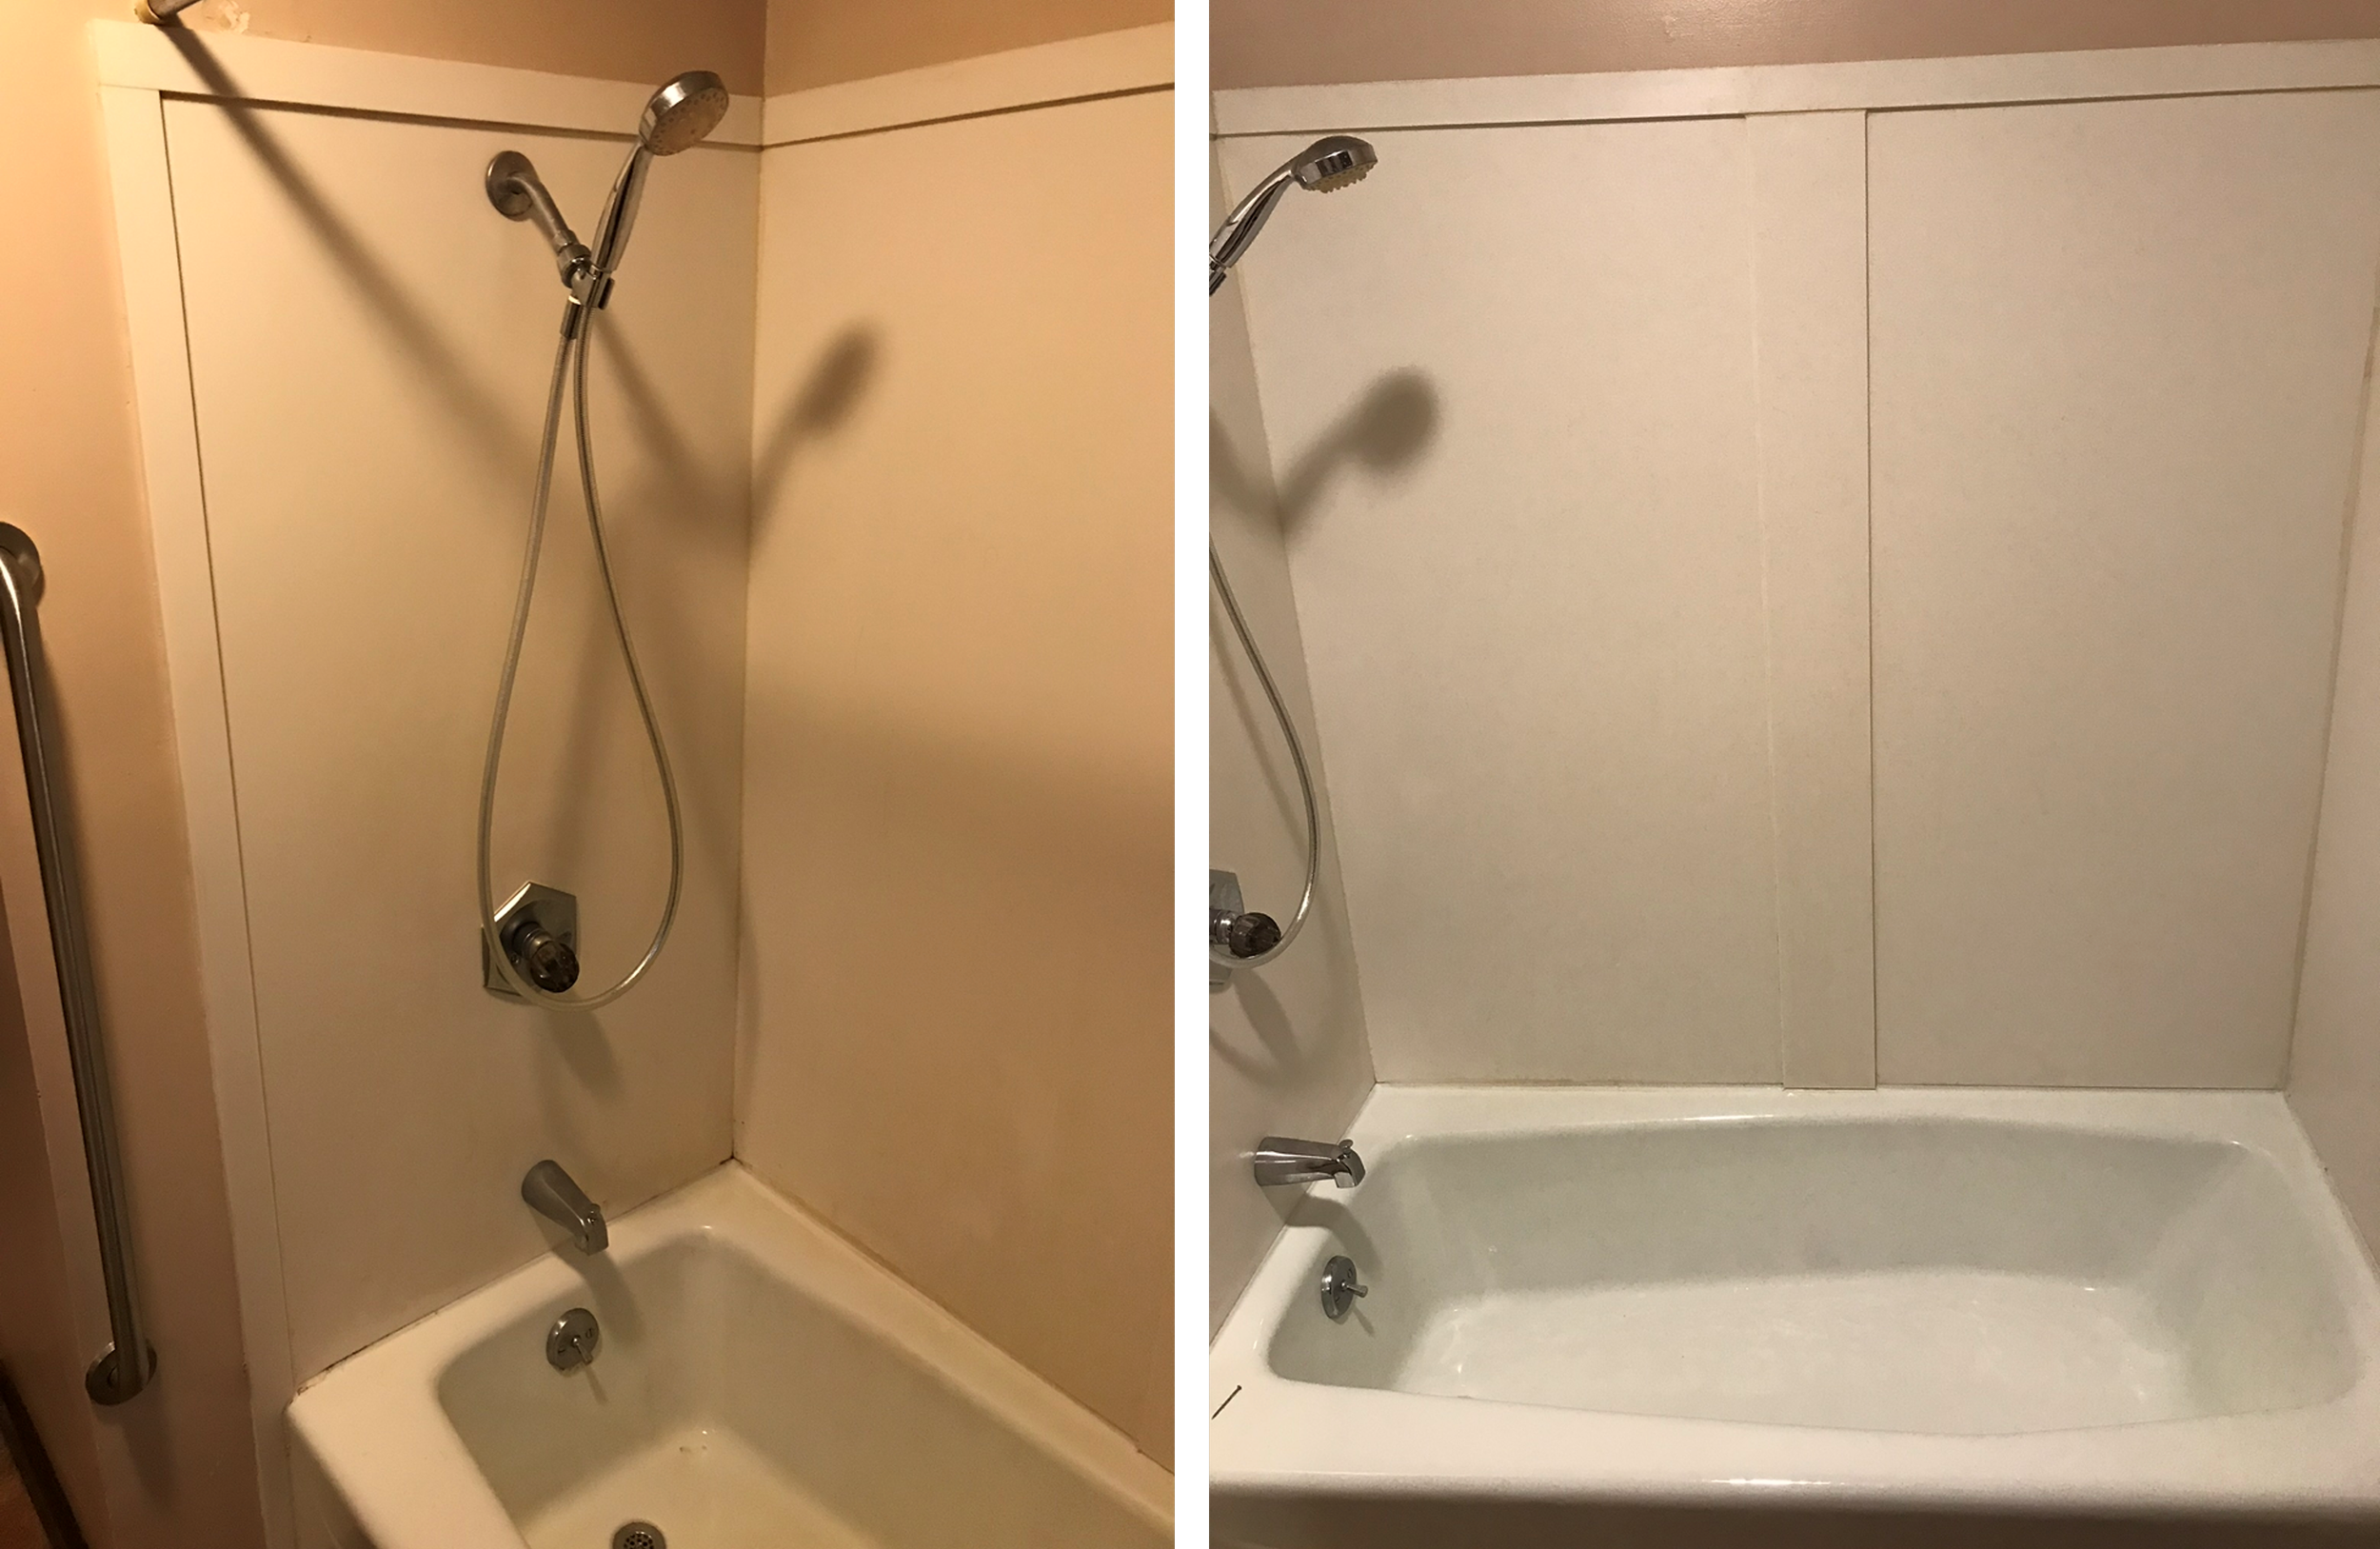
The existing Corian shower surround was good quality and perfectly functional, but it only came about three-quarters of the way up the wall and just wasn’t at all attractive to me. It certainly lacked that modern look I wanted.
The shower head was also too low. I’m six feet tall, and while I appreciate a good shower, I don’t particularly enjoy ducking underneath the shower head to get one.
I wanted to keep the bathtub because it was white, in great shape, and I wanted the option to take a bath—and to bathe my dog. So, the tub itself stayed.
The floor, however, had to go.
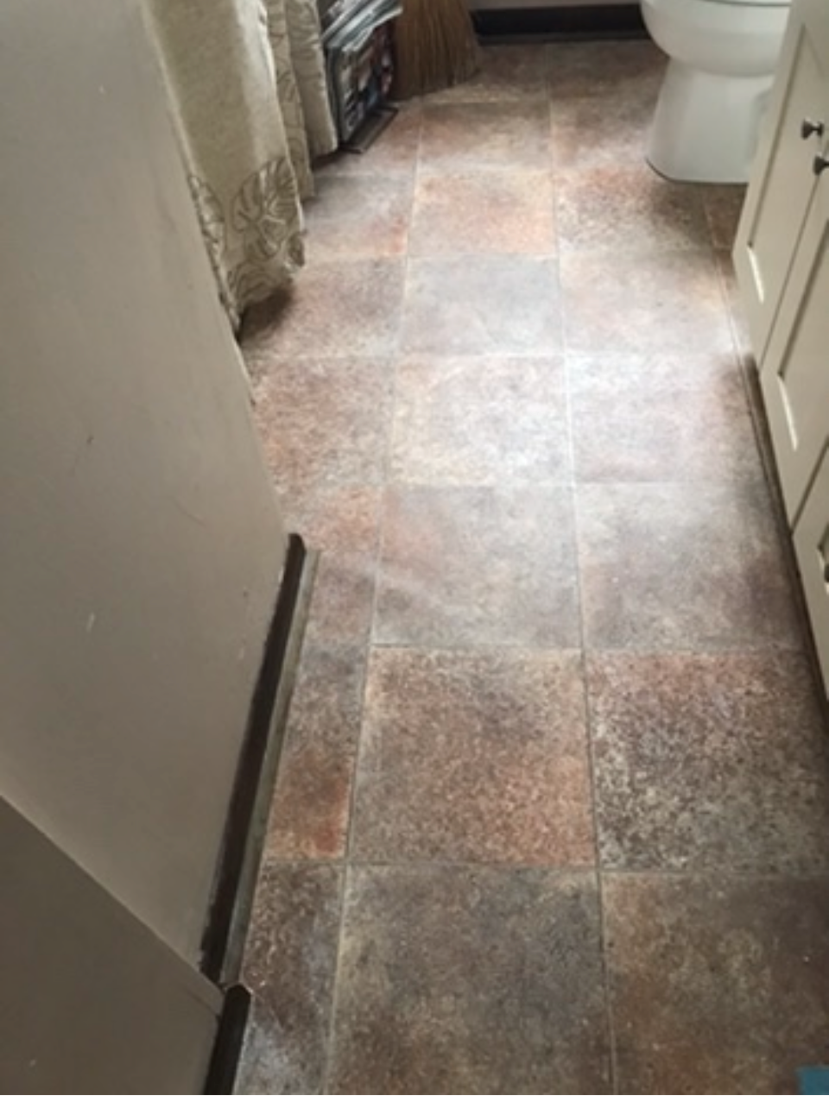
The rusty-brown vinyl sheet flooring wasn’t cutting it. Worse yet, whoever installed it originally didn’t get the installation quite right. There were bubbles throughout the floor, which made the whole thing look even more tired.
And then there was the storage situation.
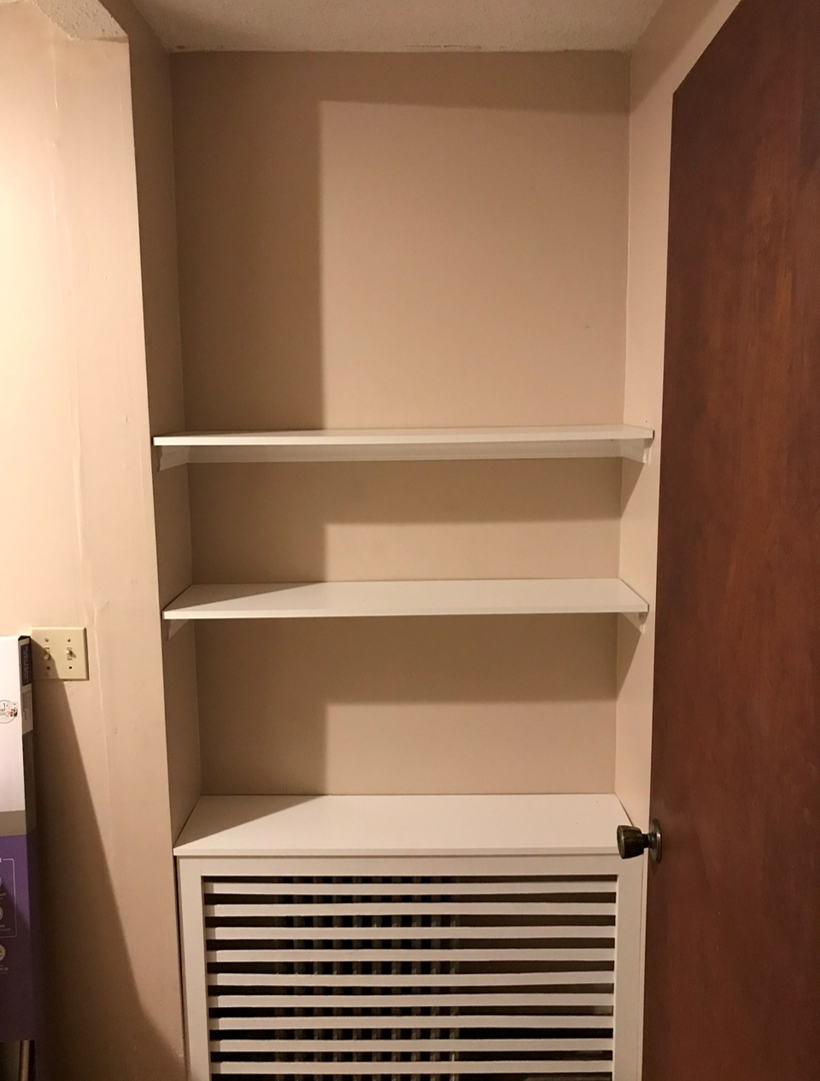
The floating shelf alcove was essentially the only storage in the bathroom. I knew I had enough vertical space to add another shelf for towels and décor, so that was an easy decision.
The radiator was another eyesore. It had a top on it, and it did the job, but it looked…chintzy.
I knew I could do better.
And, as anyone who has ever renovated an old house knows, once you start looking at the things you could do better, it becomes very difficult to stop.
Tip 1: Start at the Top and Work Your Way Down
The first thing to go was the popcorn ceiling.

I removed it using a spray bottle filled with a 50/50 mixture of warm water and white vinegar. I worked in small sections, thoroughly saturating the ceiling before scraping.
It didn’t take long, but it was messy.
Very messy.
If you decide to tackle a popcorn ceiling yourself, work in small areas and make sure the material is thoroughly saturated before scraping. And please wear eye protection and a mask so you aren’t inhaling dust or particles.
My house is about 70 years old, so there was always the possibility that the ceiling material could contain asbestos. Better safe than sorry. If you have an older home and aren’t sure what you’re dealing with, have the material tested before disturbing it.
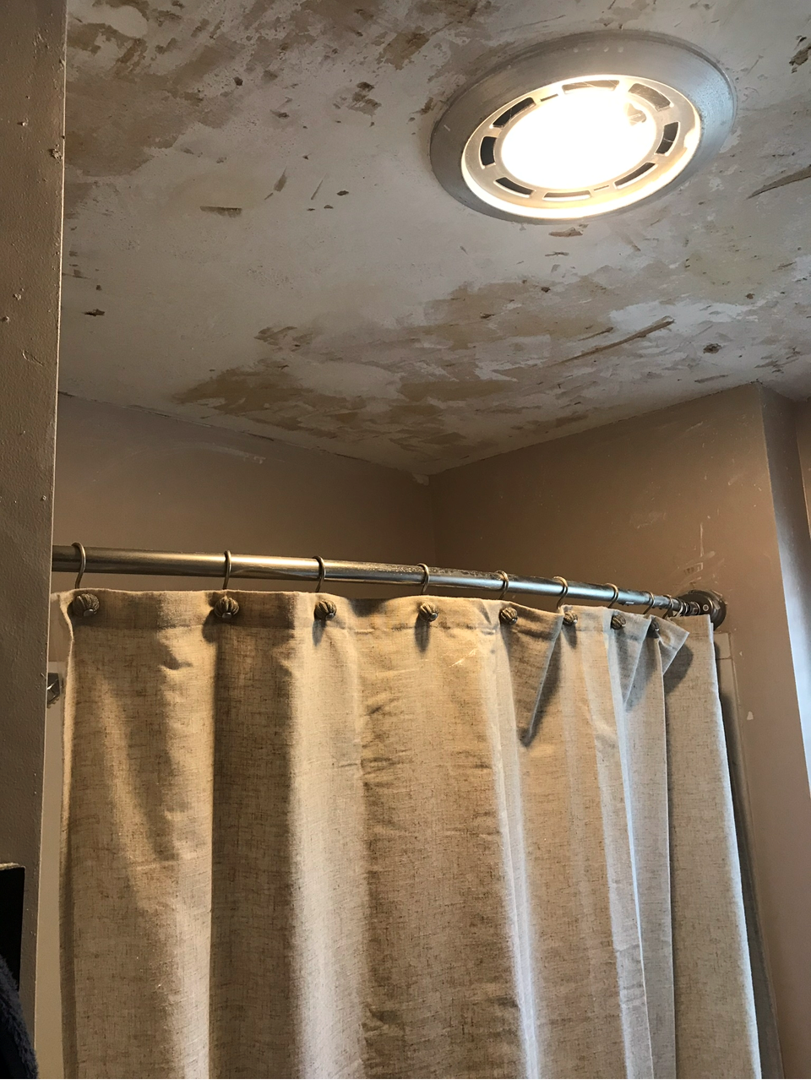
Once the ceiling was down and cleaned up, I could move on to the next phase.
Tip 2: Know When to Hire Help
Once I removed the existing tub surround, I was thrilled to discover that the wall underneath was in great shape.
That was a nice surprise.
What wasn’t quite so appealing was the plumbing work I wanted to do.
I wanted to install a new faucet mixing valve, replace the water supply lines, and raise the shower head. I was intimidated by that part of the project, so I hired a handyman to help.
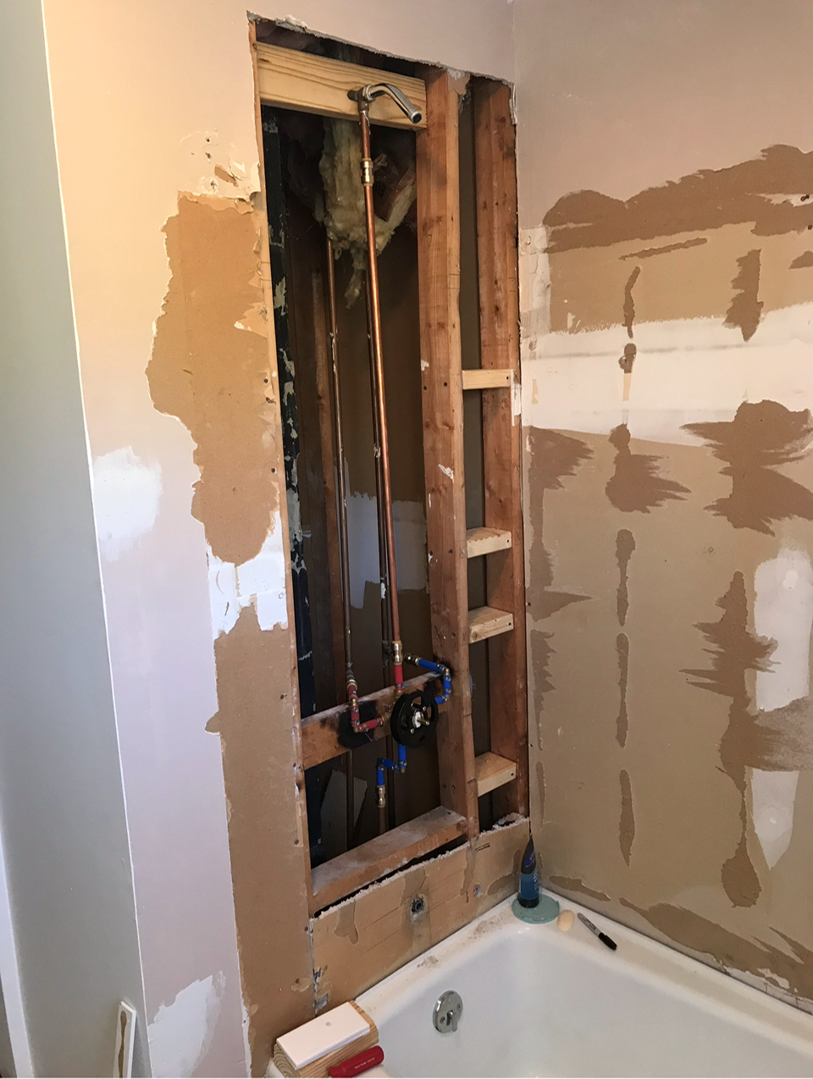
And honestly? He did a great job.
There is absolutely nothing wrong with admitting that a particular part of a DIY project is beyond your current skill level. Knowing when to hire help can actually be one of the smartest DIY decisions you make.
While the wall was open, I noticed something else.
Behind the chimney, which runs along the shower wall, was a large amount of unused space.
Aha.
You know what that means.
Storage!
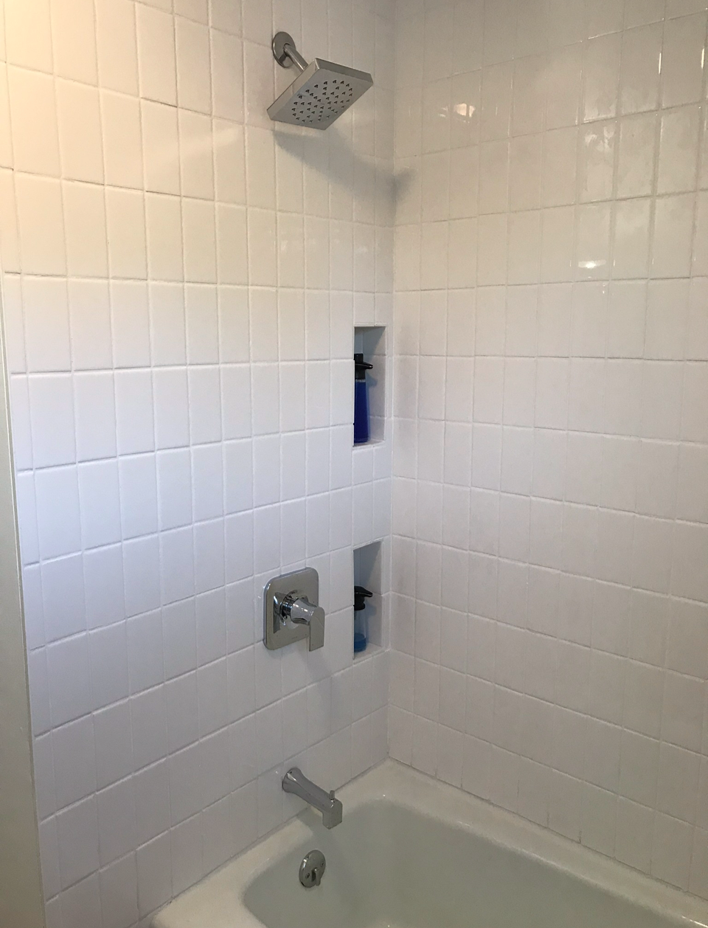
I decided to use the space between the vertical studs to create two recessed shower niches for shampoo, soap, and other bath necessities.
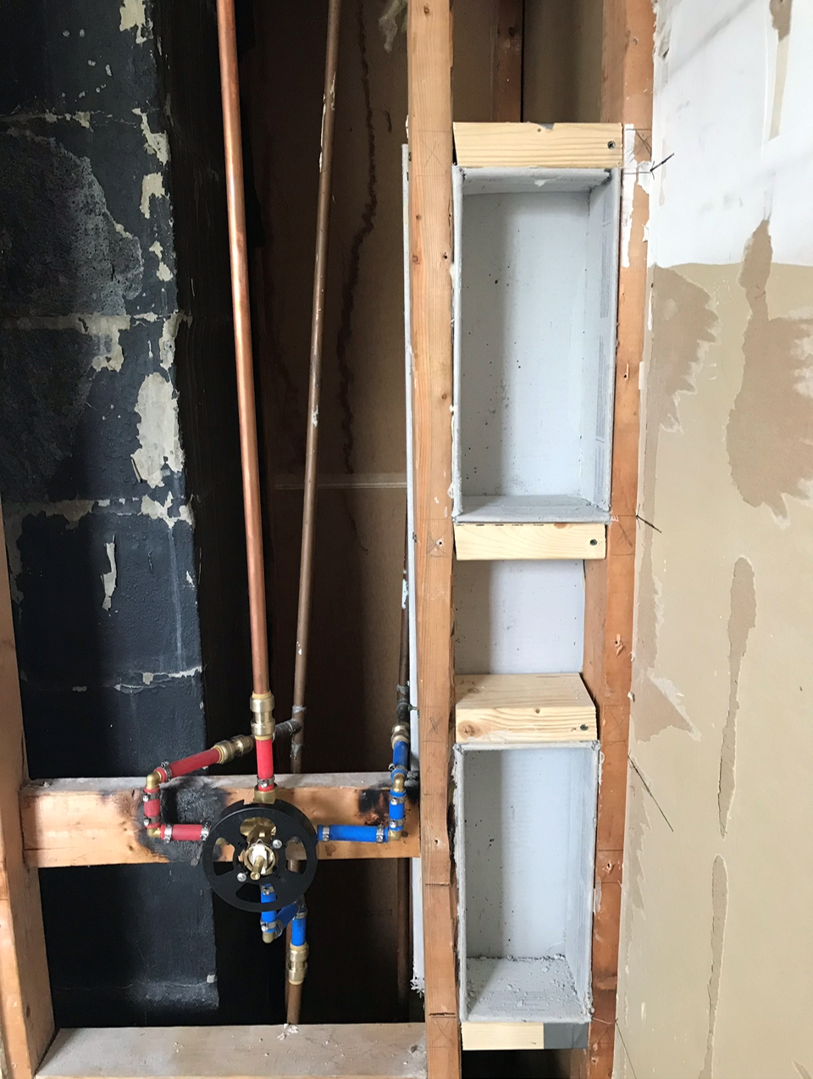
This was a completely unplanned addition, but it ended up being one of my favorite new things in my bathroom.
After that, I closed the wall back up with a combination of new and existing drywall.
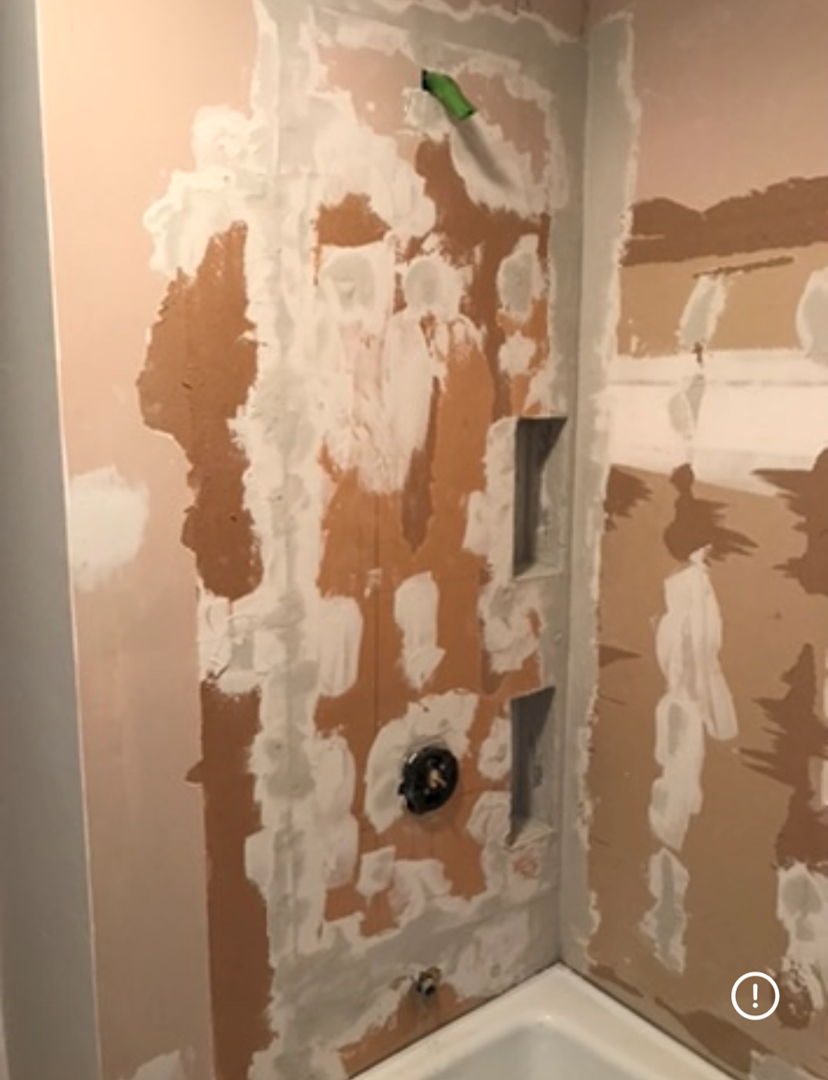
And that brings me to an important lesson.
Tip 3: Pitch the Bottom of Your Shower Niches
Before I got too far into building the recessed shower niches, I did some research.
I’m glad I did.
One mistake that inexperienced DIYers can make when building shower niches is failing to create a slight pitch on the bottom shelf. Without that slope, water can sit inside the niche and potentially work its way into the tile and grout.
The bottom of the niche should be angled slightly toward the shower or tub floor so water can run out rather than sit there.
So, I pitched the bottoms of my niches before moving on.
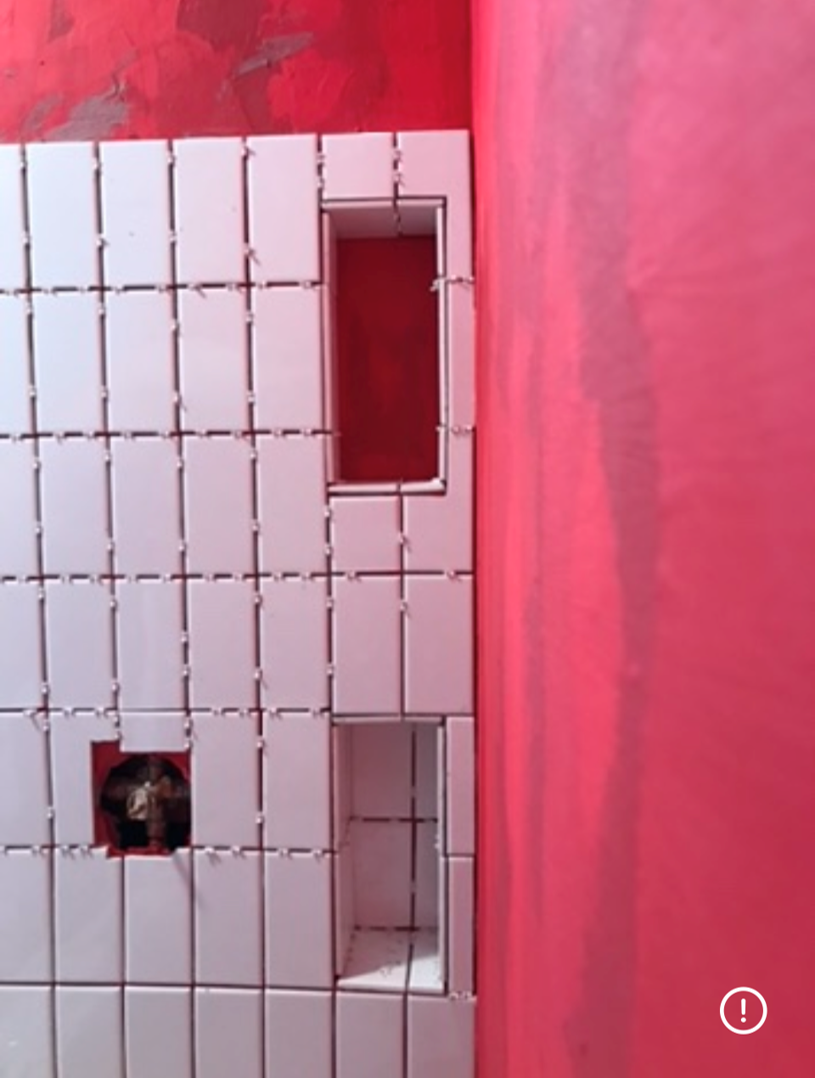
Then came waterproofing.
I applied multiple coats of RedGard waterproofing to the entire shower surround and both niches. I think I used at least five coats and went through two gallon buckets.
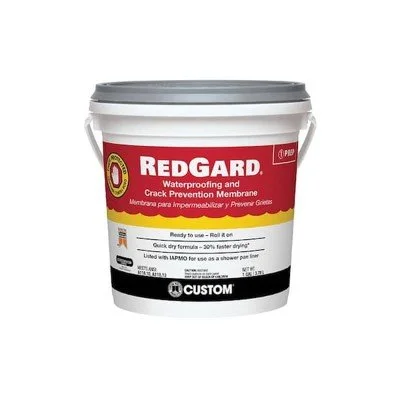
RedGard 1 Gal. Waterproofing and Crack Prevention Membrane Home Depot
It was a lot.
RedGard goes on pink and dries to a deep red, which is actually pretty interesting to watch. Because I applied so many coats, I gave it several days to fully cure before moving on to tiling.
The waterproofing membrane gave me the protection I wanted before I started installing the tile.
And now came the fun part.
Tip 4: Don’t Be Afraid to Learn a New Skill
I knew I wanted white subway tile.
I know…
Revolutionary, lol!
White subway tile has been done approximately one billion times, but I love it, so I wasn’t about to let originality stand between me and something I actually liked.
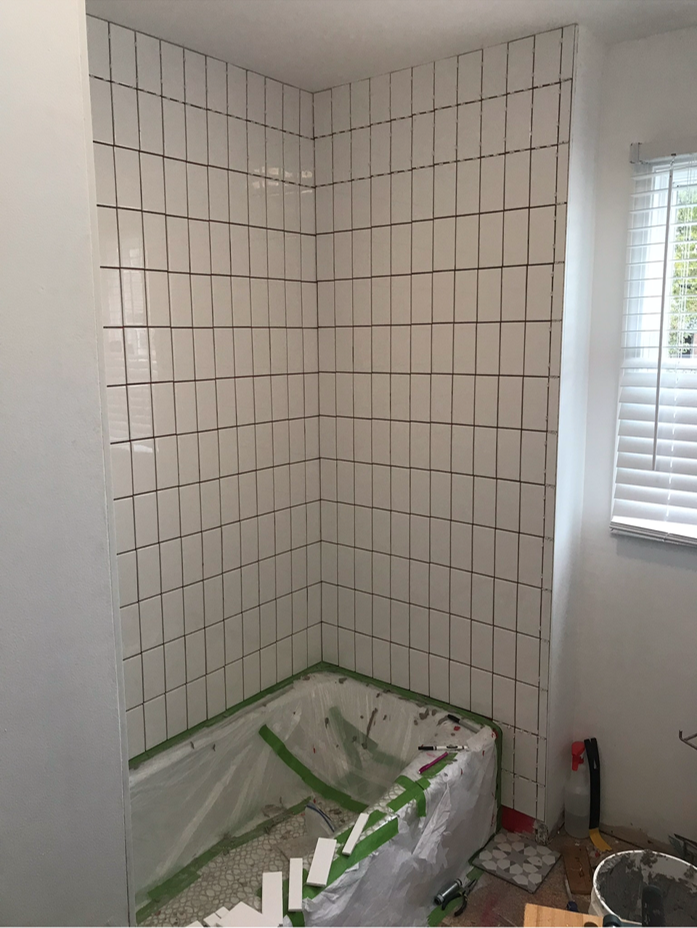
Instead, I decided to install it vertically in a stacked, “soldier-style” layout. This gave the traditional subway tile a slightly more modern look and added some personality to the space.
I didn’t use specialty tile. I used the boring old white subway tile from the big-box store.
And I think it looks great.
I had tiled my kitchen backsplash about three months earlier, so I wasn’t completely new to tiling. I was, however, still intimidated by the wet saw and getting the cuts just right and uniform looking.
So, before I started cutting the actual bathroom tile, I spent an afternoon in my garage cutting scraps of old tile.
It was worth it.
Getting comfortable with the saw before tackling the real project made me much more confident—and much safer.
Sometimes the best way to learn a new DIY skill is simply to practice on something you don’t care about first.
Installing the New Bathroom Floor Tile
Once the shower surround was finished, it was time to tackle the floor.
The old vinyl sheet flooring came up super easy because it was only glued around the edges.
Which explained all those bubbles.
When the vinyl was gone, I got another pleasant surprise: the subfloor was in excellent condition, and the floor was completely level.
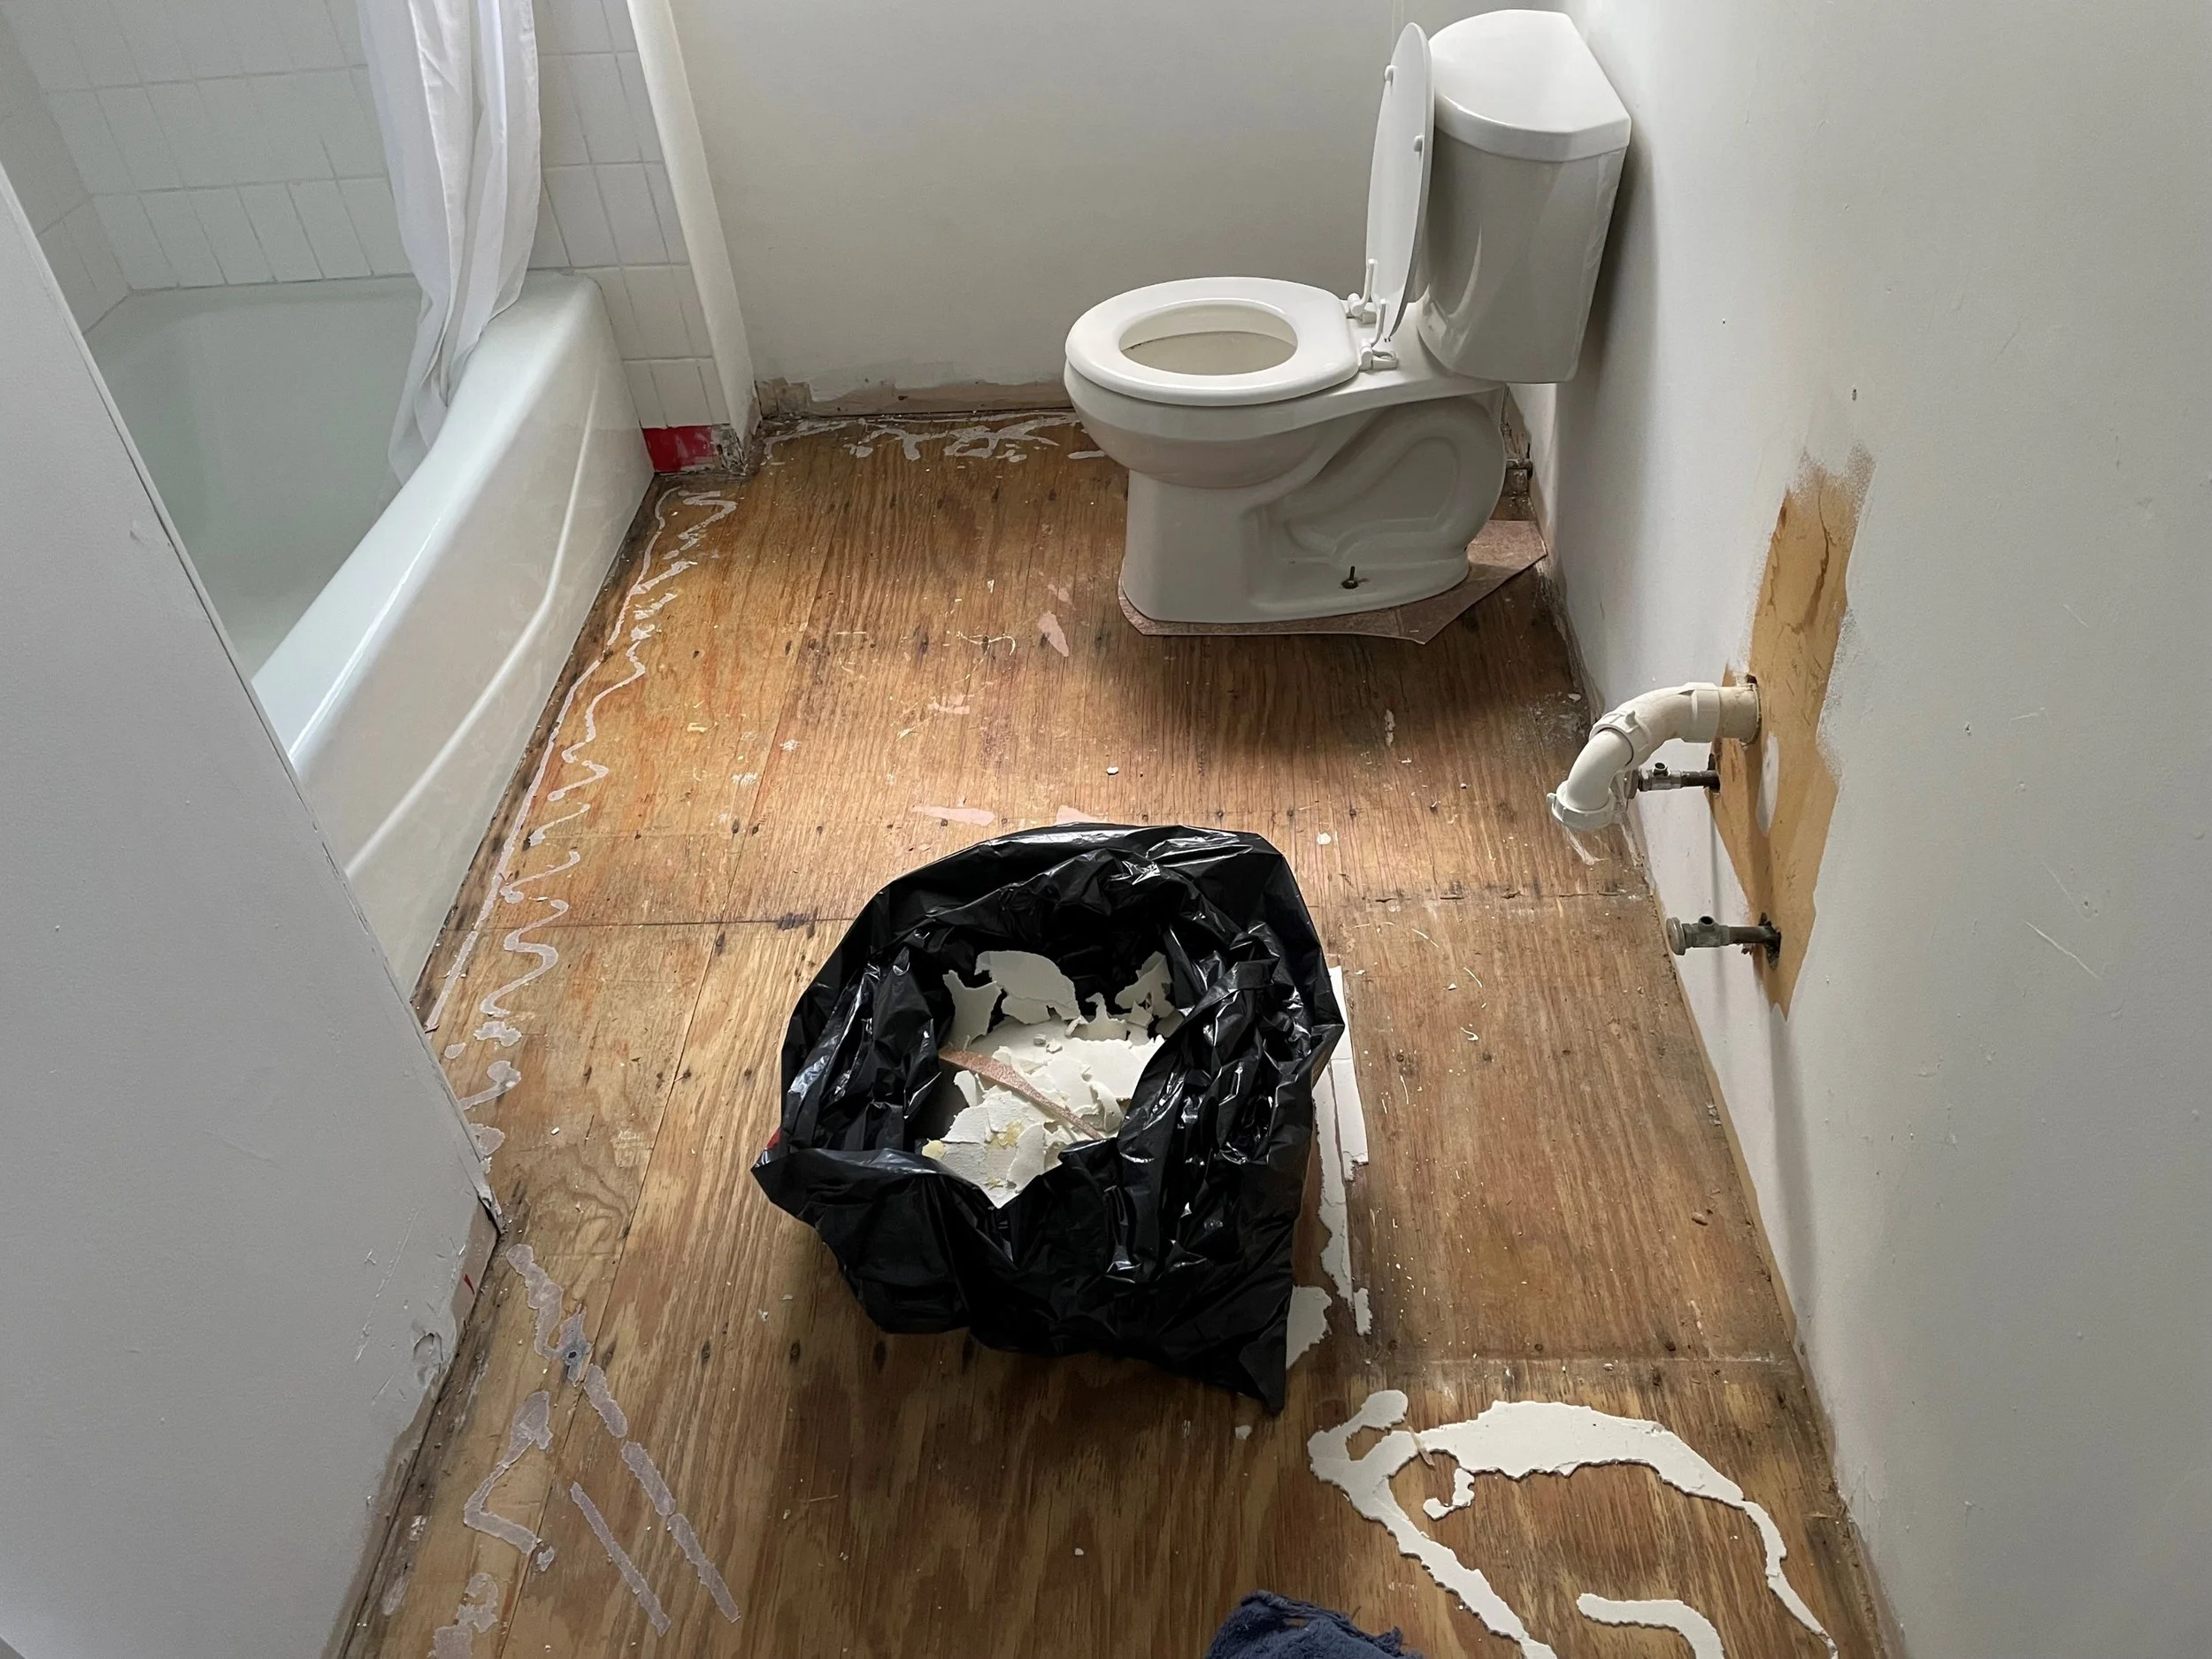
That made installing tiles much easier.
While I was deciding on the floor tile pattern, I gave the walls a quick coat of white primer.
I knew I wanted some contrast on the floor, but I hadn't decided exactly what that would look like yet.
I narrowed it down to three options.
The first was a marble-look mosaic with a strong dark-and-light contrast. The second was another marble option with slightly softer contrast. The third was a geometric ceramic tile.
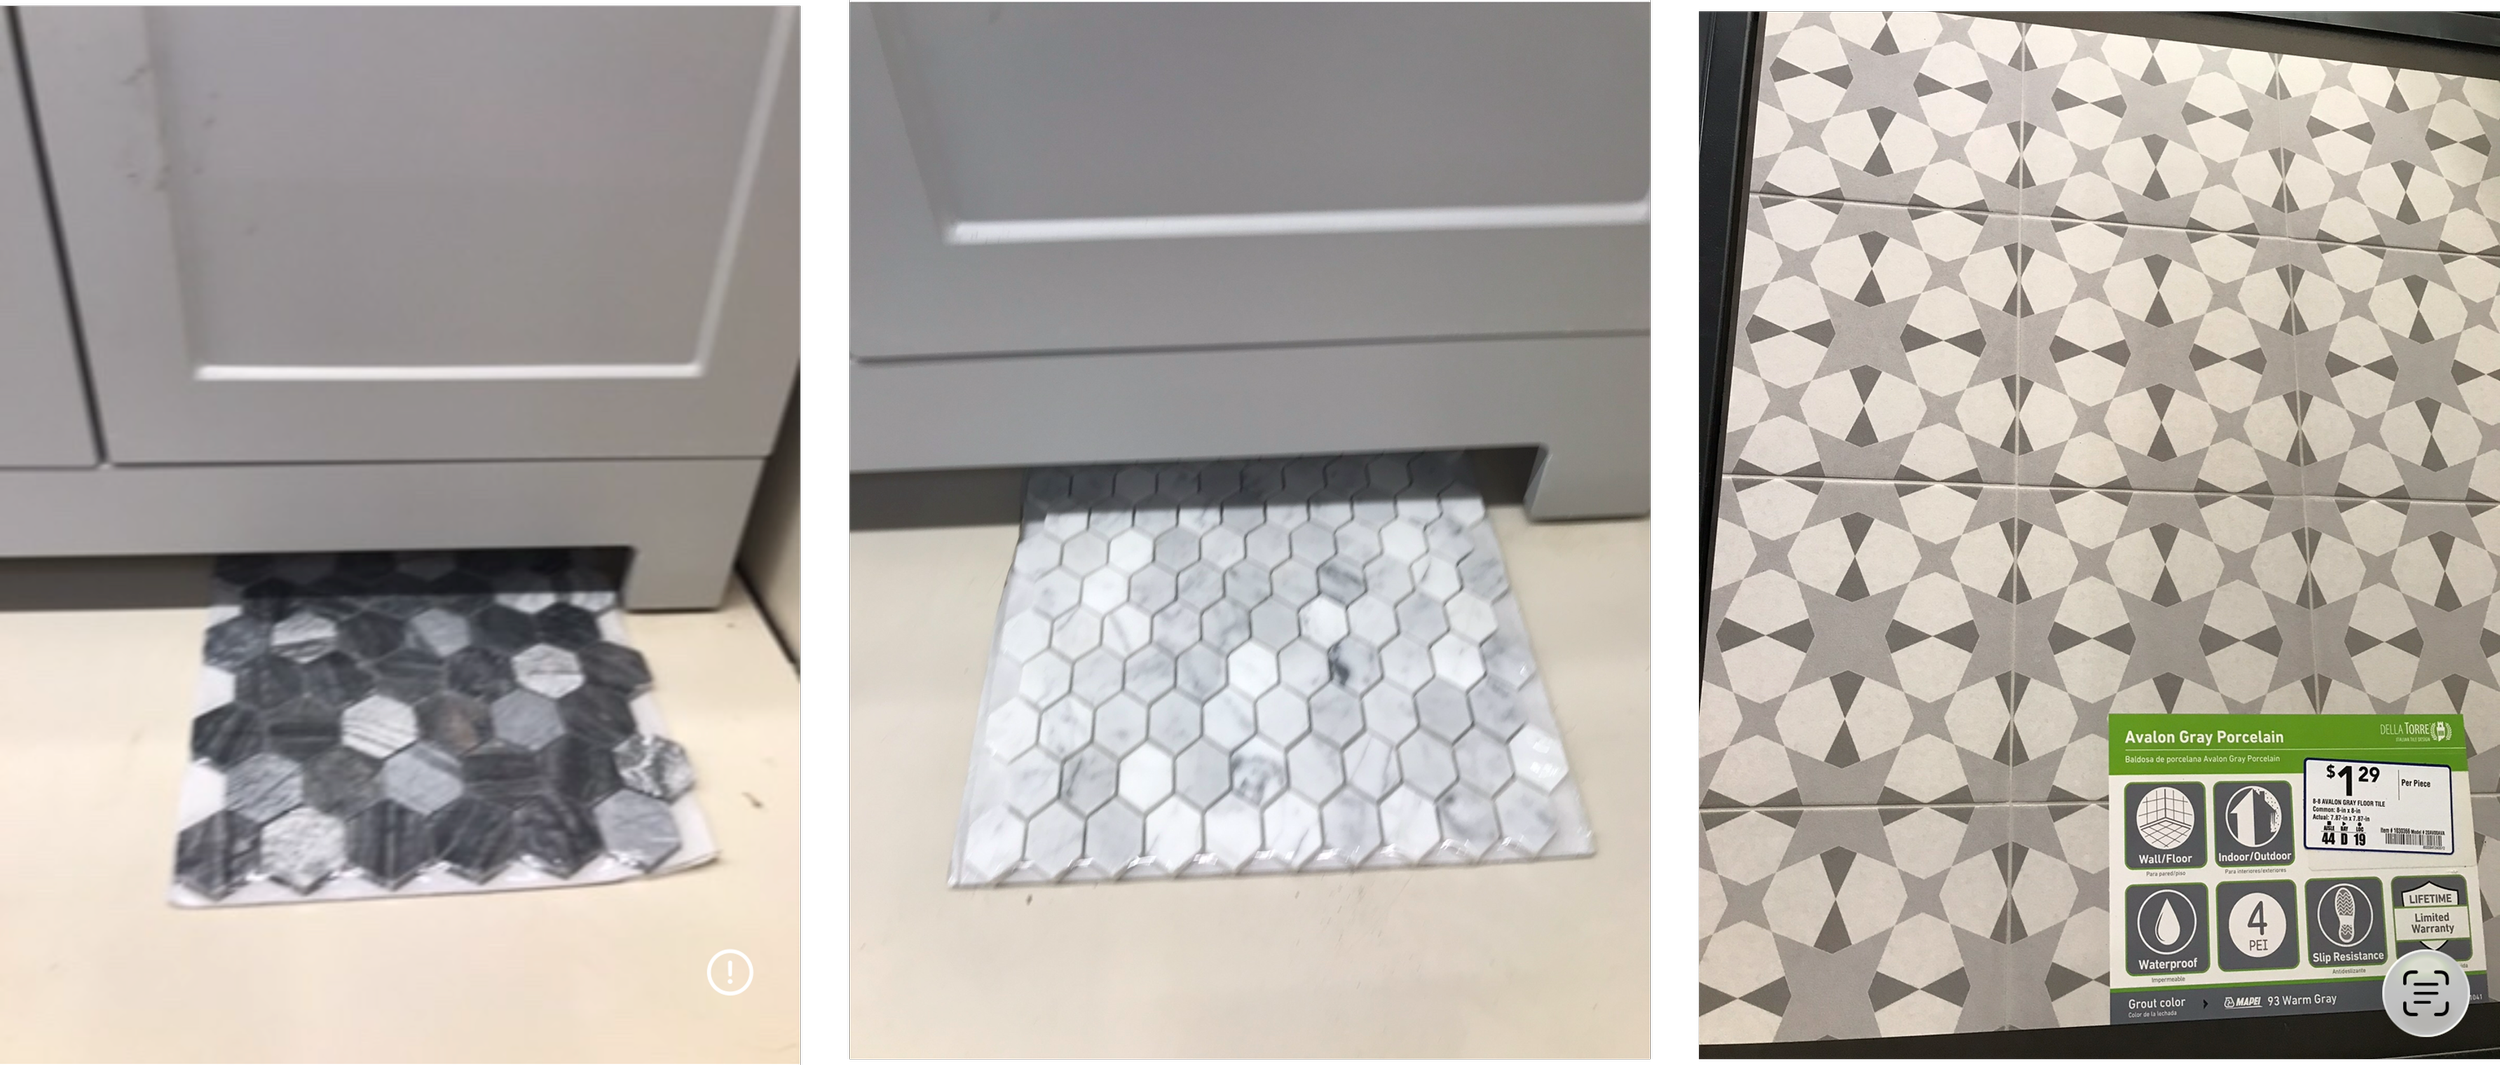
I liked all three.
Then my tile saw made the decision for me.
I have a smaller saw that can only accommodate smaller tiles, and the geometric tile was 9" x 9"—the largest size my saw could handle.
The marble tiles were 12" x 12" sheets on mesh. I technically could have cut them down, but I would have created a lot of waste.
So, option three it was.
Sometimes the renovation makes the design decisions for you.
Tip 5: Leave Space Around Floor Tiles
And now we come to my biggest mistake in the entire bathroom makeover.
I didn’t leave enough space between the floor tile and the tub—or between the tile and the door transition.
I wanted a really clean, straight look, so I butted the tiles right up against both.
Bad idea.
The grout eventually cracked in those areas because I didn't allow enough room for movement.
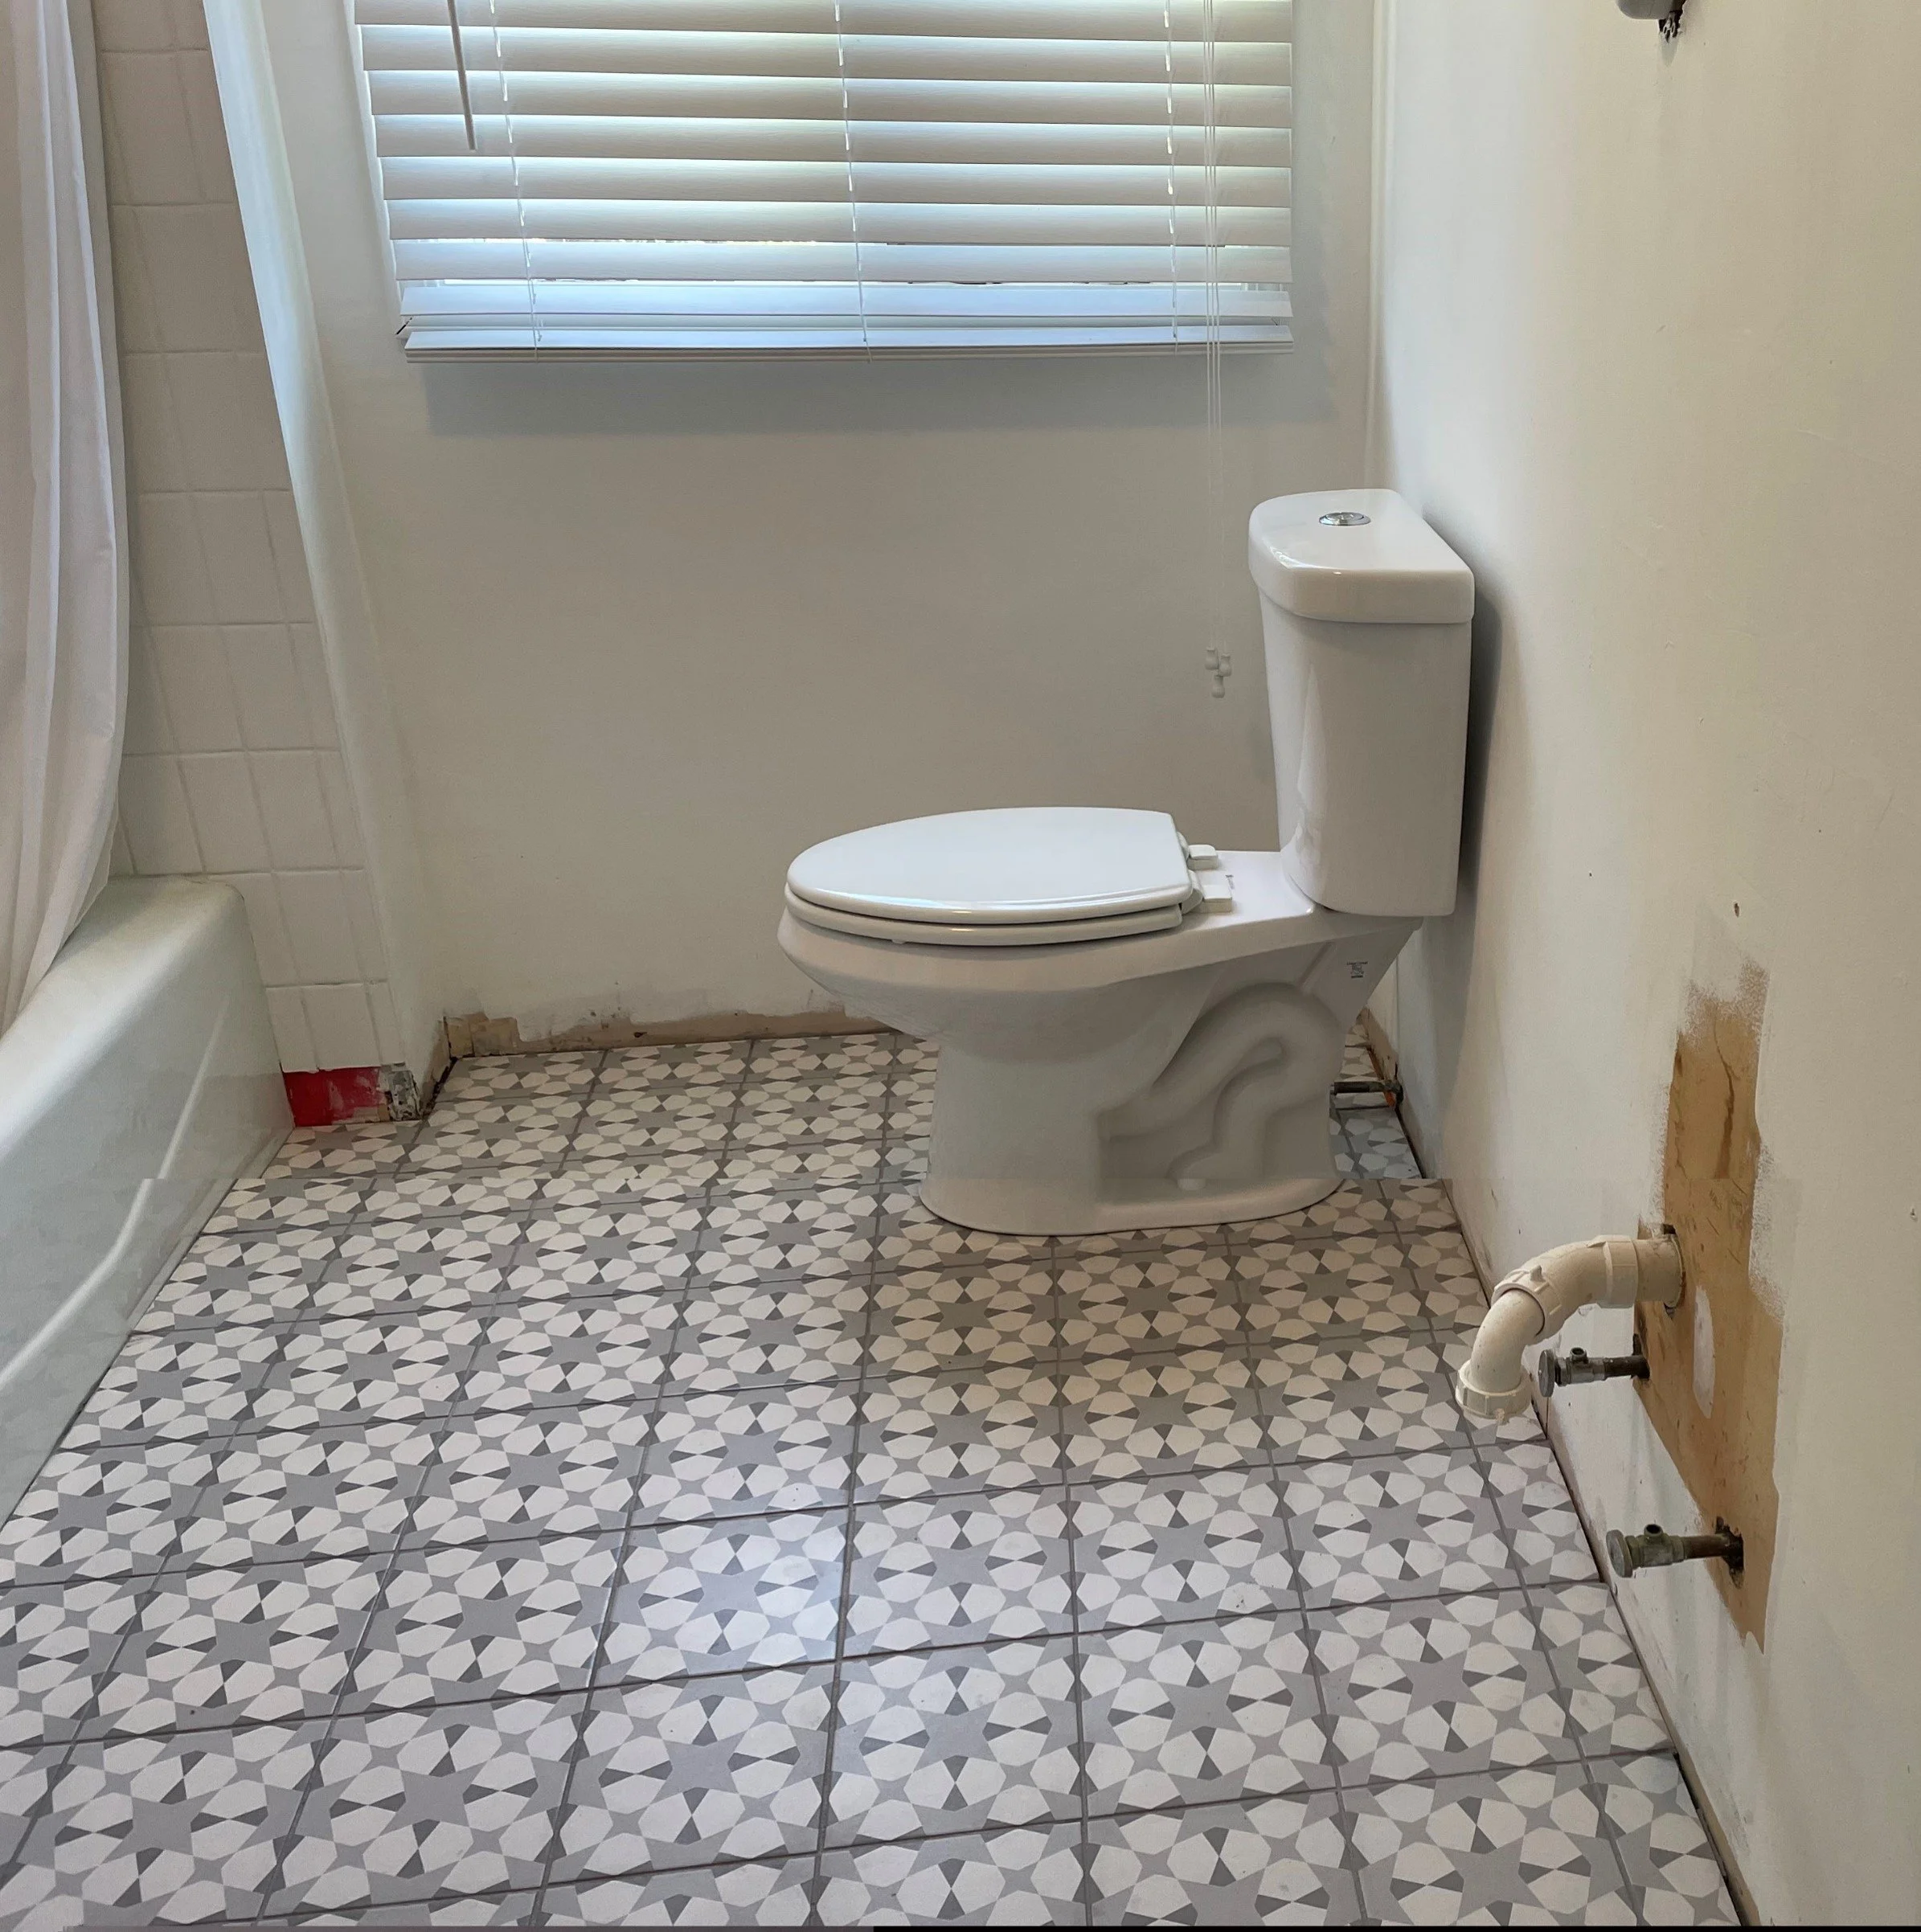
Along the walls, I left adequate space because I knew the base trim would cover it. But around the tub and door, I got a little too ambitious with my quest for a perfectly clean line.
So now I get to break out the multi-tool, cut away some of those tiles, and regrout. But that is a project for another day.
Learn from my mistake:
Give your floor tile a little breathing room and make sure to add spacers between your tiles and all walls, doorways, or fixtures that the tiles mortared up to.
Your future self will thank you.
Oh yeah, and before you tile, you must install a vapor barrier and underlayment! I used Schluter Ditra orange underlay as a product to adhere the tiles to. This provides a vapor barrier and a uniform surface for tile adhesion.
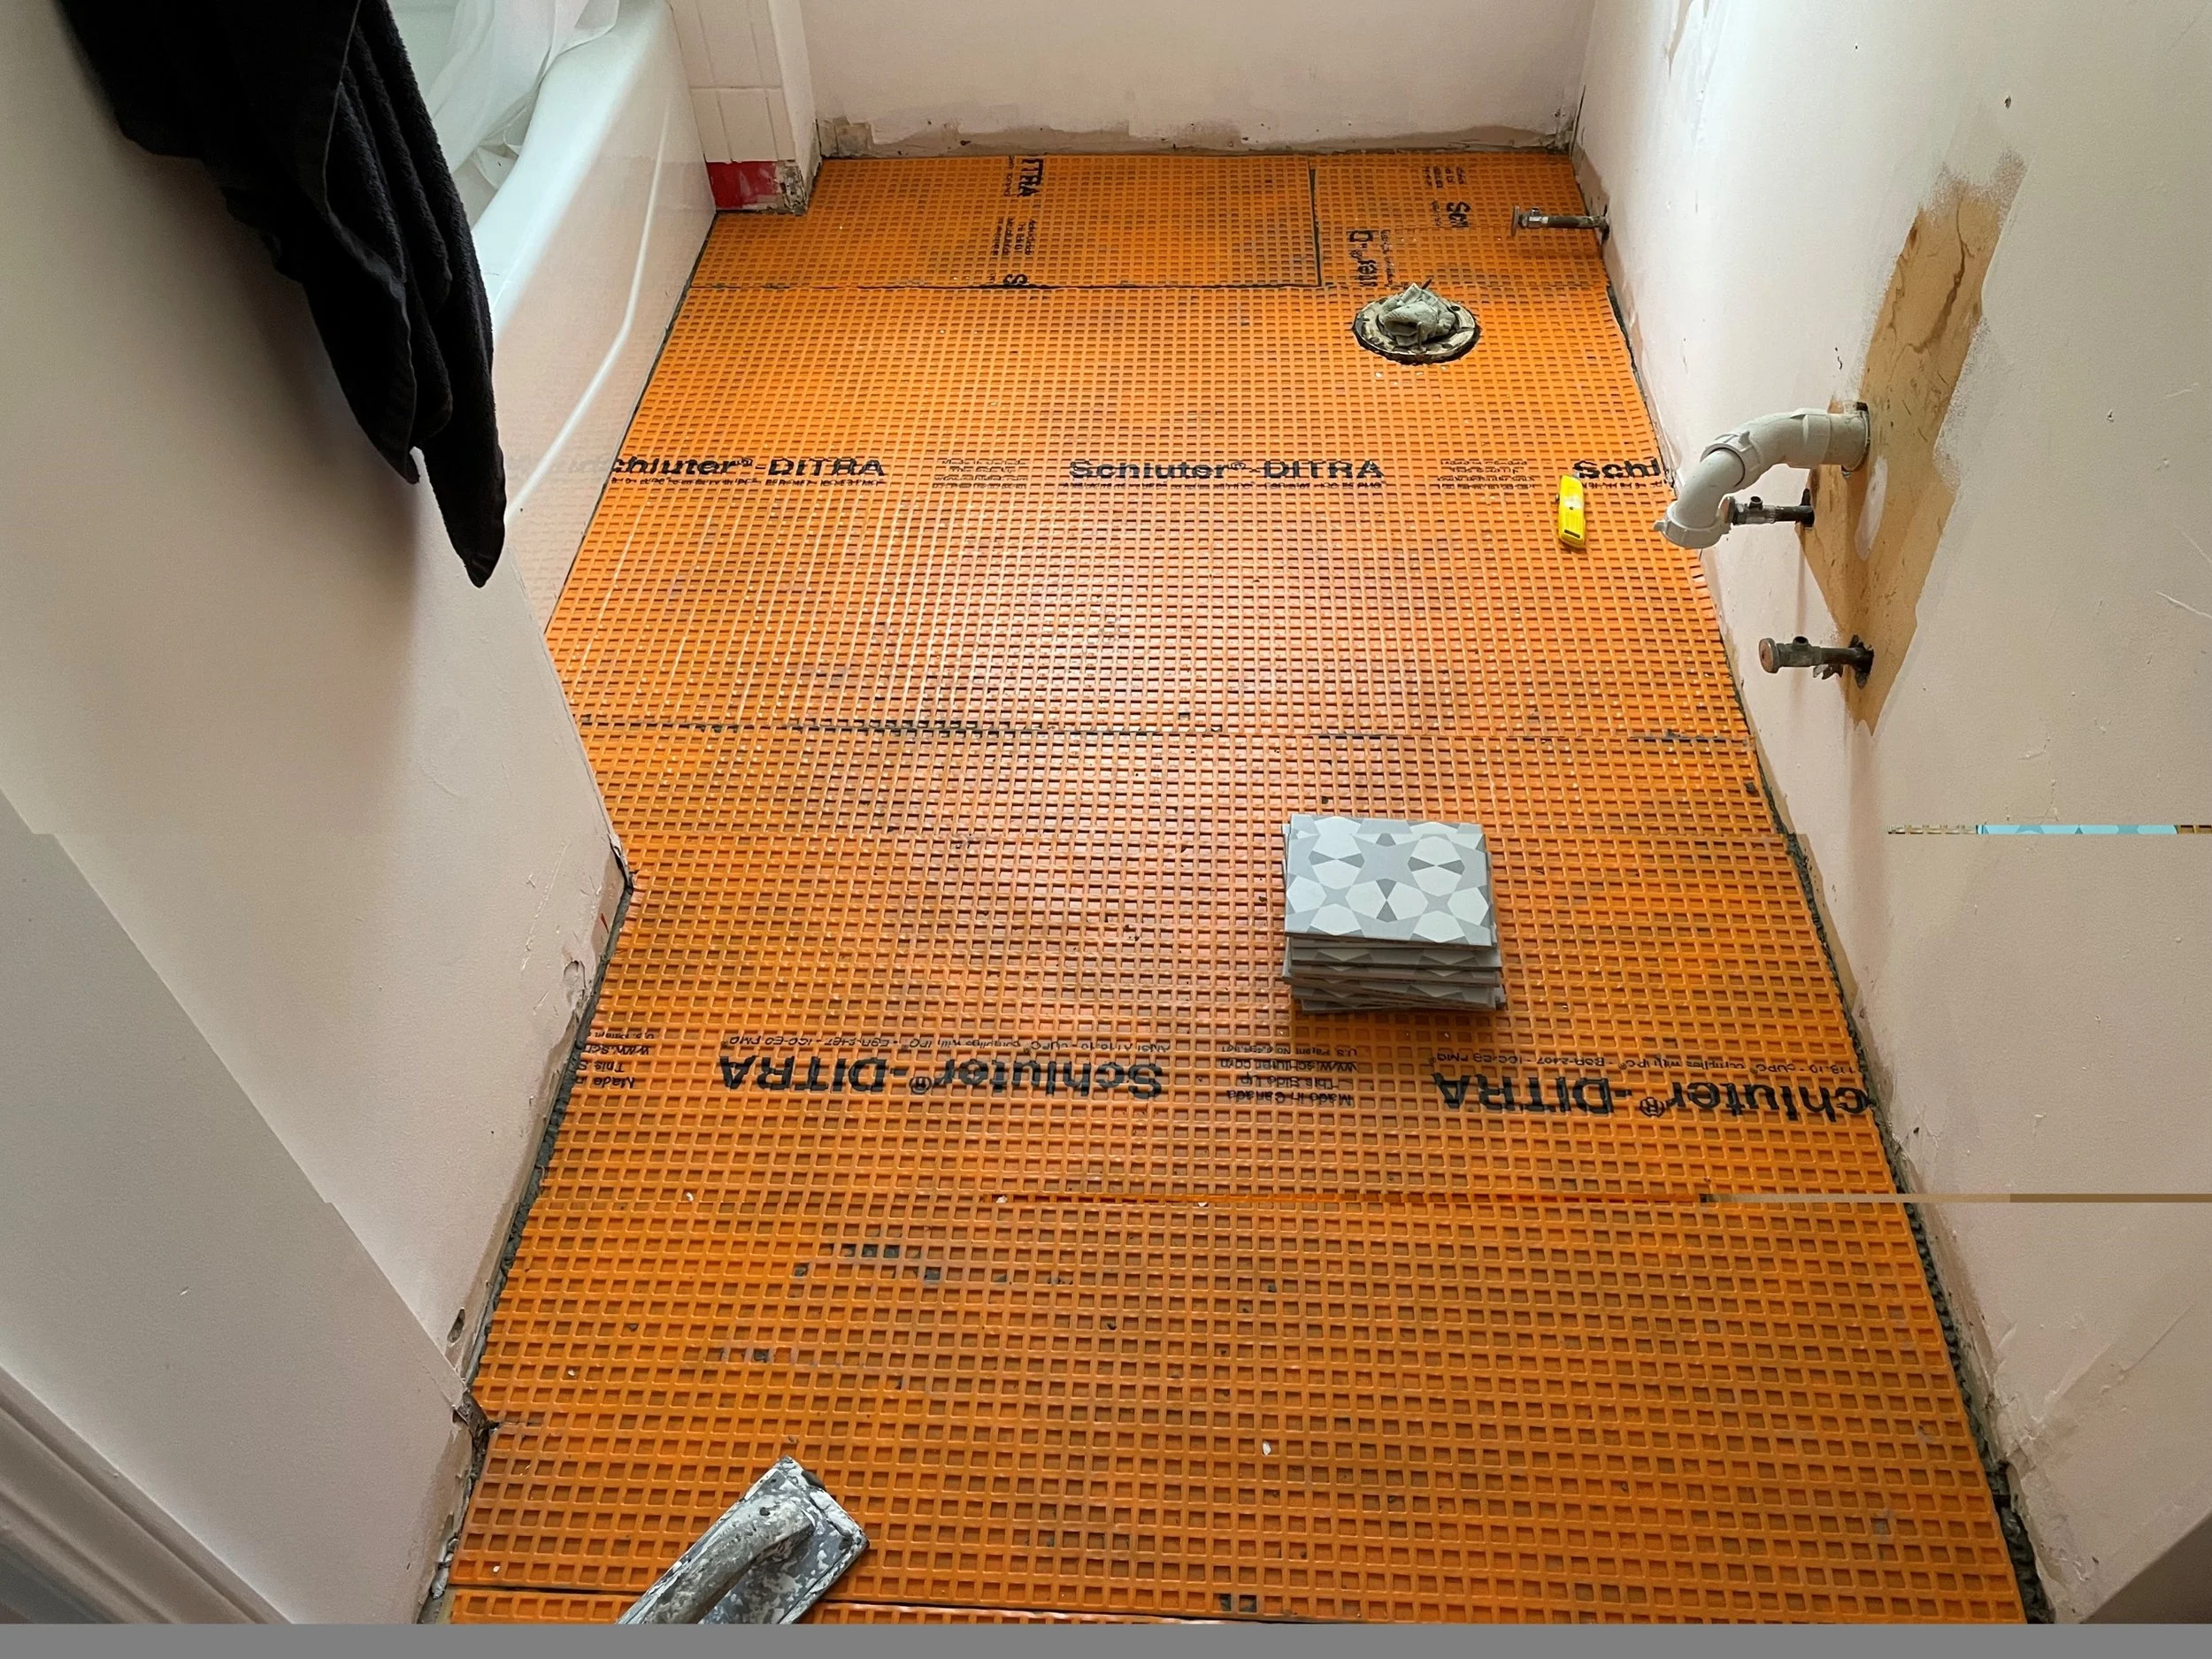
Schluter Ditra
Adding More Storage to the Bathroom
Once the floor was done, I moved on to the open shelf alcove.
I added one additional shelf at the top, which gave me more vertical storage space.
Tip 6: Go Vertical with Storage in a Small Bathroom
If you’re short on floor space or horizontal wall space, look up.
Seriously.
Go vertical.
The previous owner had already made good use of this alcove with simple wall brackets made from leftover base trim and plywood shelves cut to size.
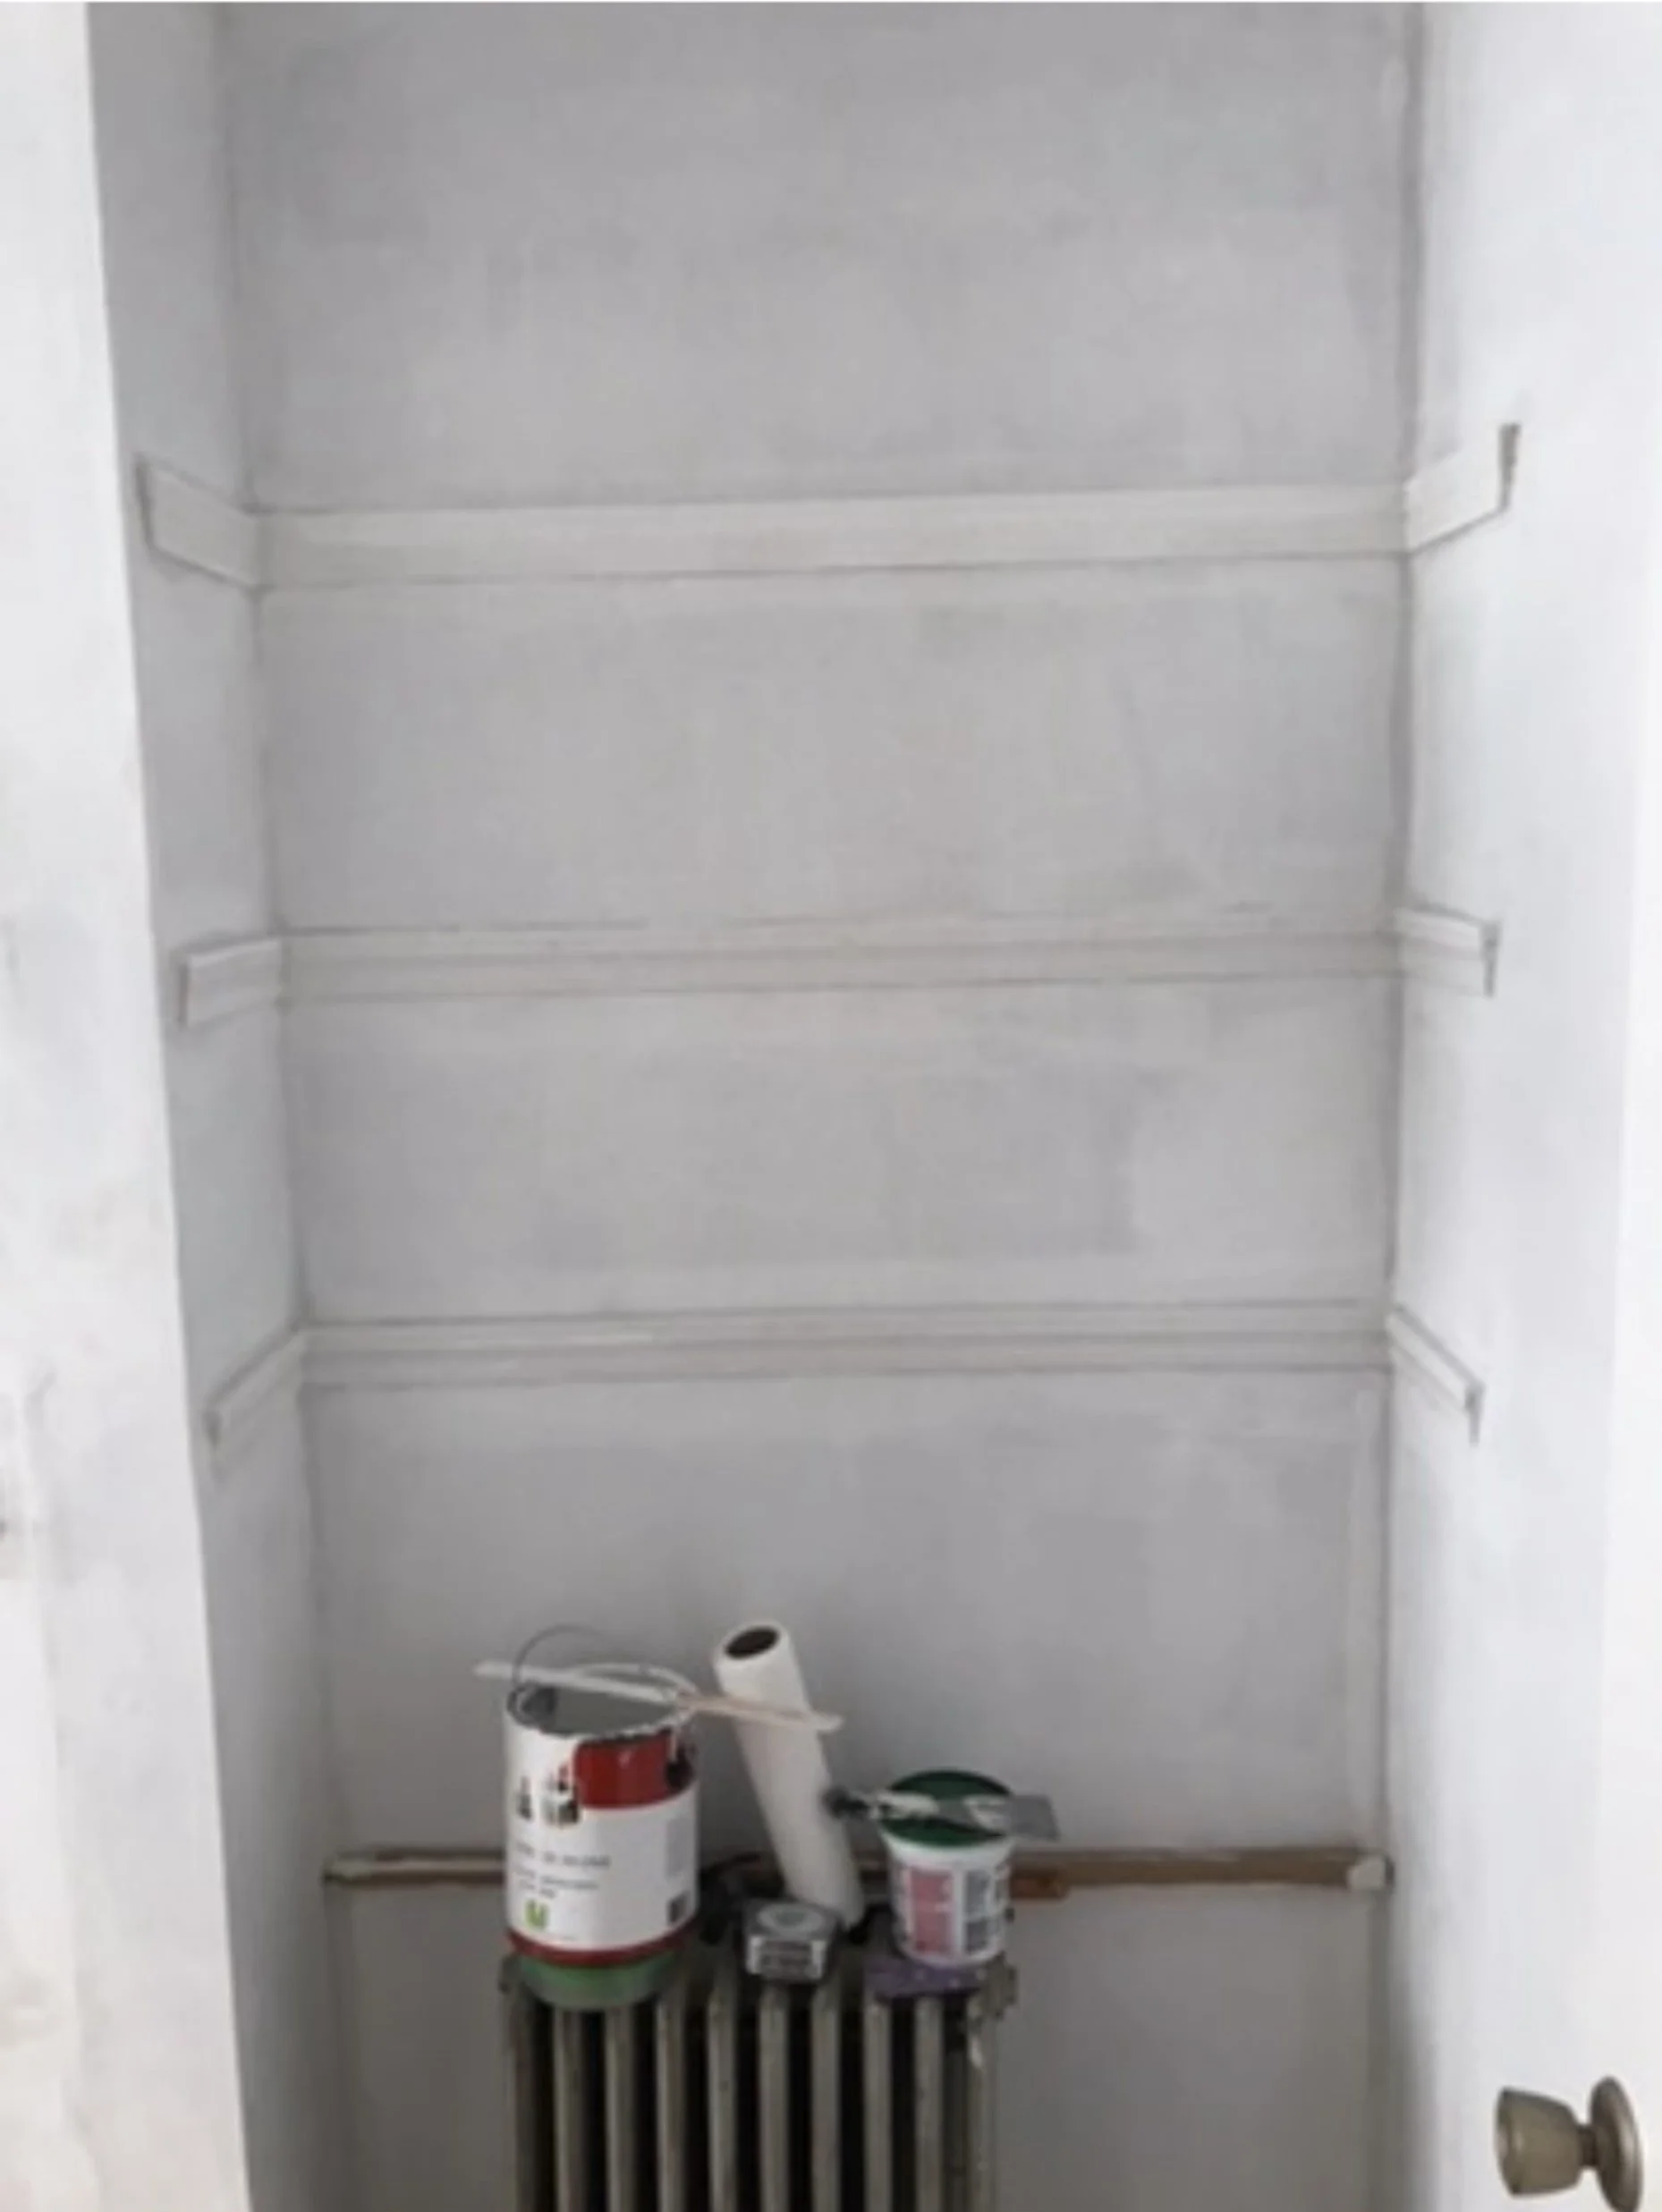
I simply repeated the existing installation, adding another trim bracket at an equal interval higher up.
Then I beefed up the front edges with a piece of thick trim board I found in my garage. I cut it into three equal pieces to give the shelves a more substantial look.

It was simple, free, and made a surprisingly big difference.
Tip 7: Go Bigger with Storage in a Small Bathroom
While I was finishing the shelves, I took a break and did what any reasonable person would do during a bathroom renovation.
I opened Marketplace to scope out a bathroom sink cabinet.
The very first cabinet I found looked perfect.
Dark wood. Simple lines. Modern. Unfussy.
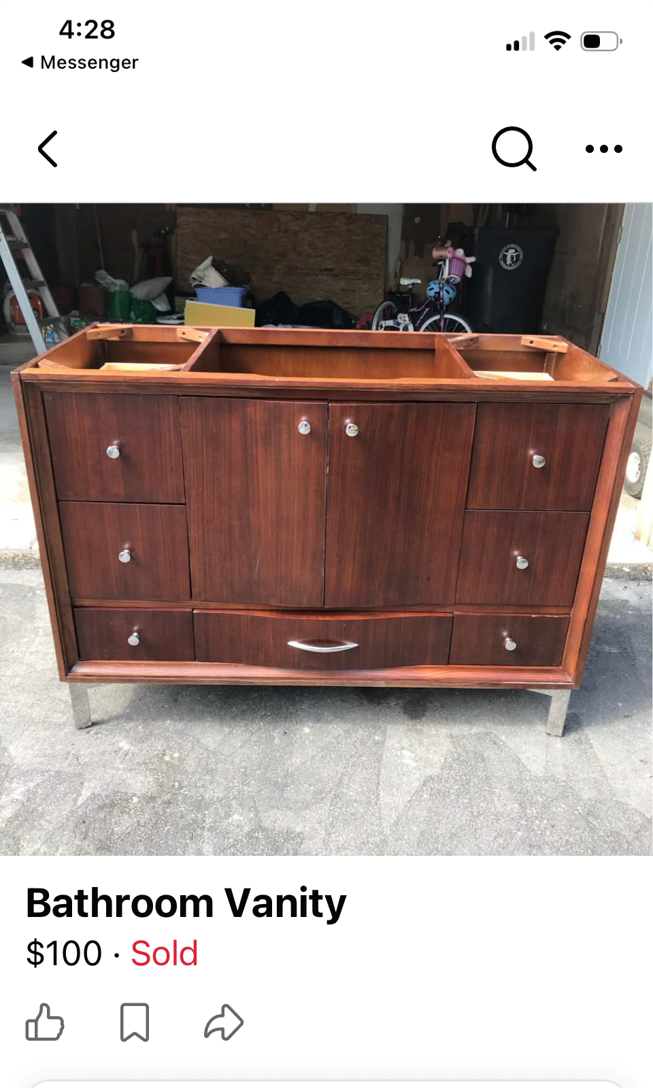
If I were a cabinet, this would be me.
And when I say serendipity is real, I mean it.
The seller had posted it less than two minutes before I took my break. He responded immediately, and I decided to pick it up right away.
He was only about 20 minutes from my house, so I ran like the wind to get it.
The vanity turned out to be exactly what I needed.
It had seven drawers and a large cabinet underneath the sink, giving me a ton of additional bathroom storage.
It was also taller than my old cabinet.
This was a very good thing because my old one was so short that I literally had to bend at the waist to wash my face and brush my teeth.
I was over that from the get-go.
There are two important lessons here, though.
First, measure everything.
I knew exactly how much floor space I had available, and this vanity maxed it out. In a small or narrow bathroom, every inch matters.
Measure before you buy so your great Marketplace score doesn't turn into a very expensive regret.
Second, ask how heavy the piece is.
I have a truck, so hauling it wasn't a problem. The seller was also kind enough to help me load it.
Getting it out of my truck and into the house by myself?
That was another story.
I managed it, but not without a few bruises and a couple of scratches on the cabinet.
Apparently, seven drawers come with a side order of heavy.
Tip 8: Repeat Your Metals and Add One Contrast
The metal finish on my new vanity was chrome.
Normally, I probably wouldn’t have chosen such a shiny, mirrored finish, but I loved the detail on this piece.
So, I decided to lean into it.
I chose a Moen waterfall faucet and matching shower fixtures with a similar chrome finish. I also liked their slightly square shape, which echoed the square legs on the vanity.
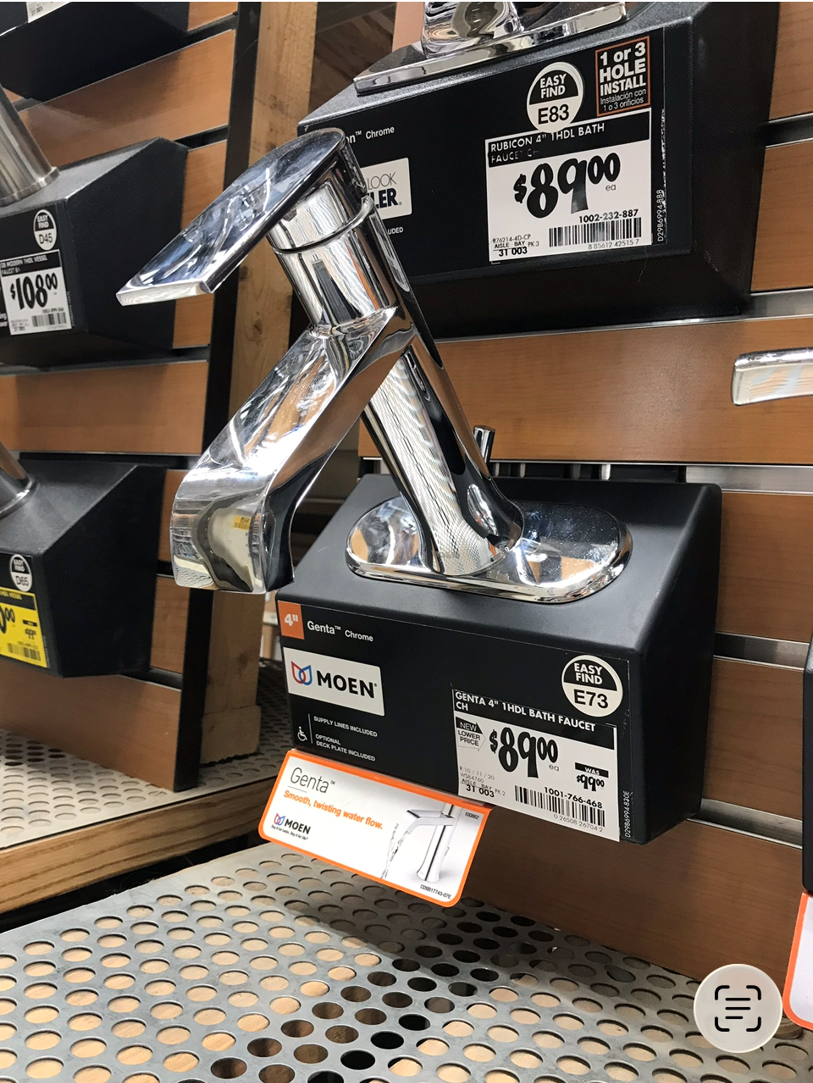
Home Depot
That made choosing the rest of the metal accents much easier.
But I didn’t want the entire bathroom to become a chrome showroom.
So, I added black accents for contrast: the shower curtain rod, trash can, and a few décor pieces.
The combination of chrome and black helped ground the room.
The result feels modern without feeling cold, which was exactly what I wanted.
Tip 9: Find Storage in Unlikely Places
The area around the radiator was another awkward spot.
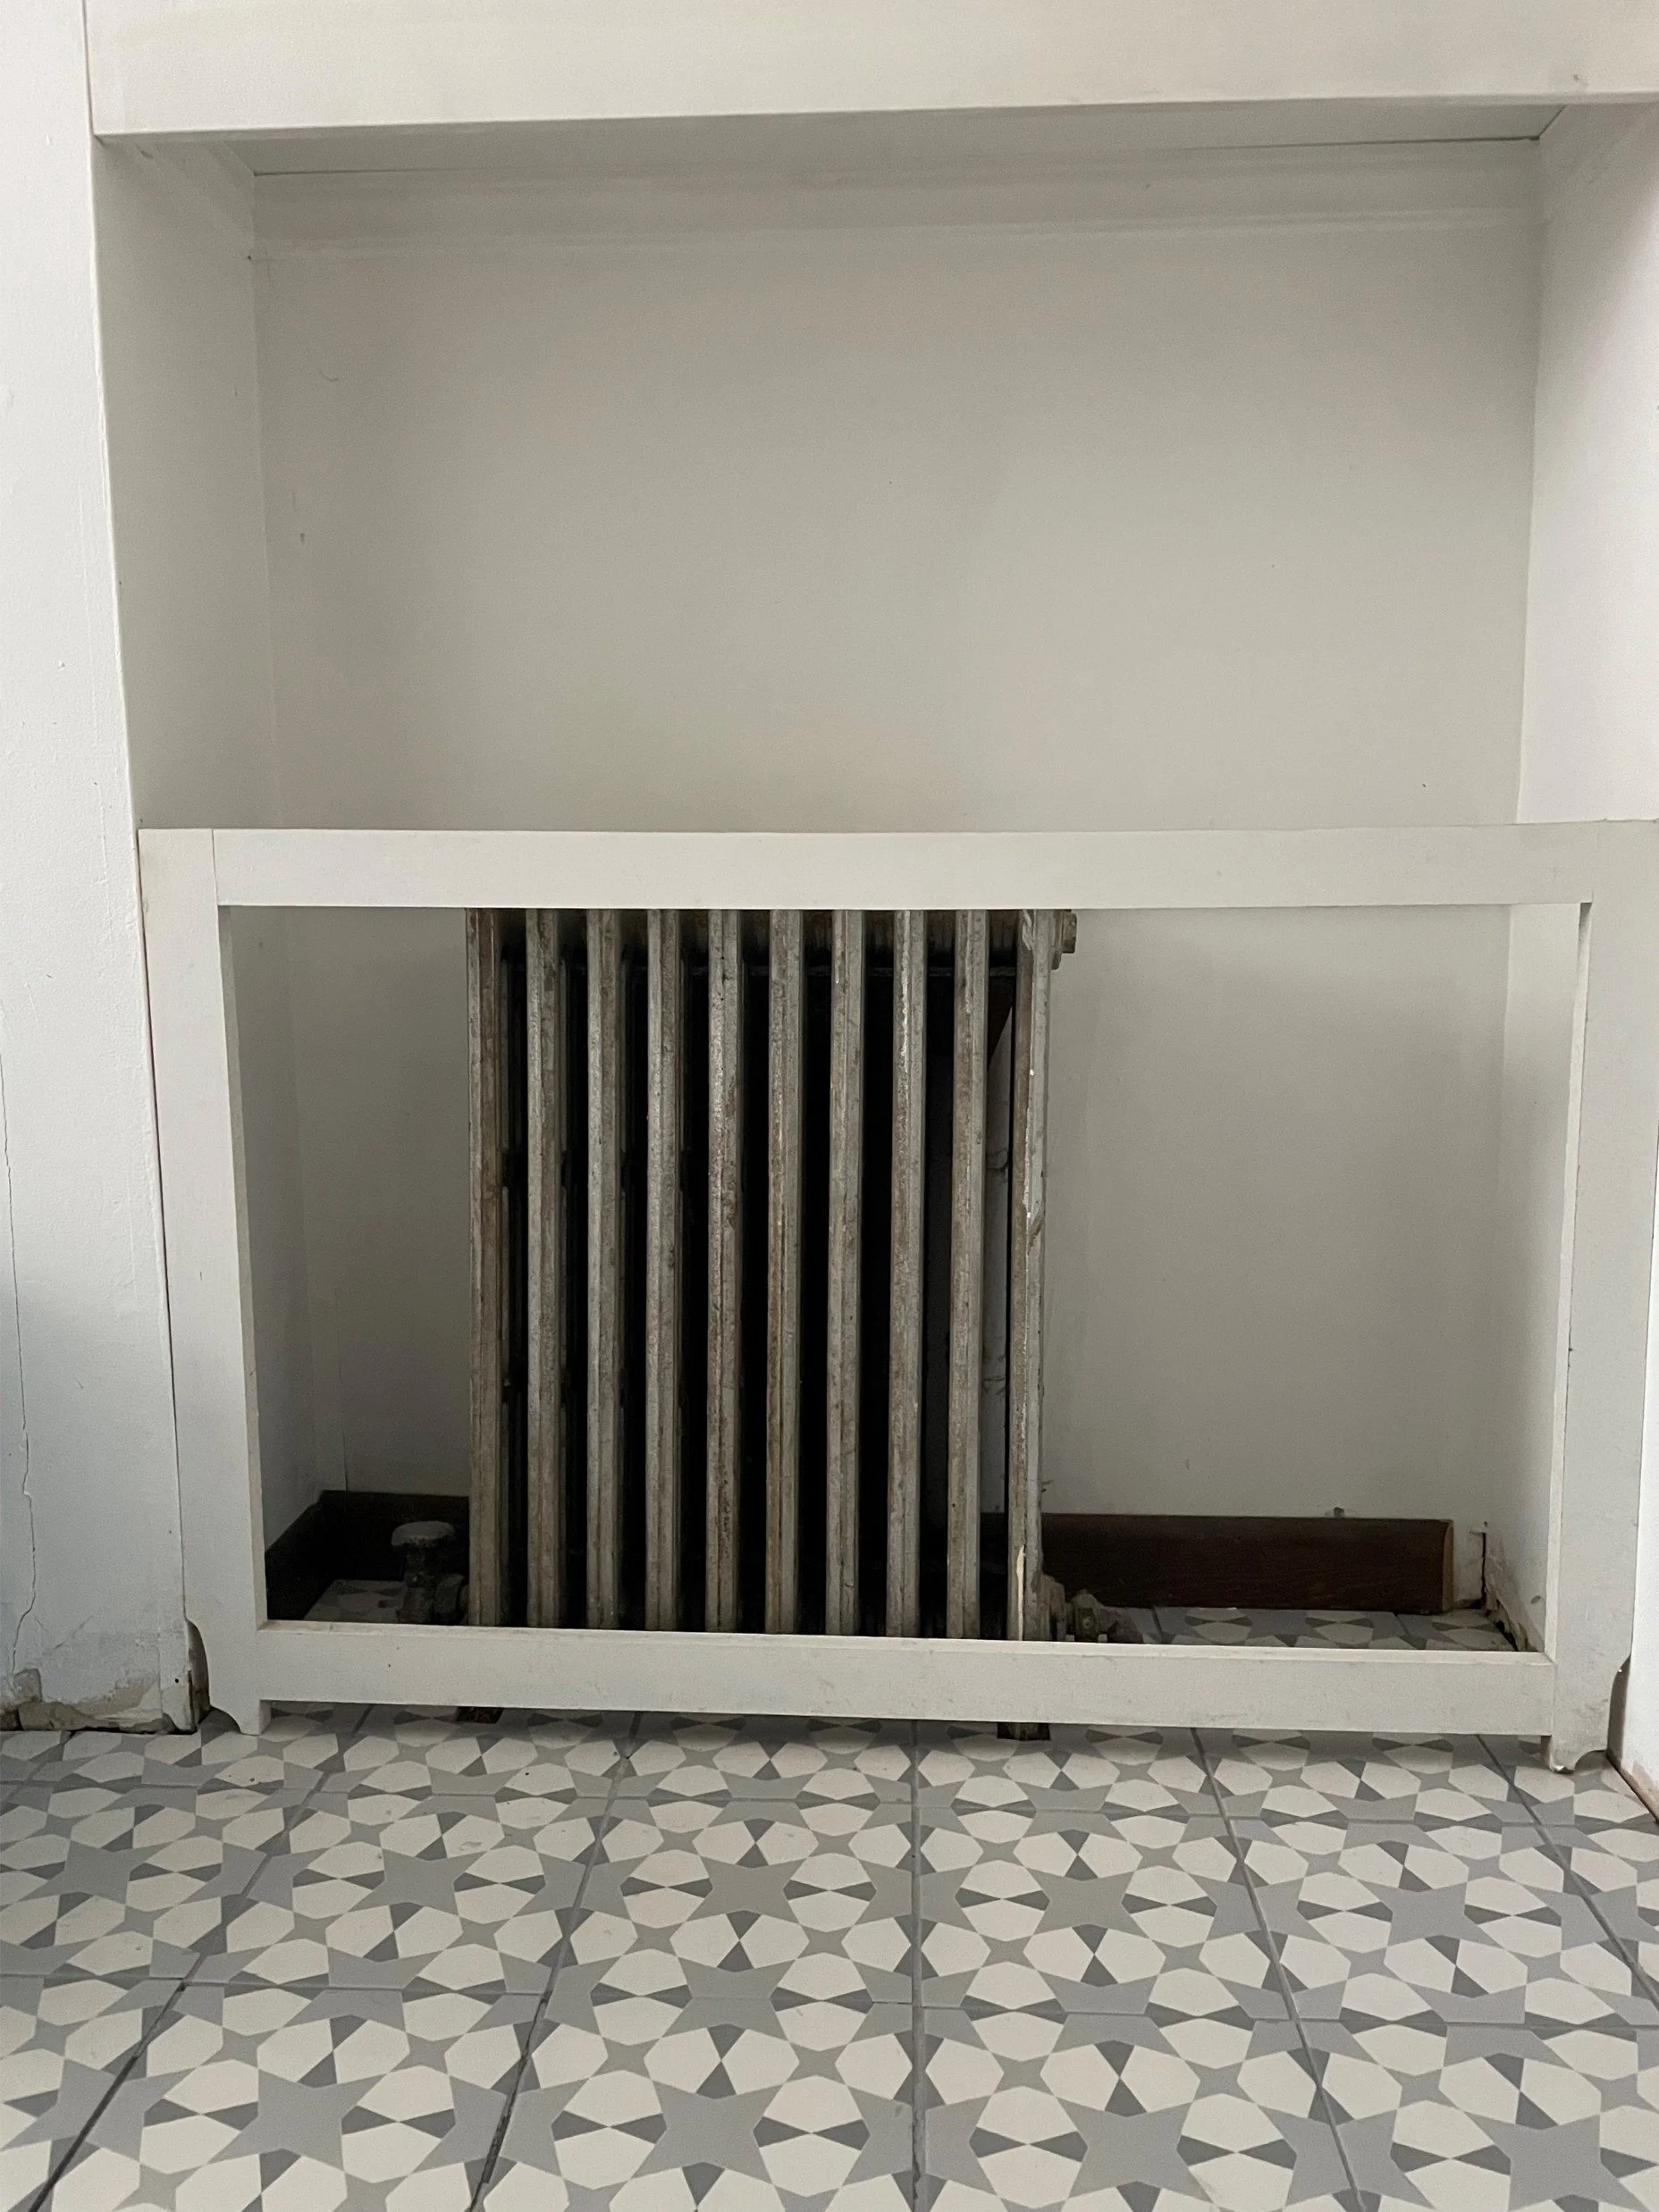
There was a little room on the left and quite a bit more on the right.
If you know anything about me, you know I have a serious issue with underused space.
My house is small. This bathroom is long and narrow. So having this weird little area that just sat there doing absolutely nothing had bothered me since I moved in.
I knew I wanted storage, but I also knew I couldn't block the radiator and interfere with the heat coming into the room.
So, I started looking for ideas.
A little Google image search led me to a combination radiator cover with built-in shelves and a console top.
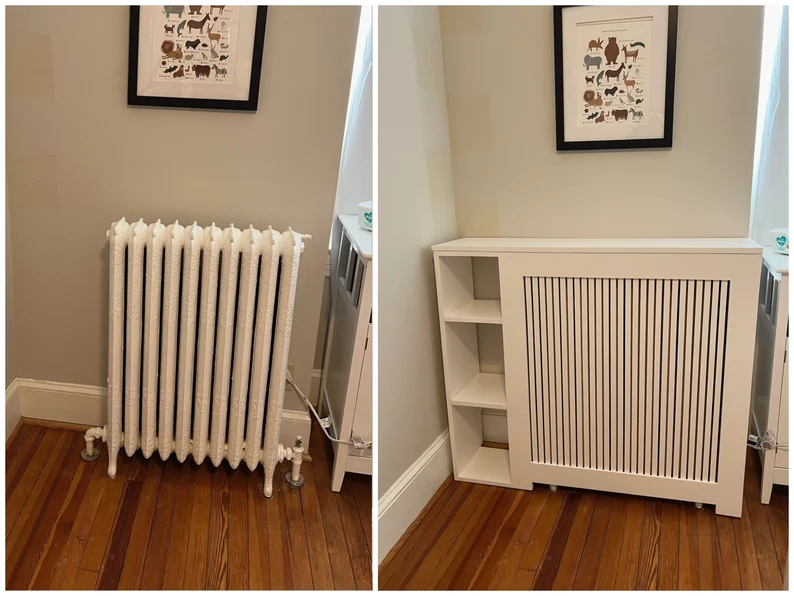
ArtMillworkDesign - STELLA Modern Heat Cover Cabinet
I loved it.
Naturally, I decided to try to make one myself.
Because that's how this whole thing started in the first place.
I knew I'd found the right design because, if I completely screwed it up, I could always buy the original.
Here’s the maker's Etsy shop for anyone who wants the done-for-you version.
I remembered that I had a pair of old pressboard shelves sitting in my attic gathering dust, so I dragged one down and did some strategic cutting.
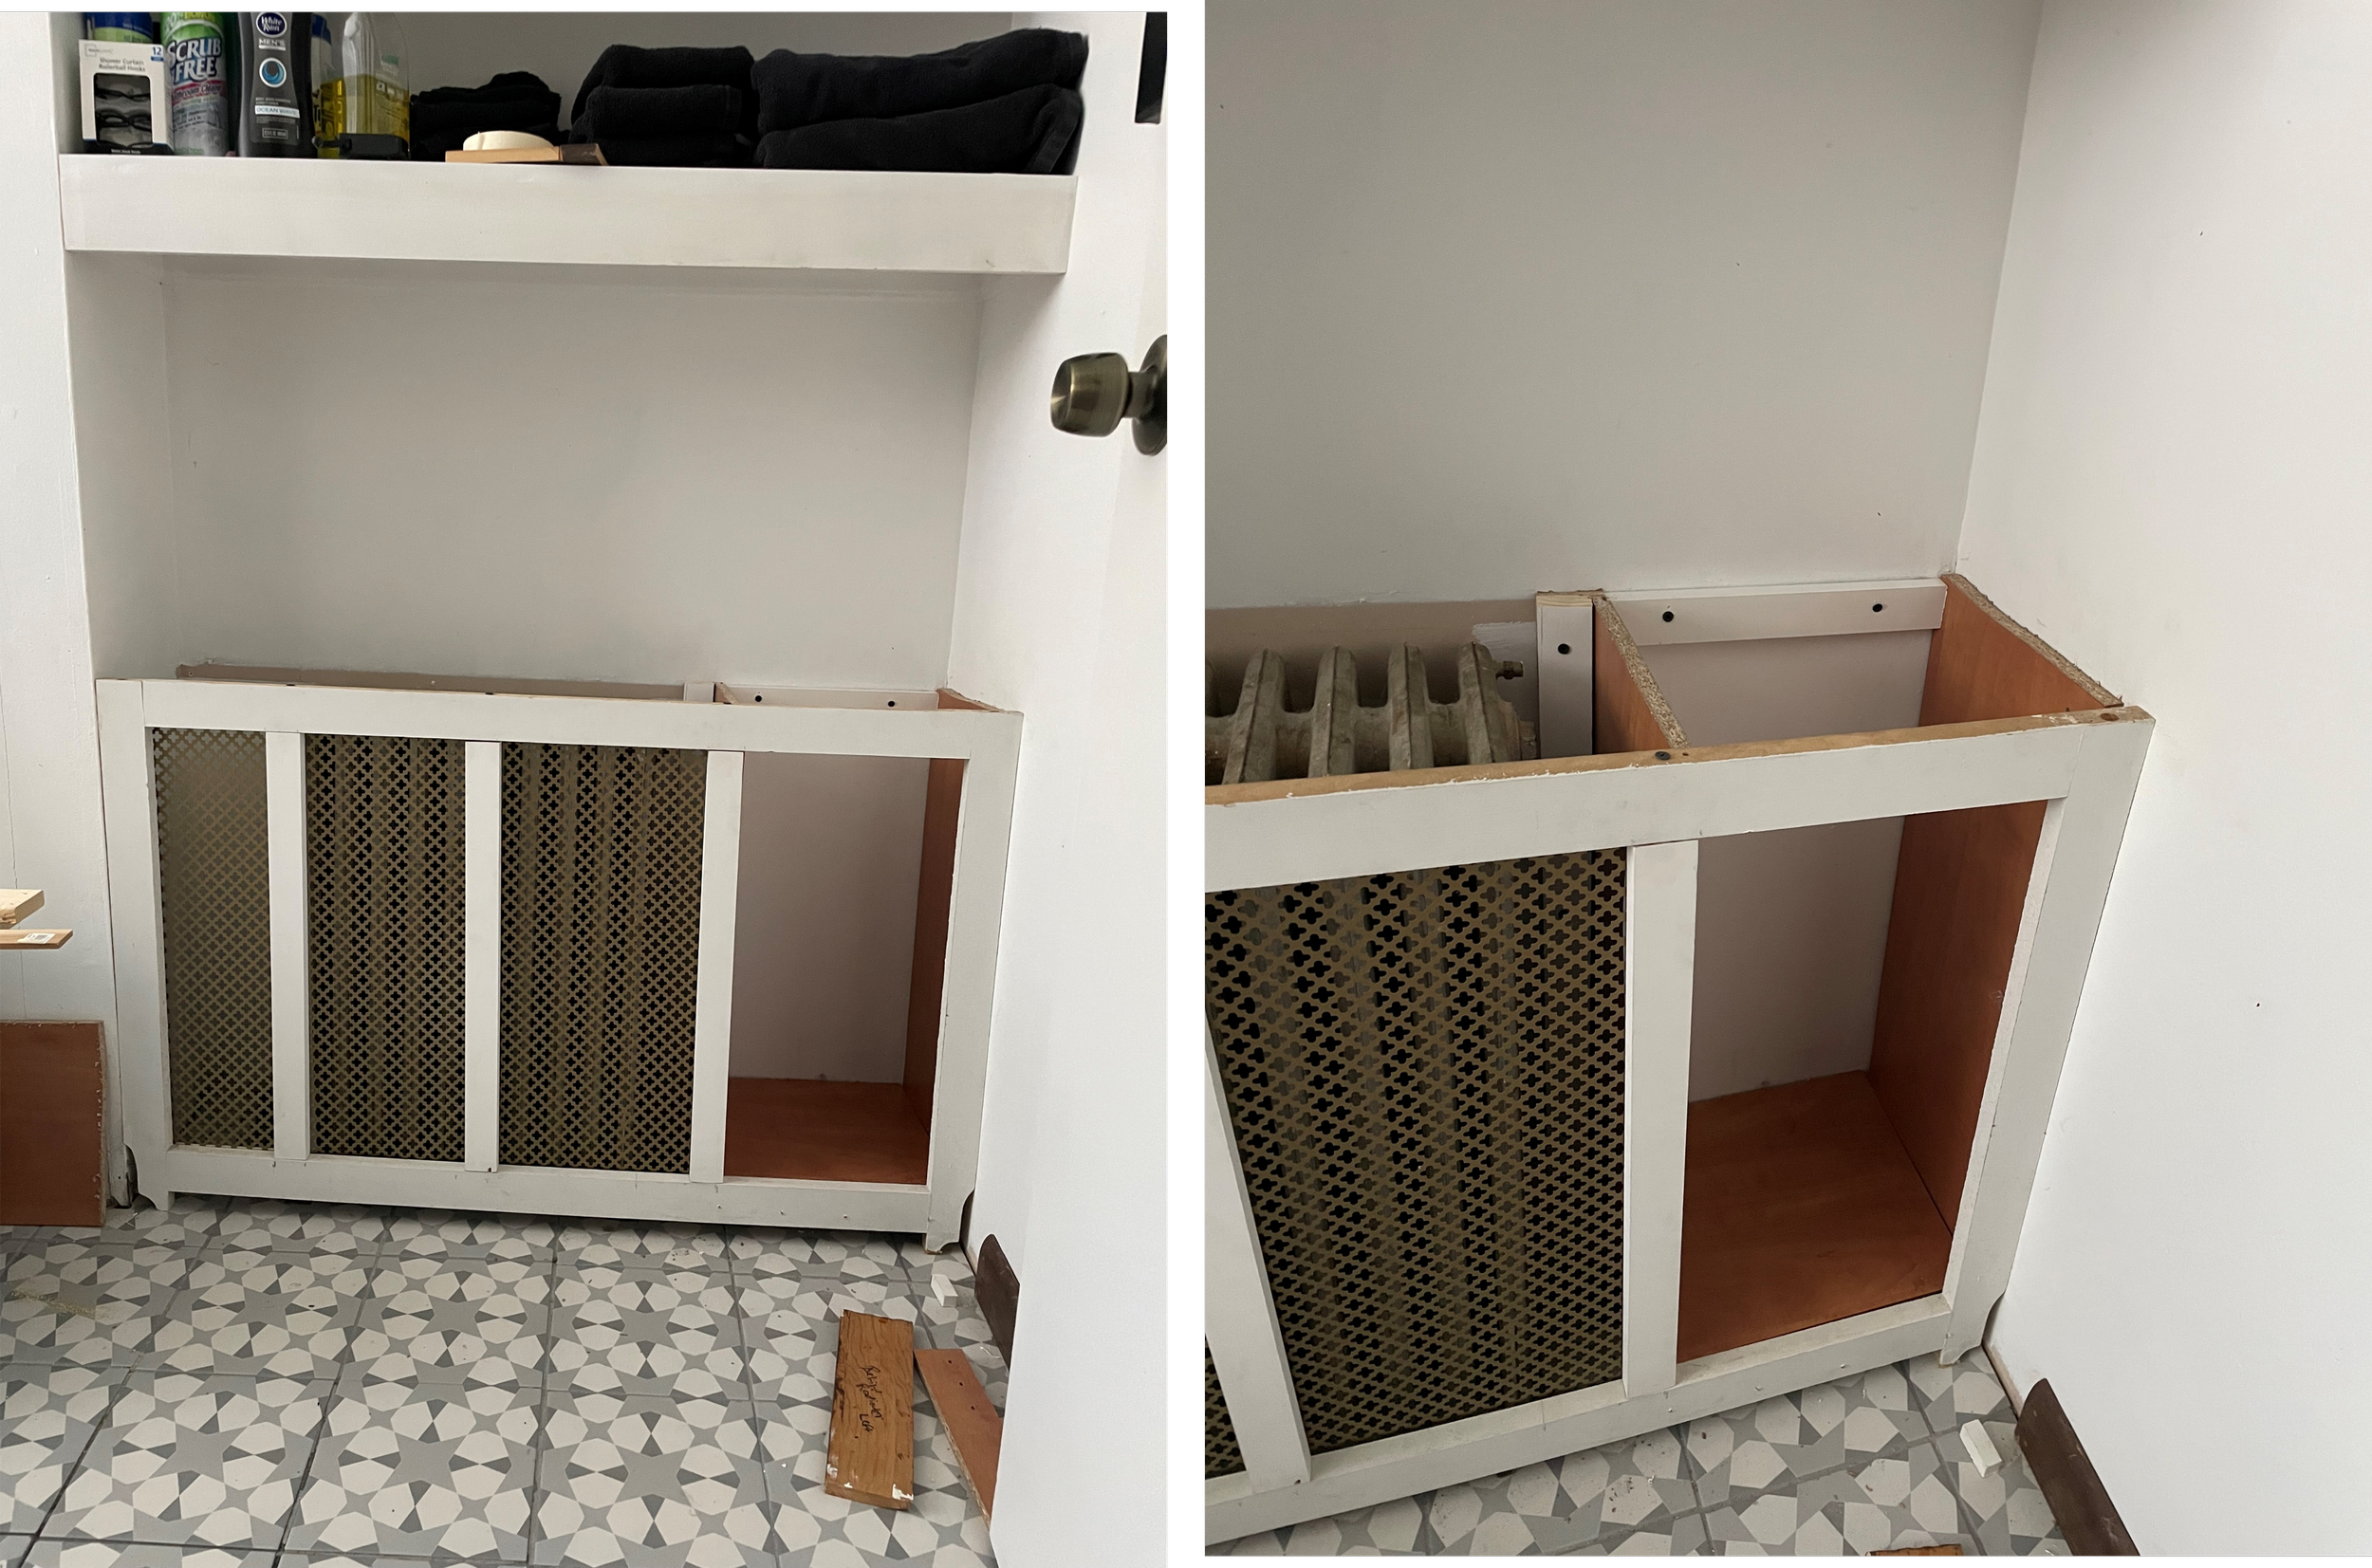
That became the body of my new shelf cabinet.
Then I used leftover radiator screen from a kitchen radiator project I had done several years ago for the front of the cover.
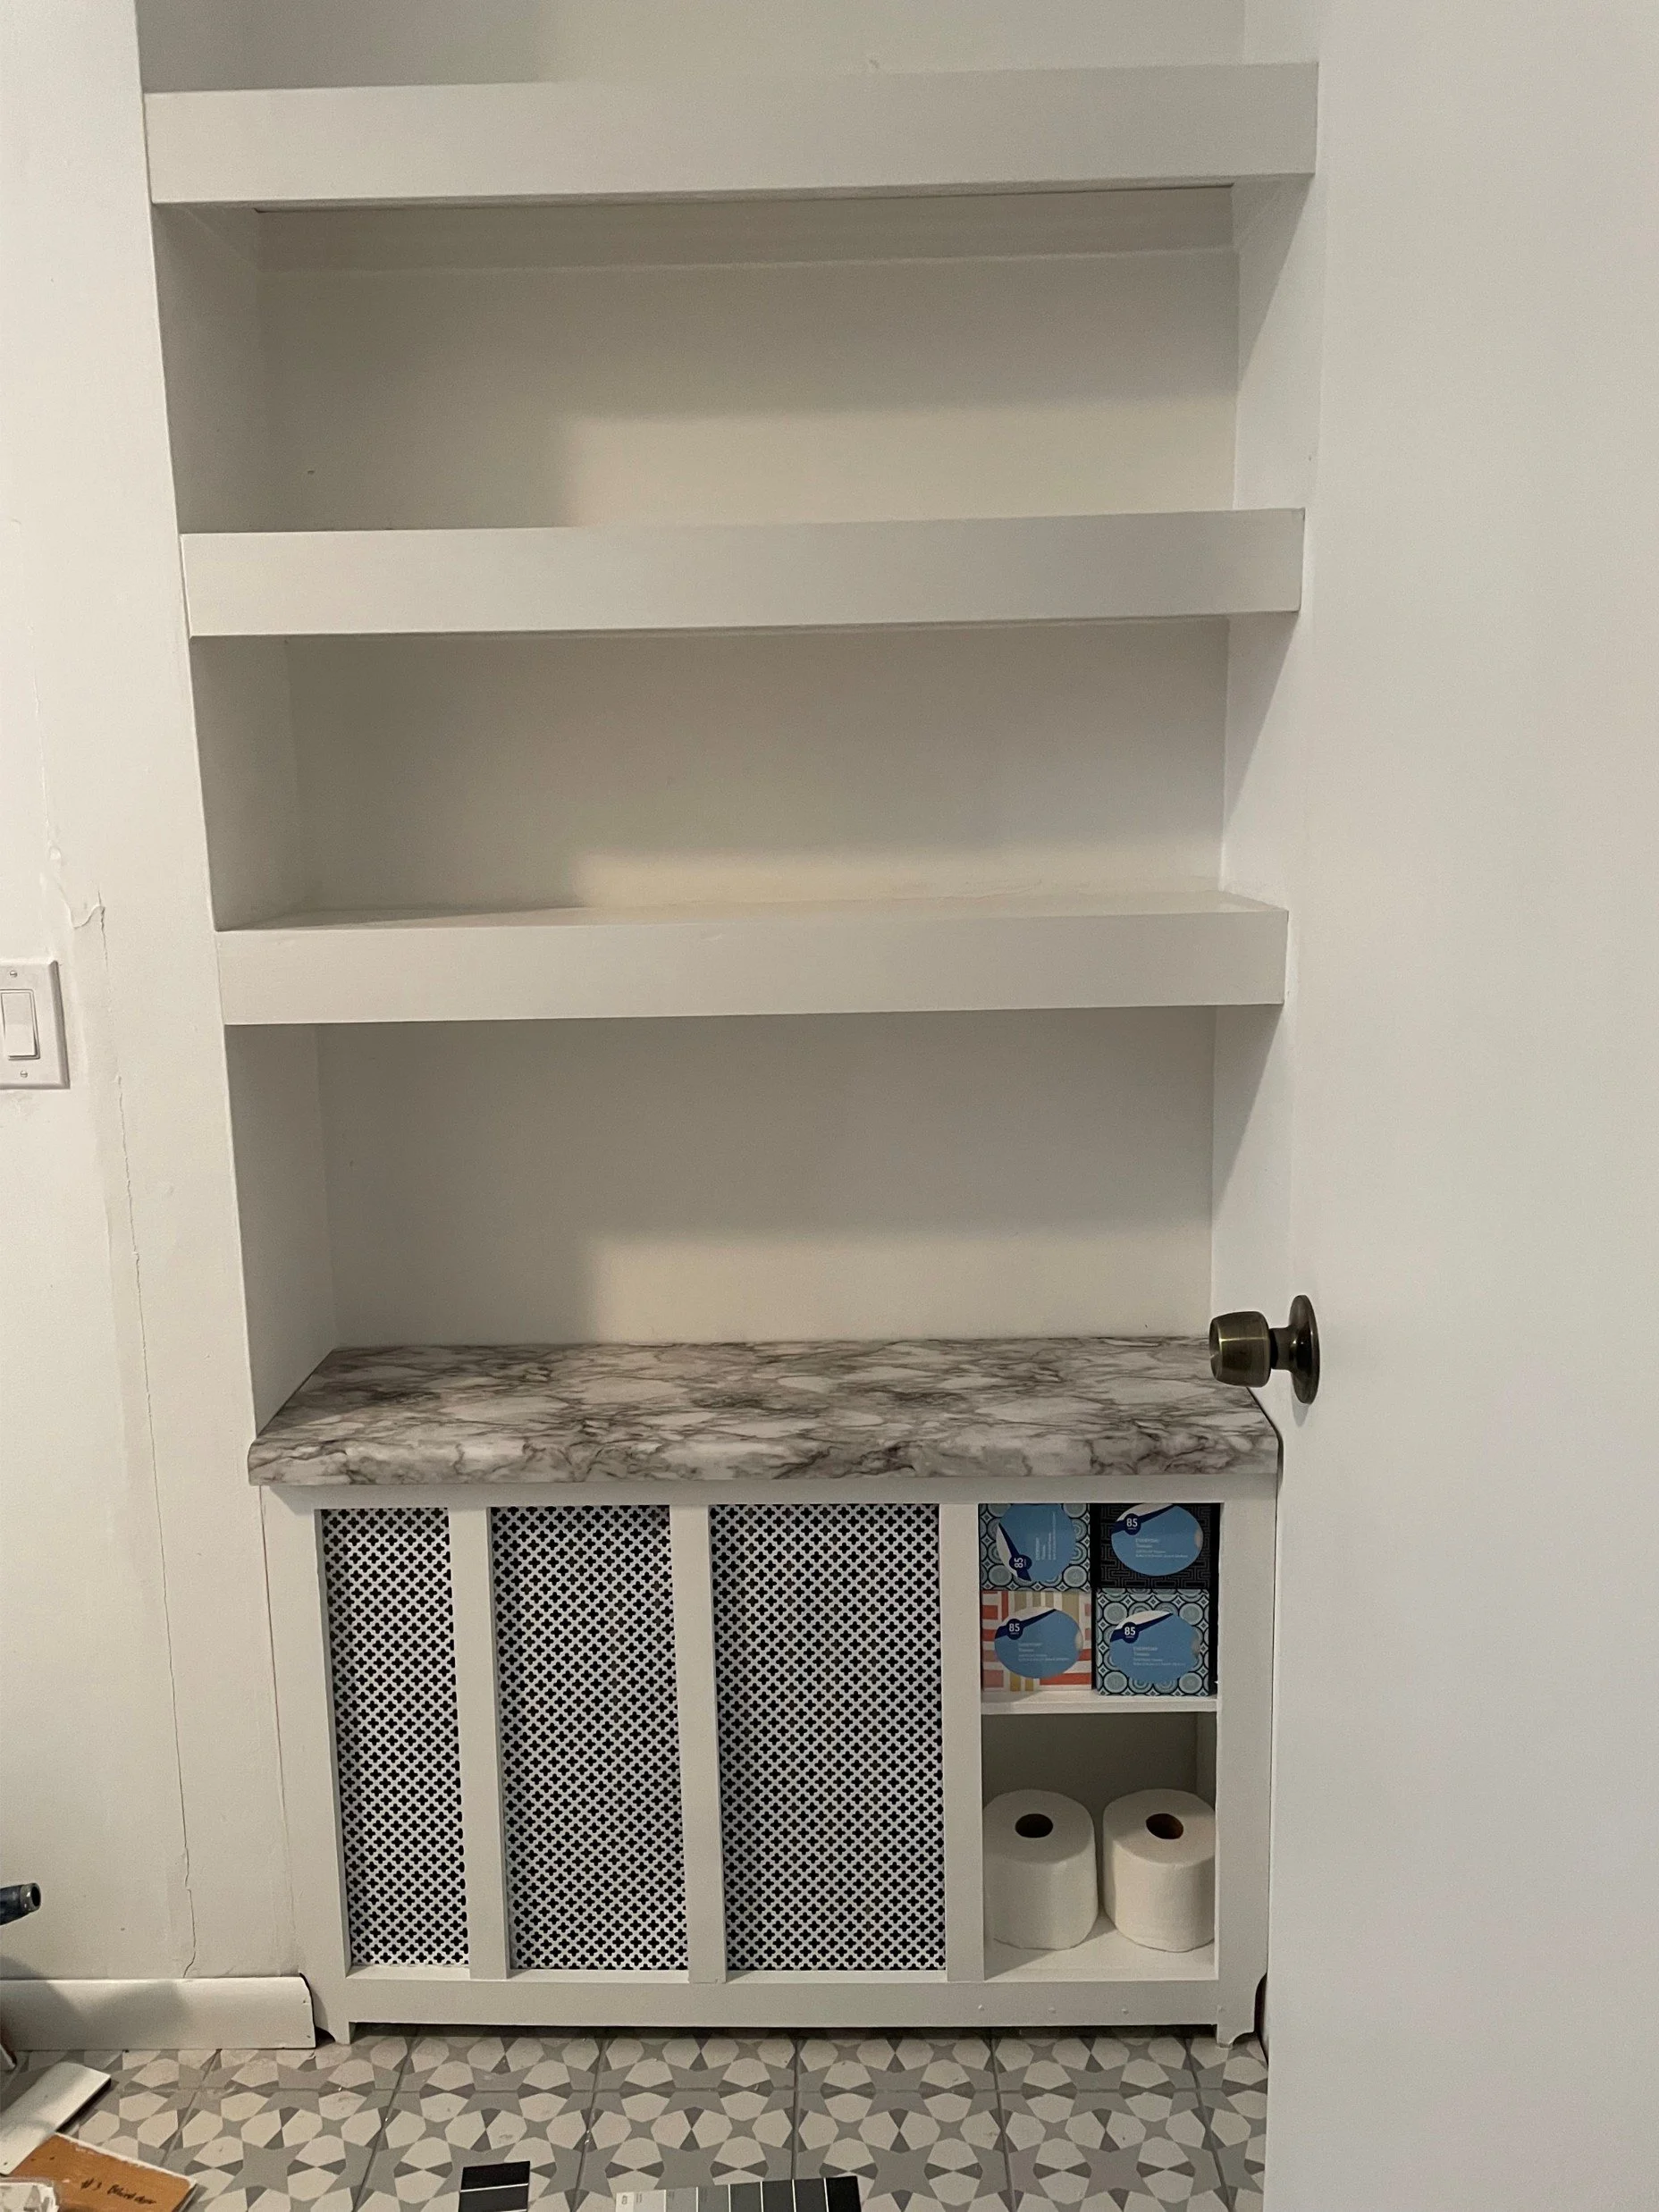
I added one of the removable shelves from the old pressboard unit, gave everything several coats of white paint, and suddenly I had the perfect place to store extra tissues and toilet paper.
And the top?
That was another serendipitous find.
Last winter, I was out walking when I spotted a huge section of laminate countertop sitting in a neighborhood snowbank.
Someone nearby was remodeling their kitchen and had carefully removed the old countertops and left them at the curb.
Obviously, I rescued one.
My original plan was to use it as a work surface in my very janky garage.
Instead, I cut it to fit the radiator cabinet and covered it with a new piece of laminate I found on discount at a home store.
Total cost?
Four dollars.
I'll take it.
Tip 10: Bathrooms Need More Light
Men and women both have grooming needs.
Makeup. Shaving. Hair stuff.
Says the bald guy, right?
Bathrooms—regardless of their size—need good lighting for all of those things.
So, I purchased a lighted vanity mirror to hang above the new sink cabinet.
There was one small problem.
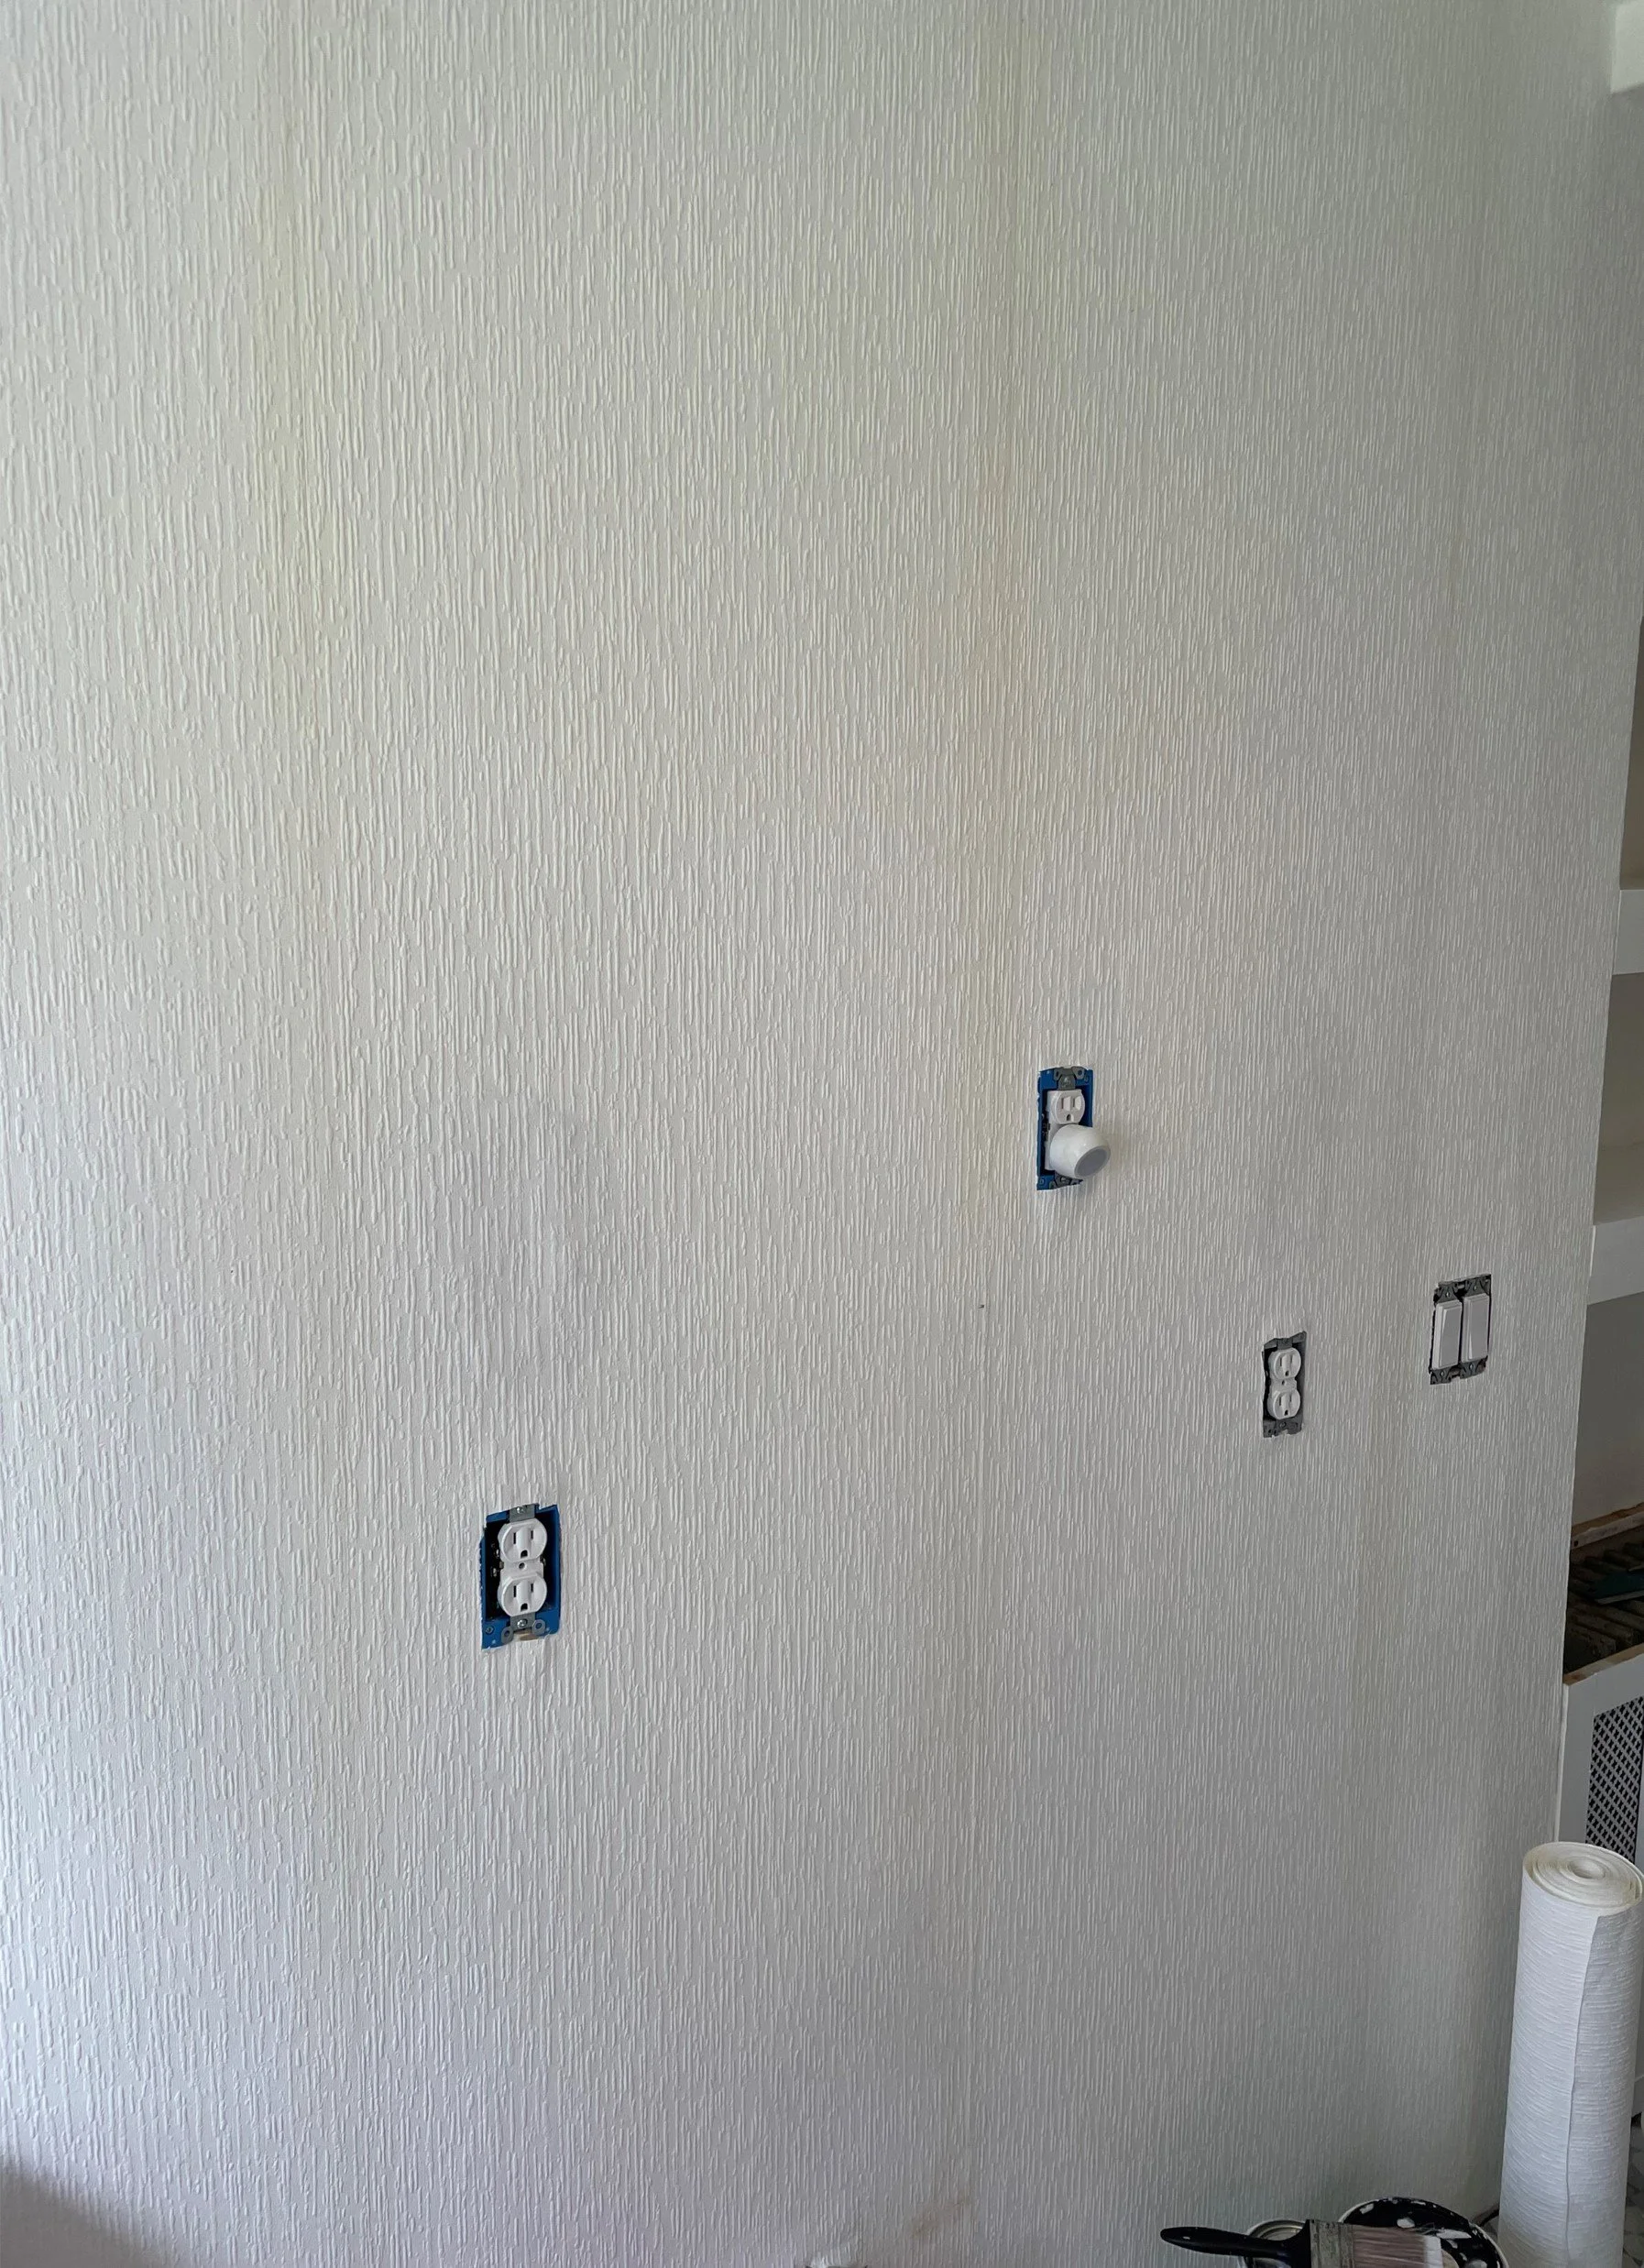
The mirror was large and horizontally oriented, which meant my existing electrical outlets were in exactly the wrong place.
Luckily, I had planned for this.
I moved the existing outlets lower on the wall, so they lined up with the light and fan switches. I also added an additional outlet in the center, which would be hidden behind the new mirror.
A word of caution here: I am not an electrician.
I learned how to install electrical outlets from a licensed electrician, but if you don't know how to do electrical work safely, hire a professional.
There is no DIY trophy for getting electrocuted.
With the electrical work finished, I was finally in the home stretch.
How to Disguise Uneven Walls in an Older Home
The last major jobs were wallpapering the walls, adding the base trim, and applying the final coats of paint.
As I mentioned earlier, my house is about 70 years old.
It's had plenty of style iterations over the decades, and I'm sure more than a few layers of paint and wallpaper.
So, when I say the walls are uneven, I mean uneven.
My bathroom is also an addition on the back of the house, which means you can actually see the transition between the original house and the addition.
And that had always bothered me.
I tried disguising it with paint.
It didn't work.
Then I found some paintable wallpaper on Marketplace.
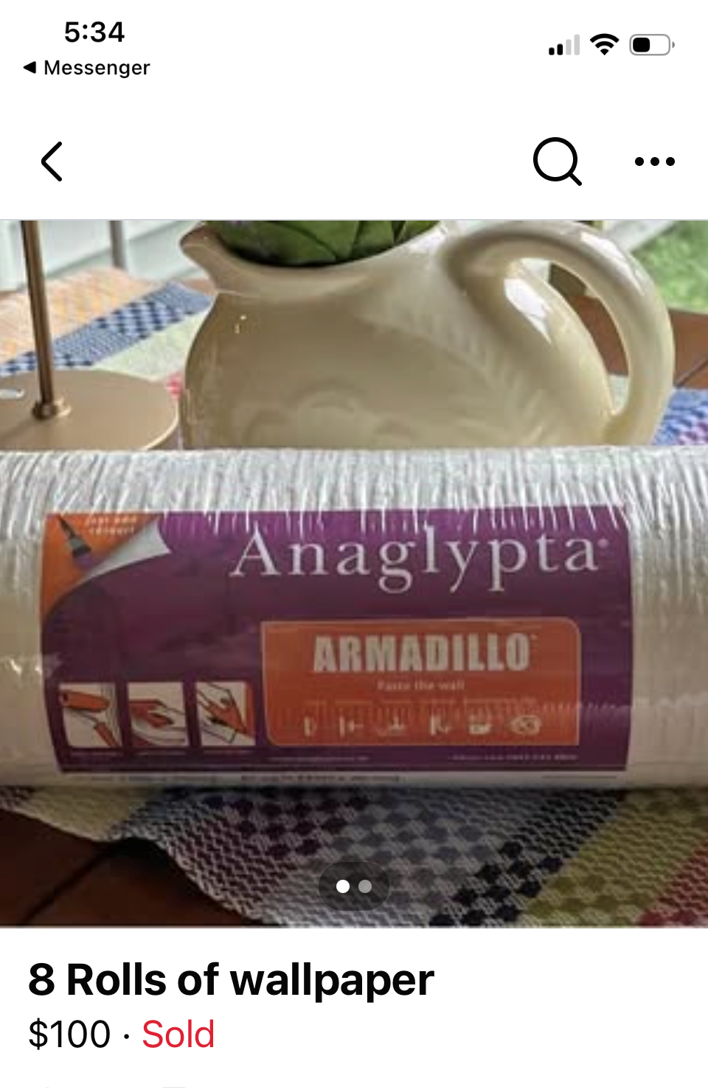
I only needed about four rolls, but someone was selling eight rolls for $100.
If you've purchased wallpaper lately, you know that's a steal.
The wallpaper was also unmatched, meaning I didn't have to worry about lining up a repeating pattern.
All I had to do was butt the seams together and make sure the texture was running in the same direction.
Easy.
More importantly, the heavy wallpaper helped disguise all those uneven spots on the walls, especially that dreaded transition between the old house and the addition.
Sometimes the easiest way to fix an old-house problem is to stop fighting it and find something that hides it beautifully.
Tip 11: Unify Different Pieces with Paint
The vanity was installed.
The lighted mirror was hung and plugged in.
The wallpaper was finished.
Now I just needed the countertop.
I found a solid-surface 48-inch vanity top at Lowe's for $198, regularly around $300, so I grabbed it and installed it that day.
Then I remembered one more thing.
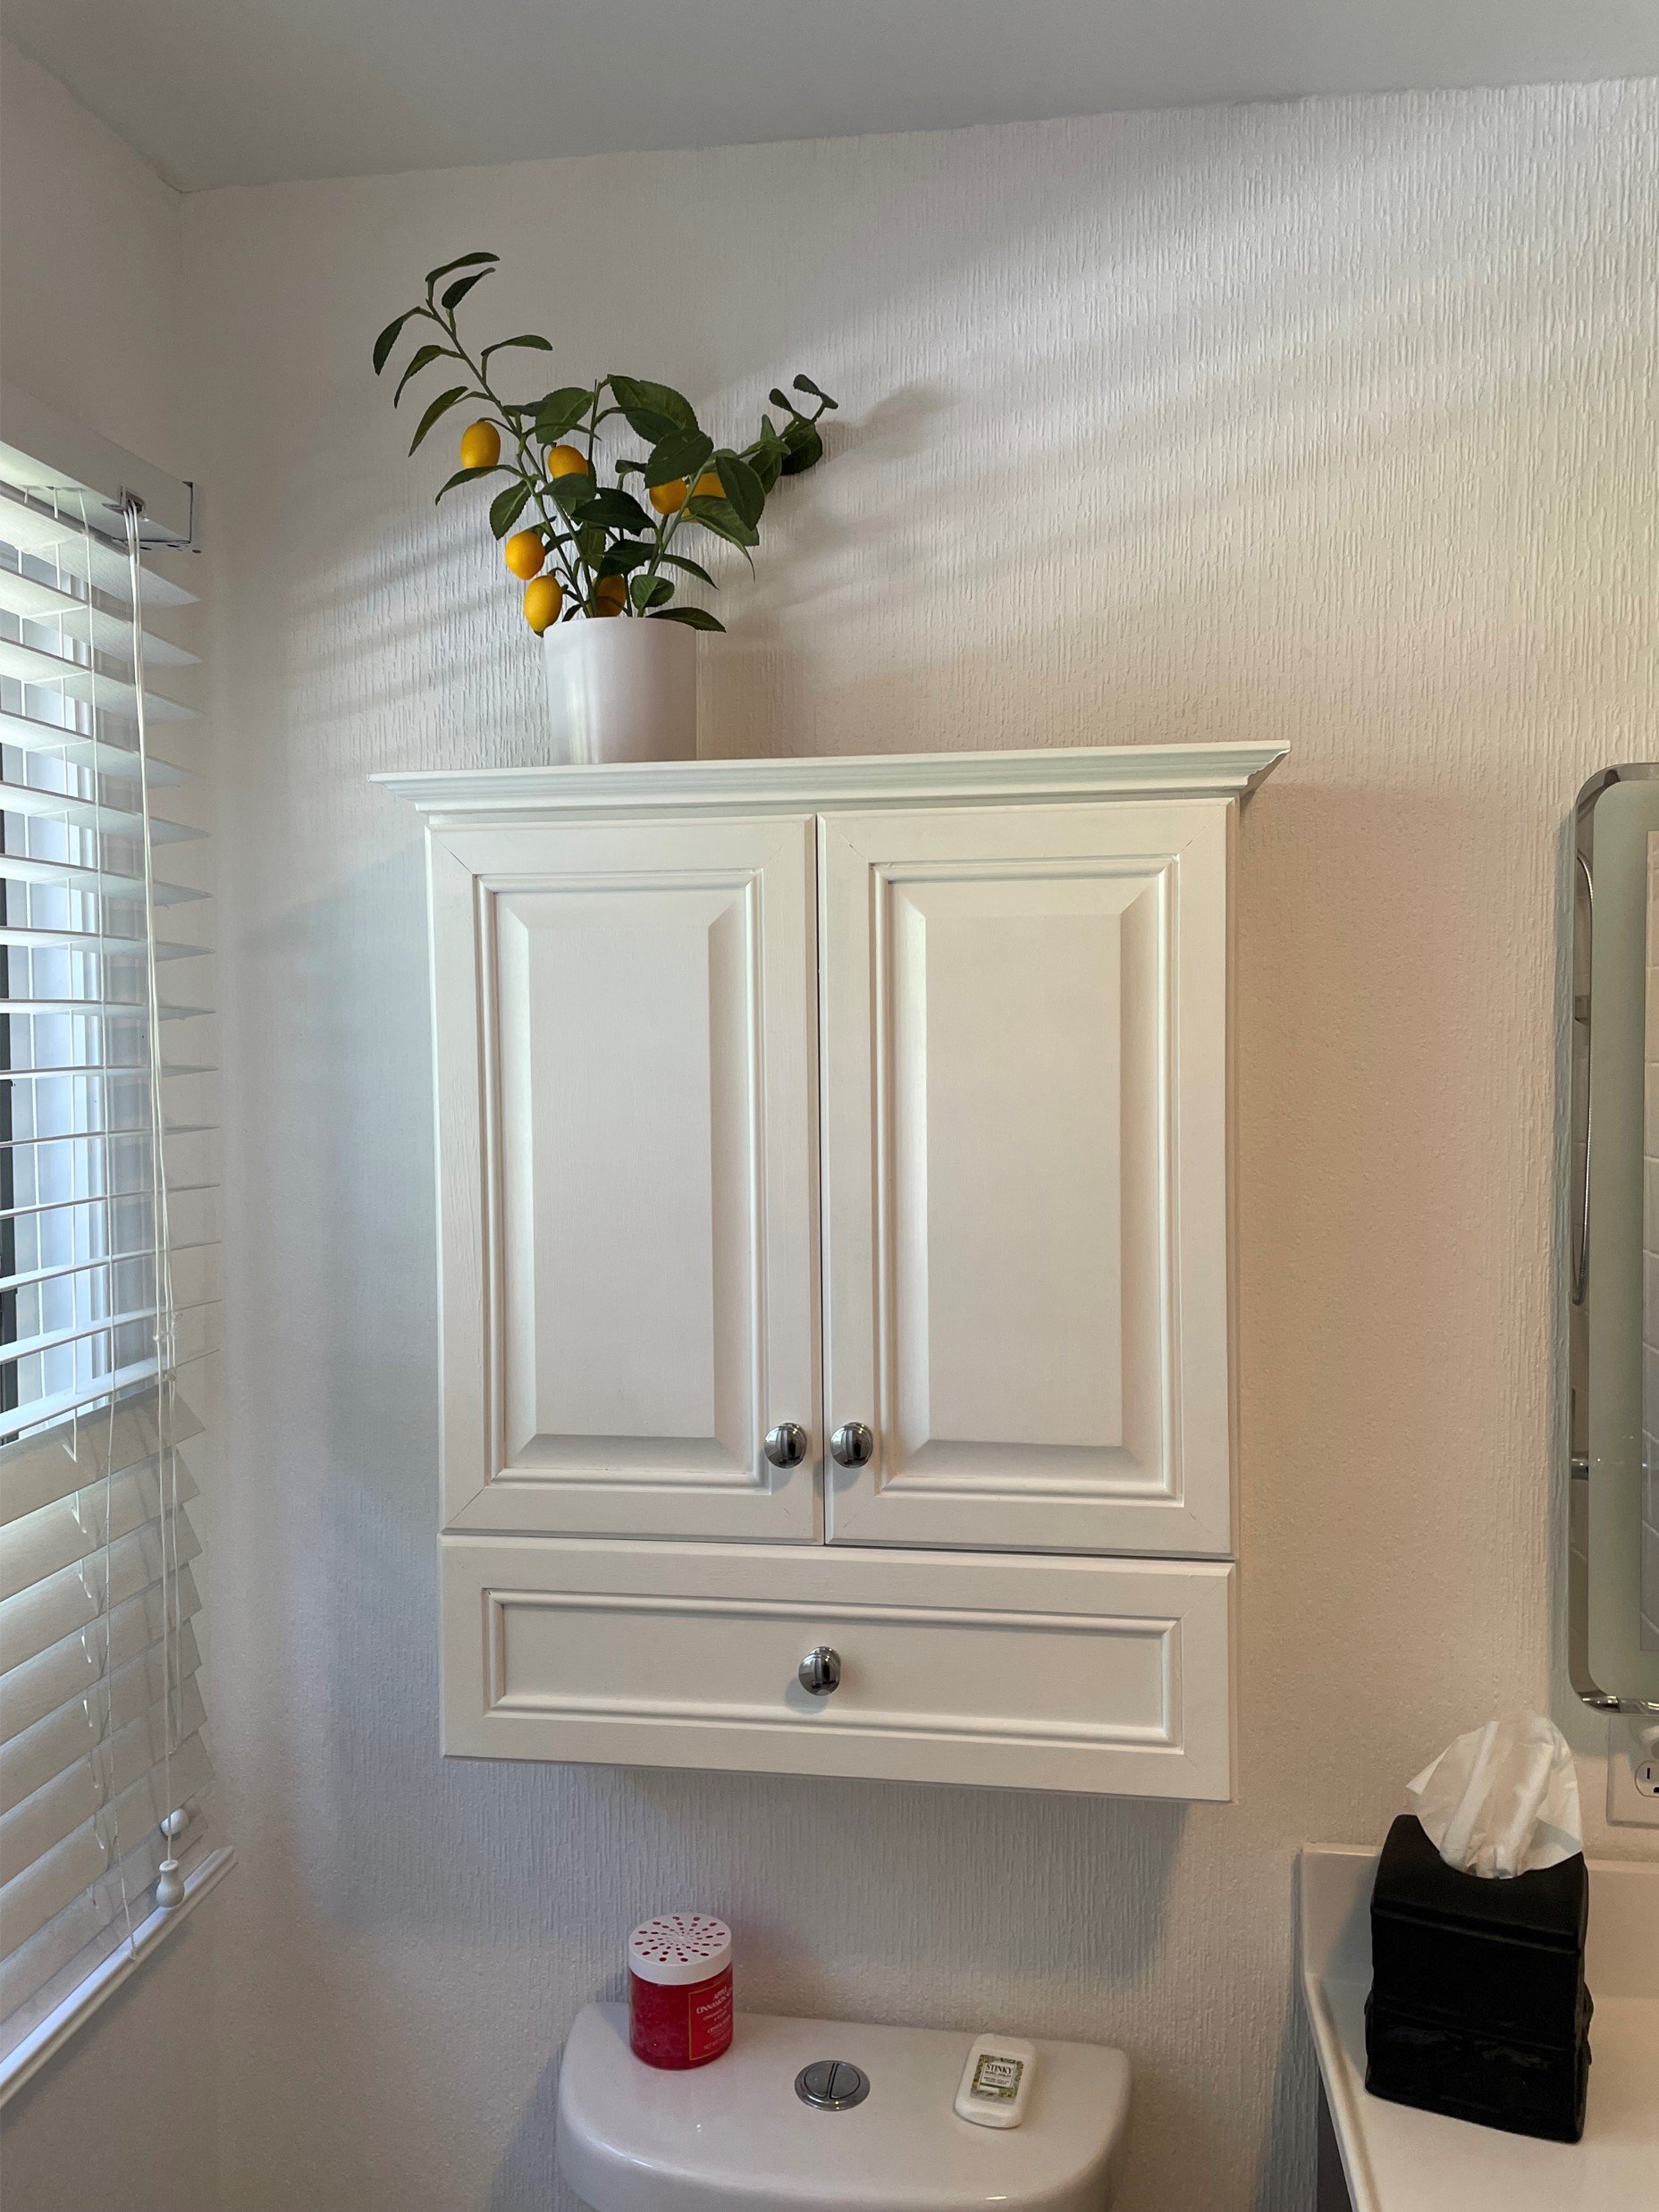
I had an old, beat-up narrow wall cabinet sitting in the attic.
So, naturally, down it came.
I cleaned it up, gave it several coats of white paint, and added new chrome knobs to coordinate with the vanity hardware.
It became the perfect medicine cabinet for above the toilet.
I knew the wall cabinet was more transitional in style while the vanity was definitely more modern. But by painting the wall cabinet the same color as the wall, I was able to make it blend in rather than compete with the vanity.
The original honey-oak finish would have clashed terribly with the dark wood of the sink cabinet.
Now, the dark vanity remains the star of the show. It also ties in beautifully with the dark wood floors throughout the rest of my house.
The little wall cabinet simply became useful storage without being visually distracting.
And that was exactly the point.
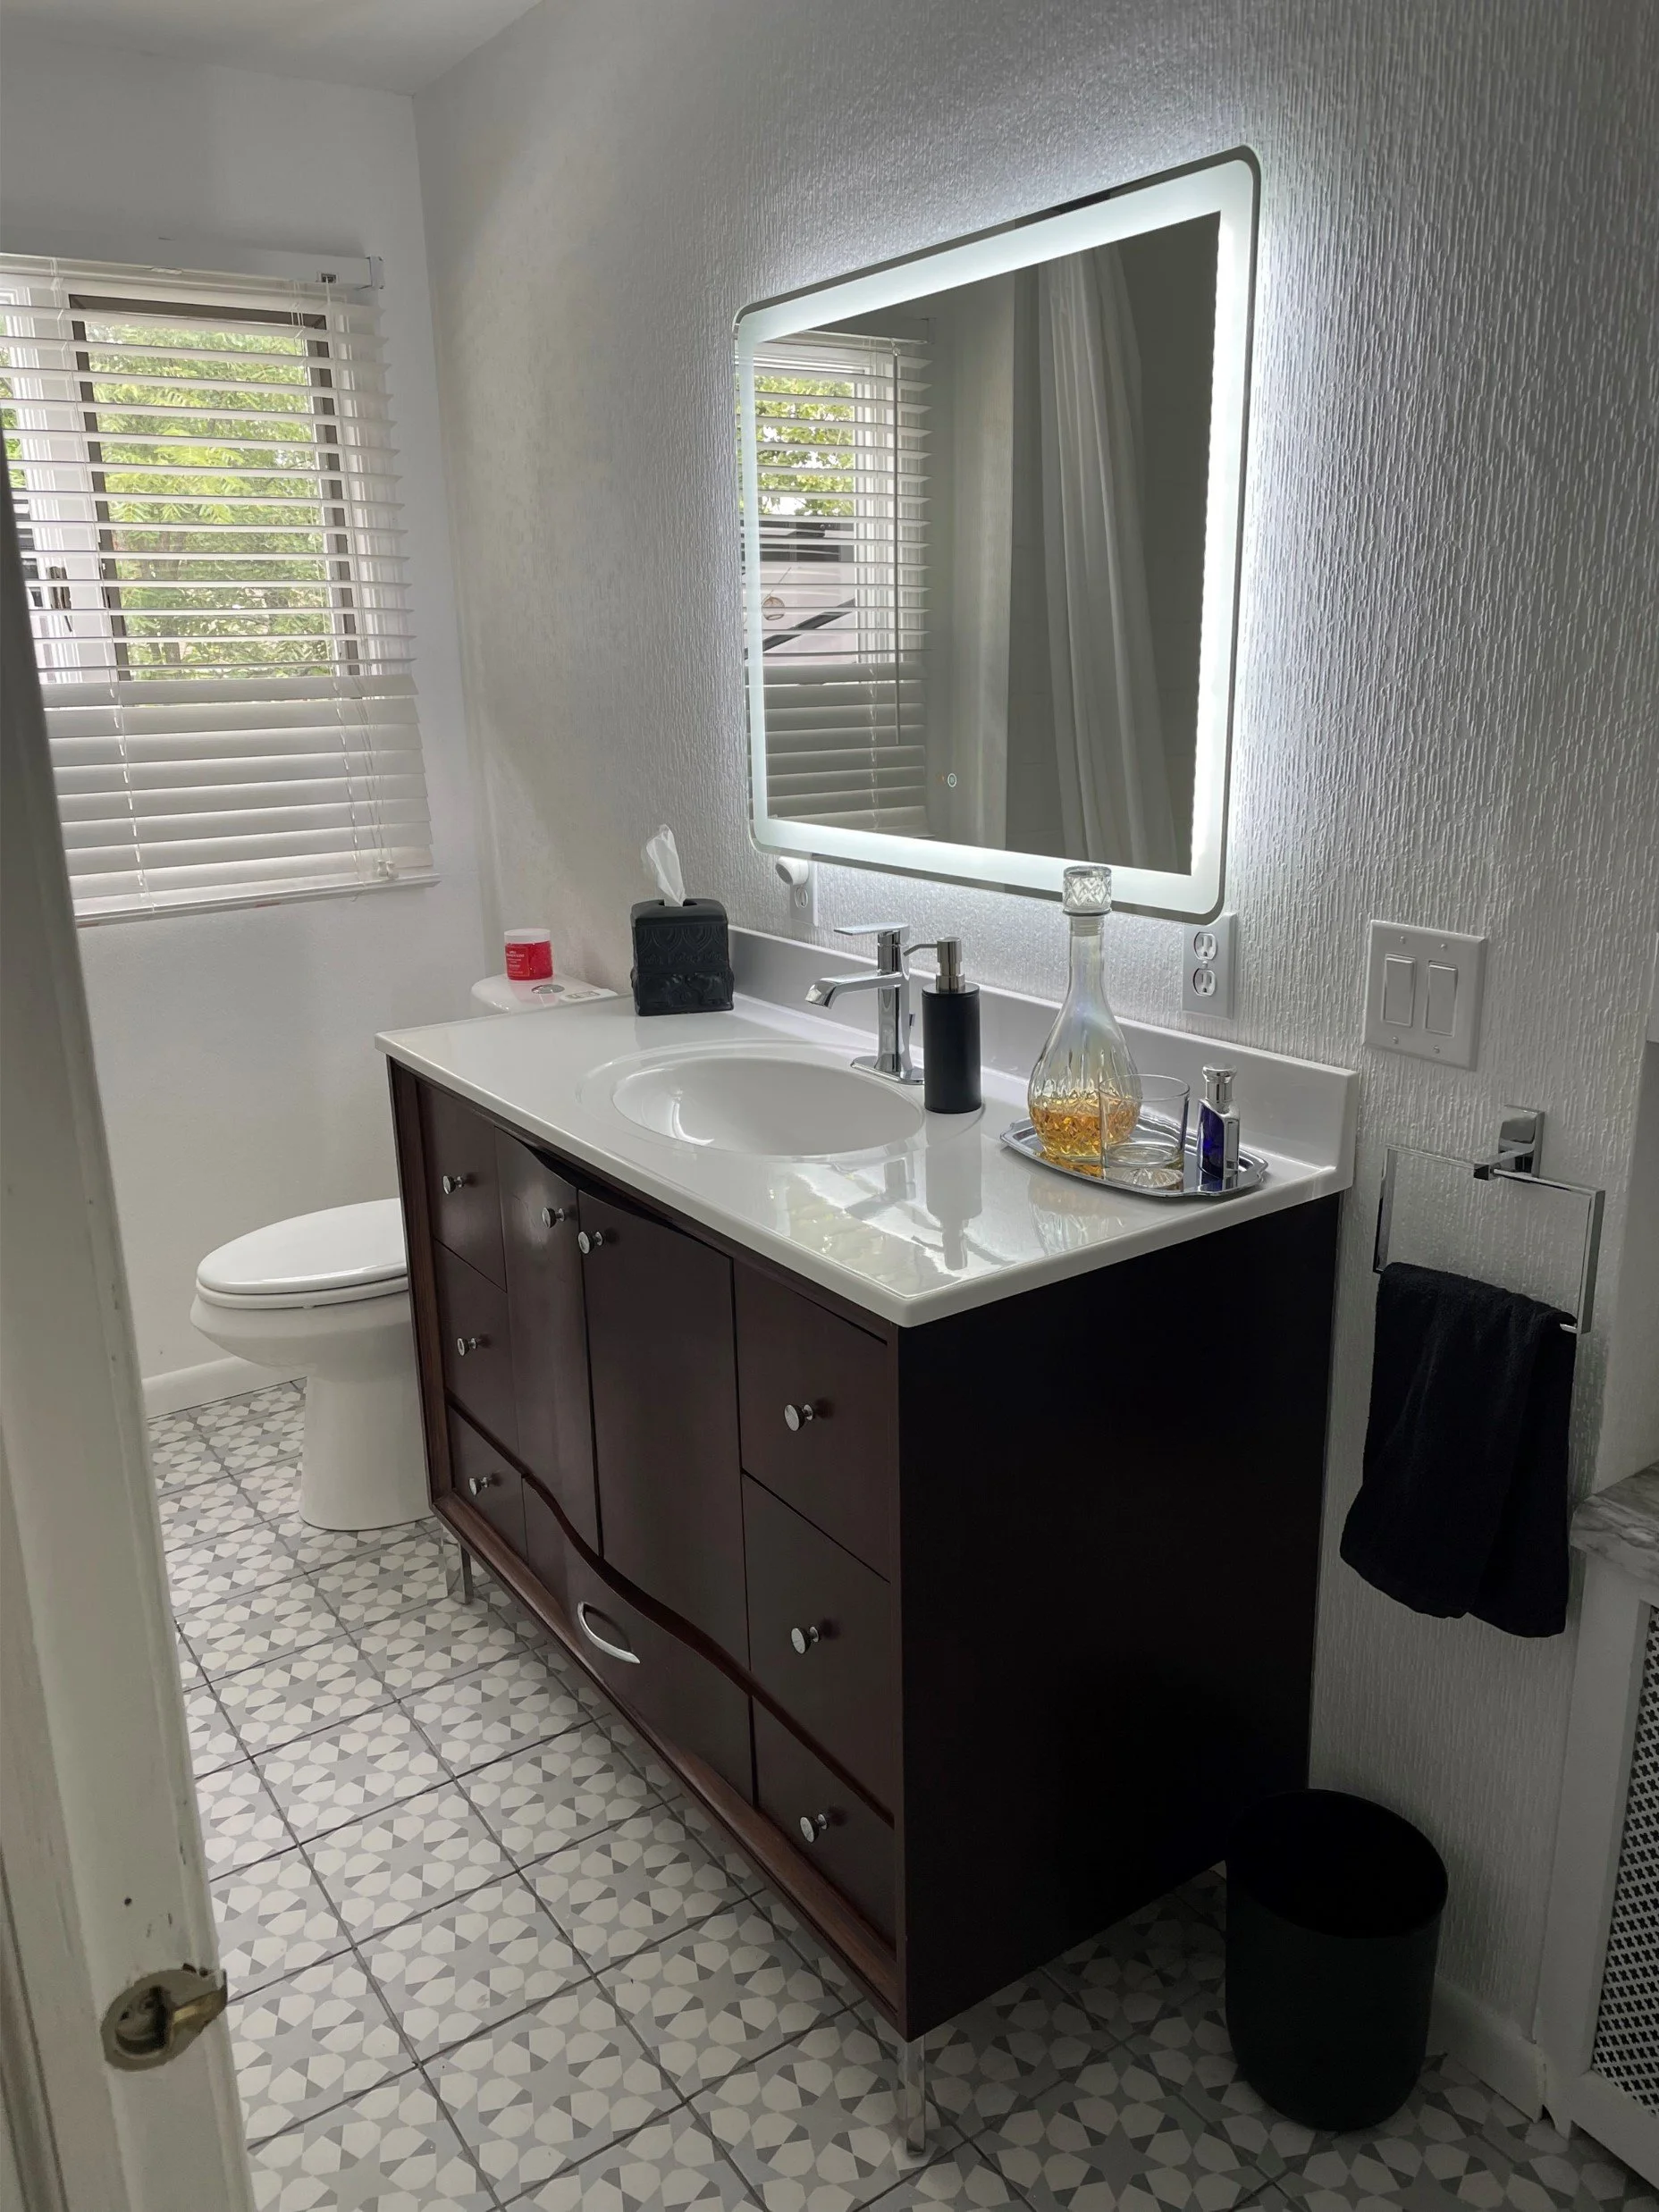
The Finished Bathroom: Small Changes, Big Transformation
After adding the final vanity-top accessories and a few carefully chosen décor pieces, I could finally step back and look at the finished bathroom.
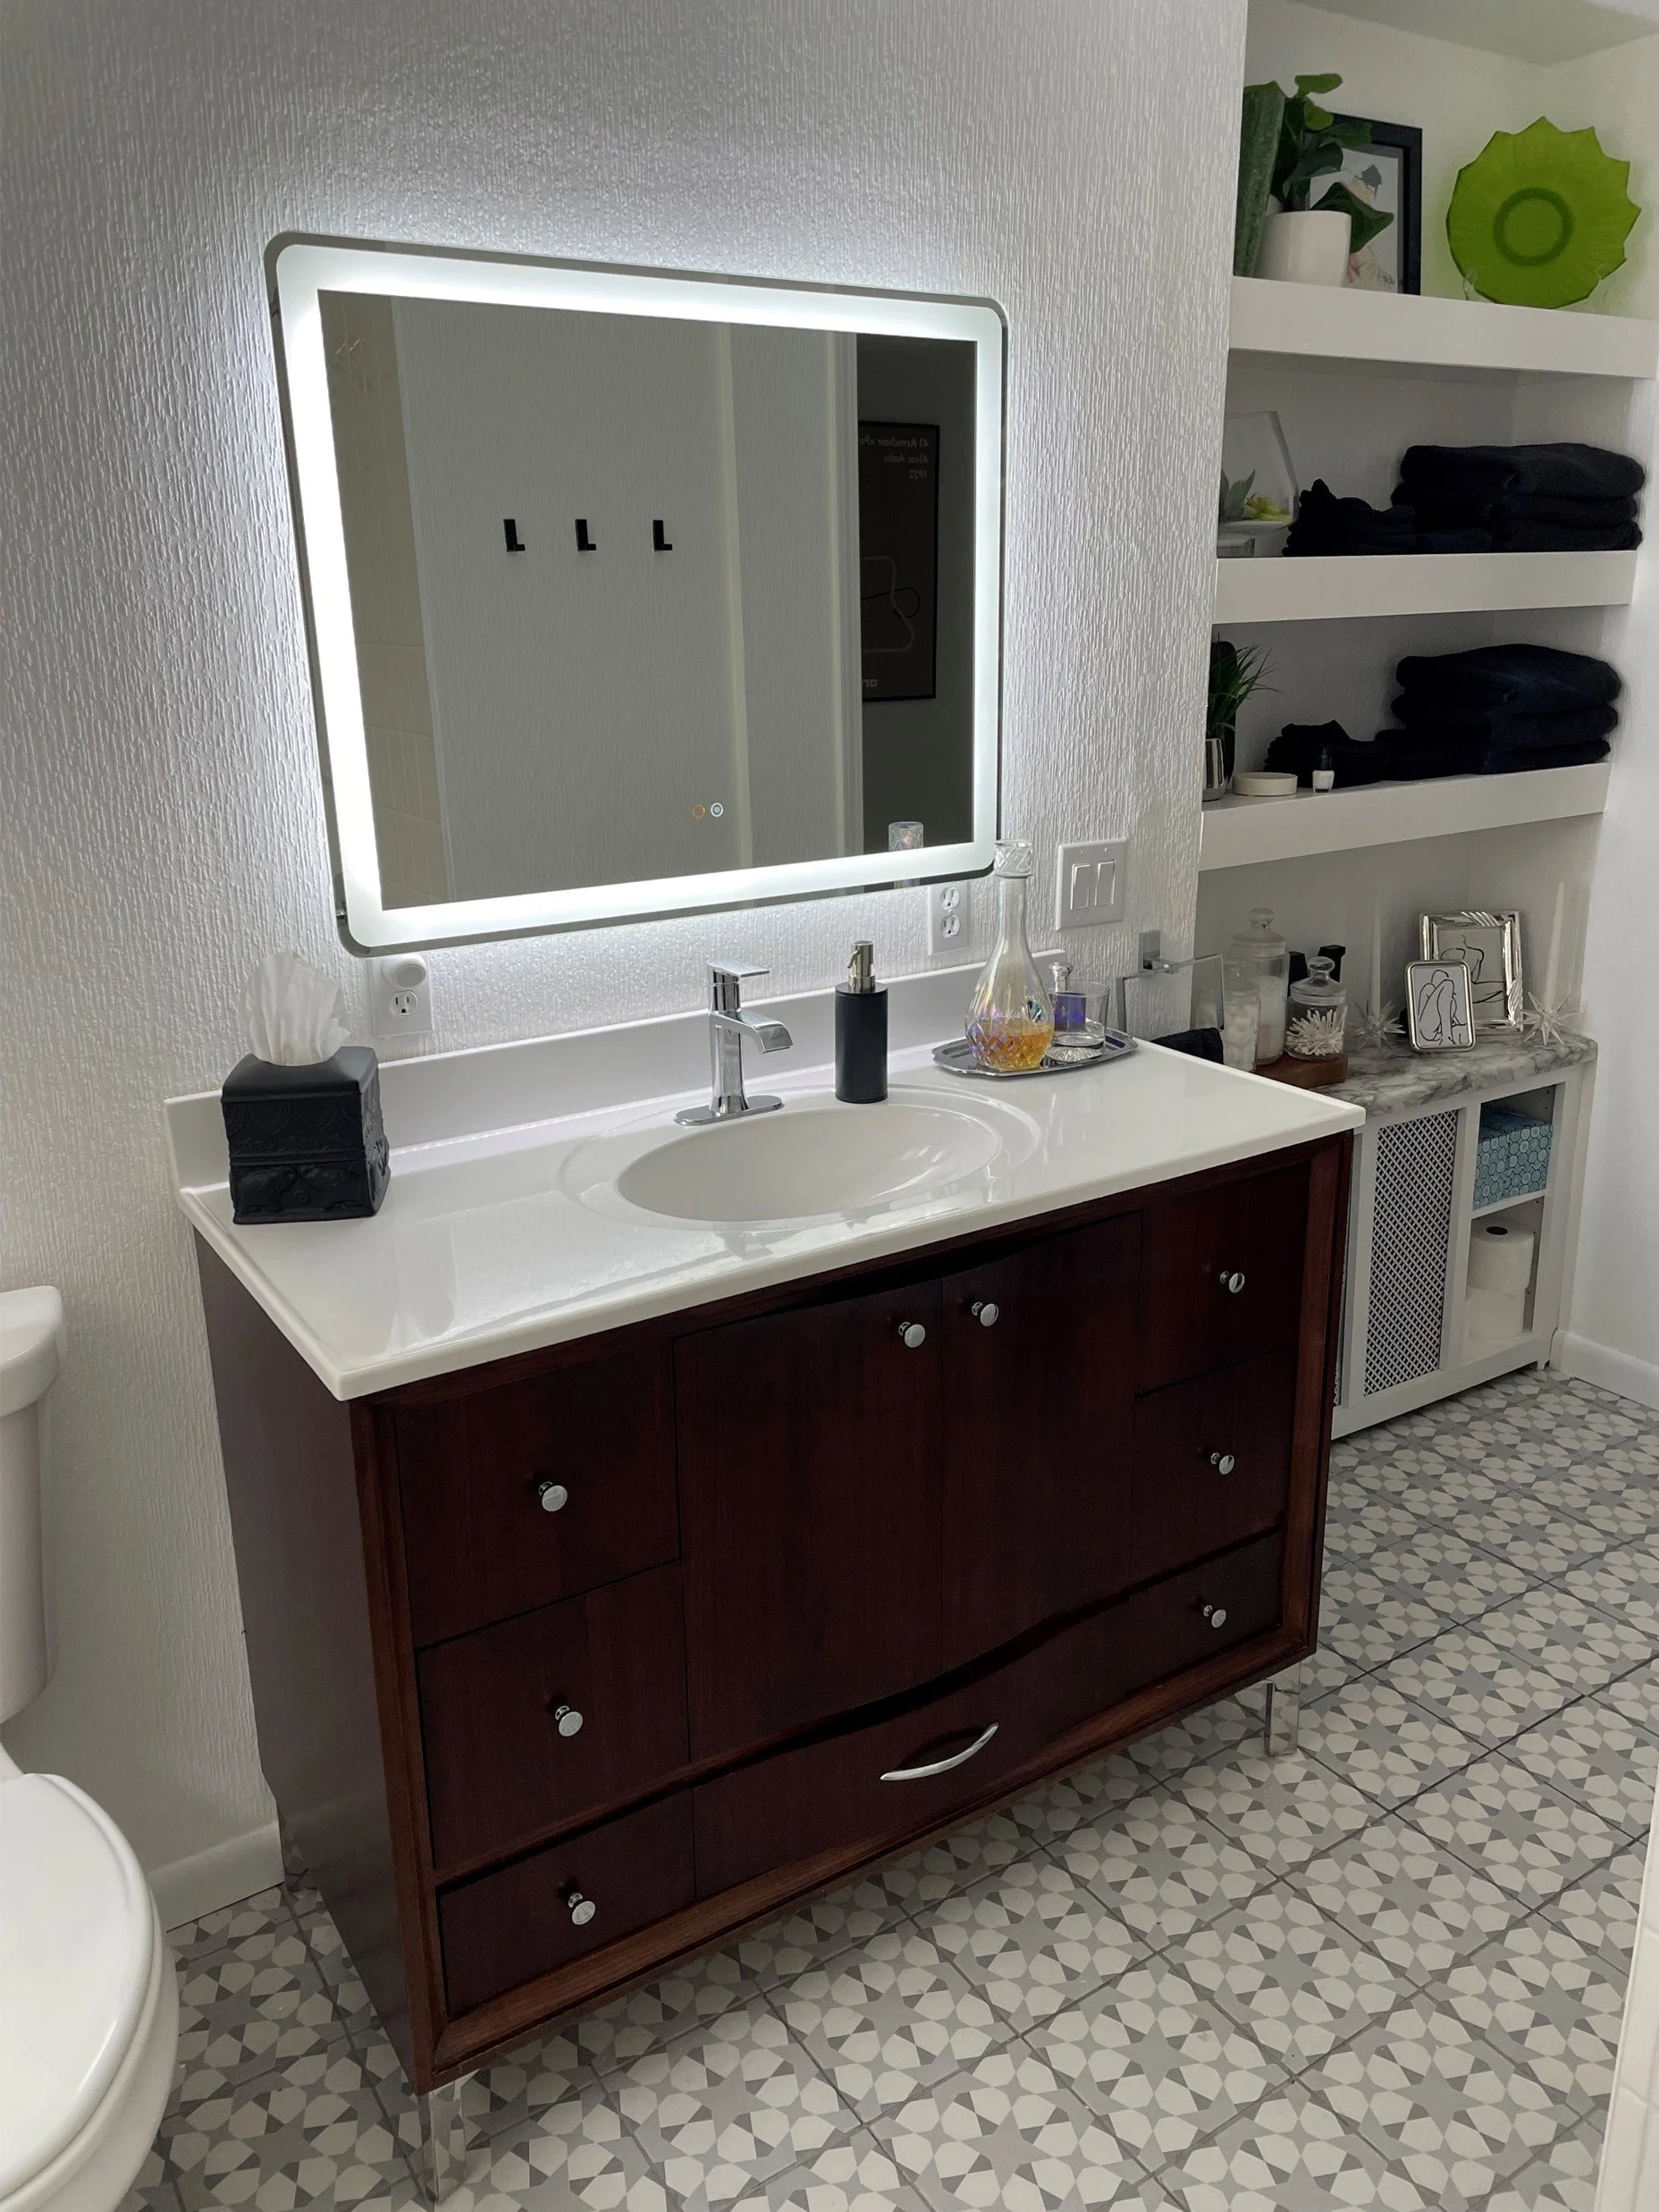
And I love it.
I didn't do a major renovation.
I didn't move walls.
I didn't replace the bathtub.
But the transformation is dramatic.
I gained useful storage in the recessed shower niches, the radiator cover cabinet, the open shelving alcove, and the new medicine cabinet above the toilet.
The finishes coordinate.
The room feels brighter.
The bathroom feels more modern.
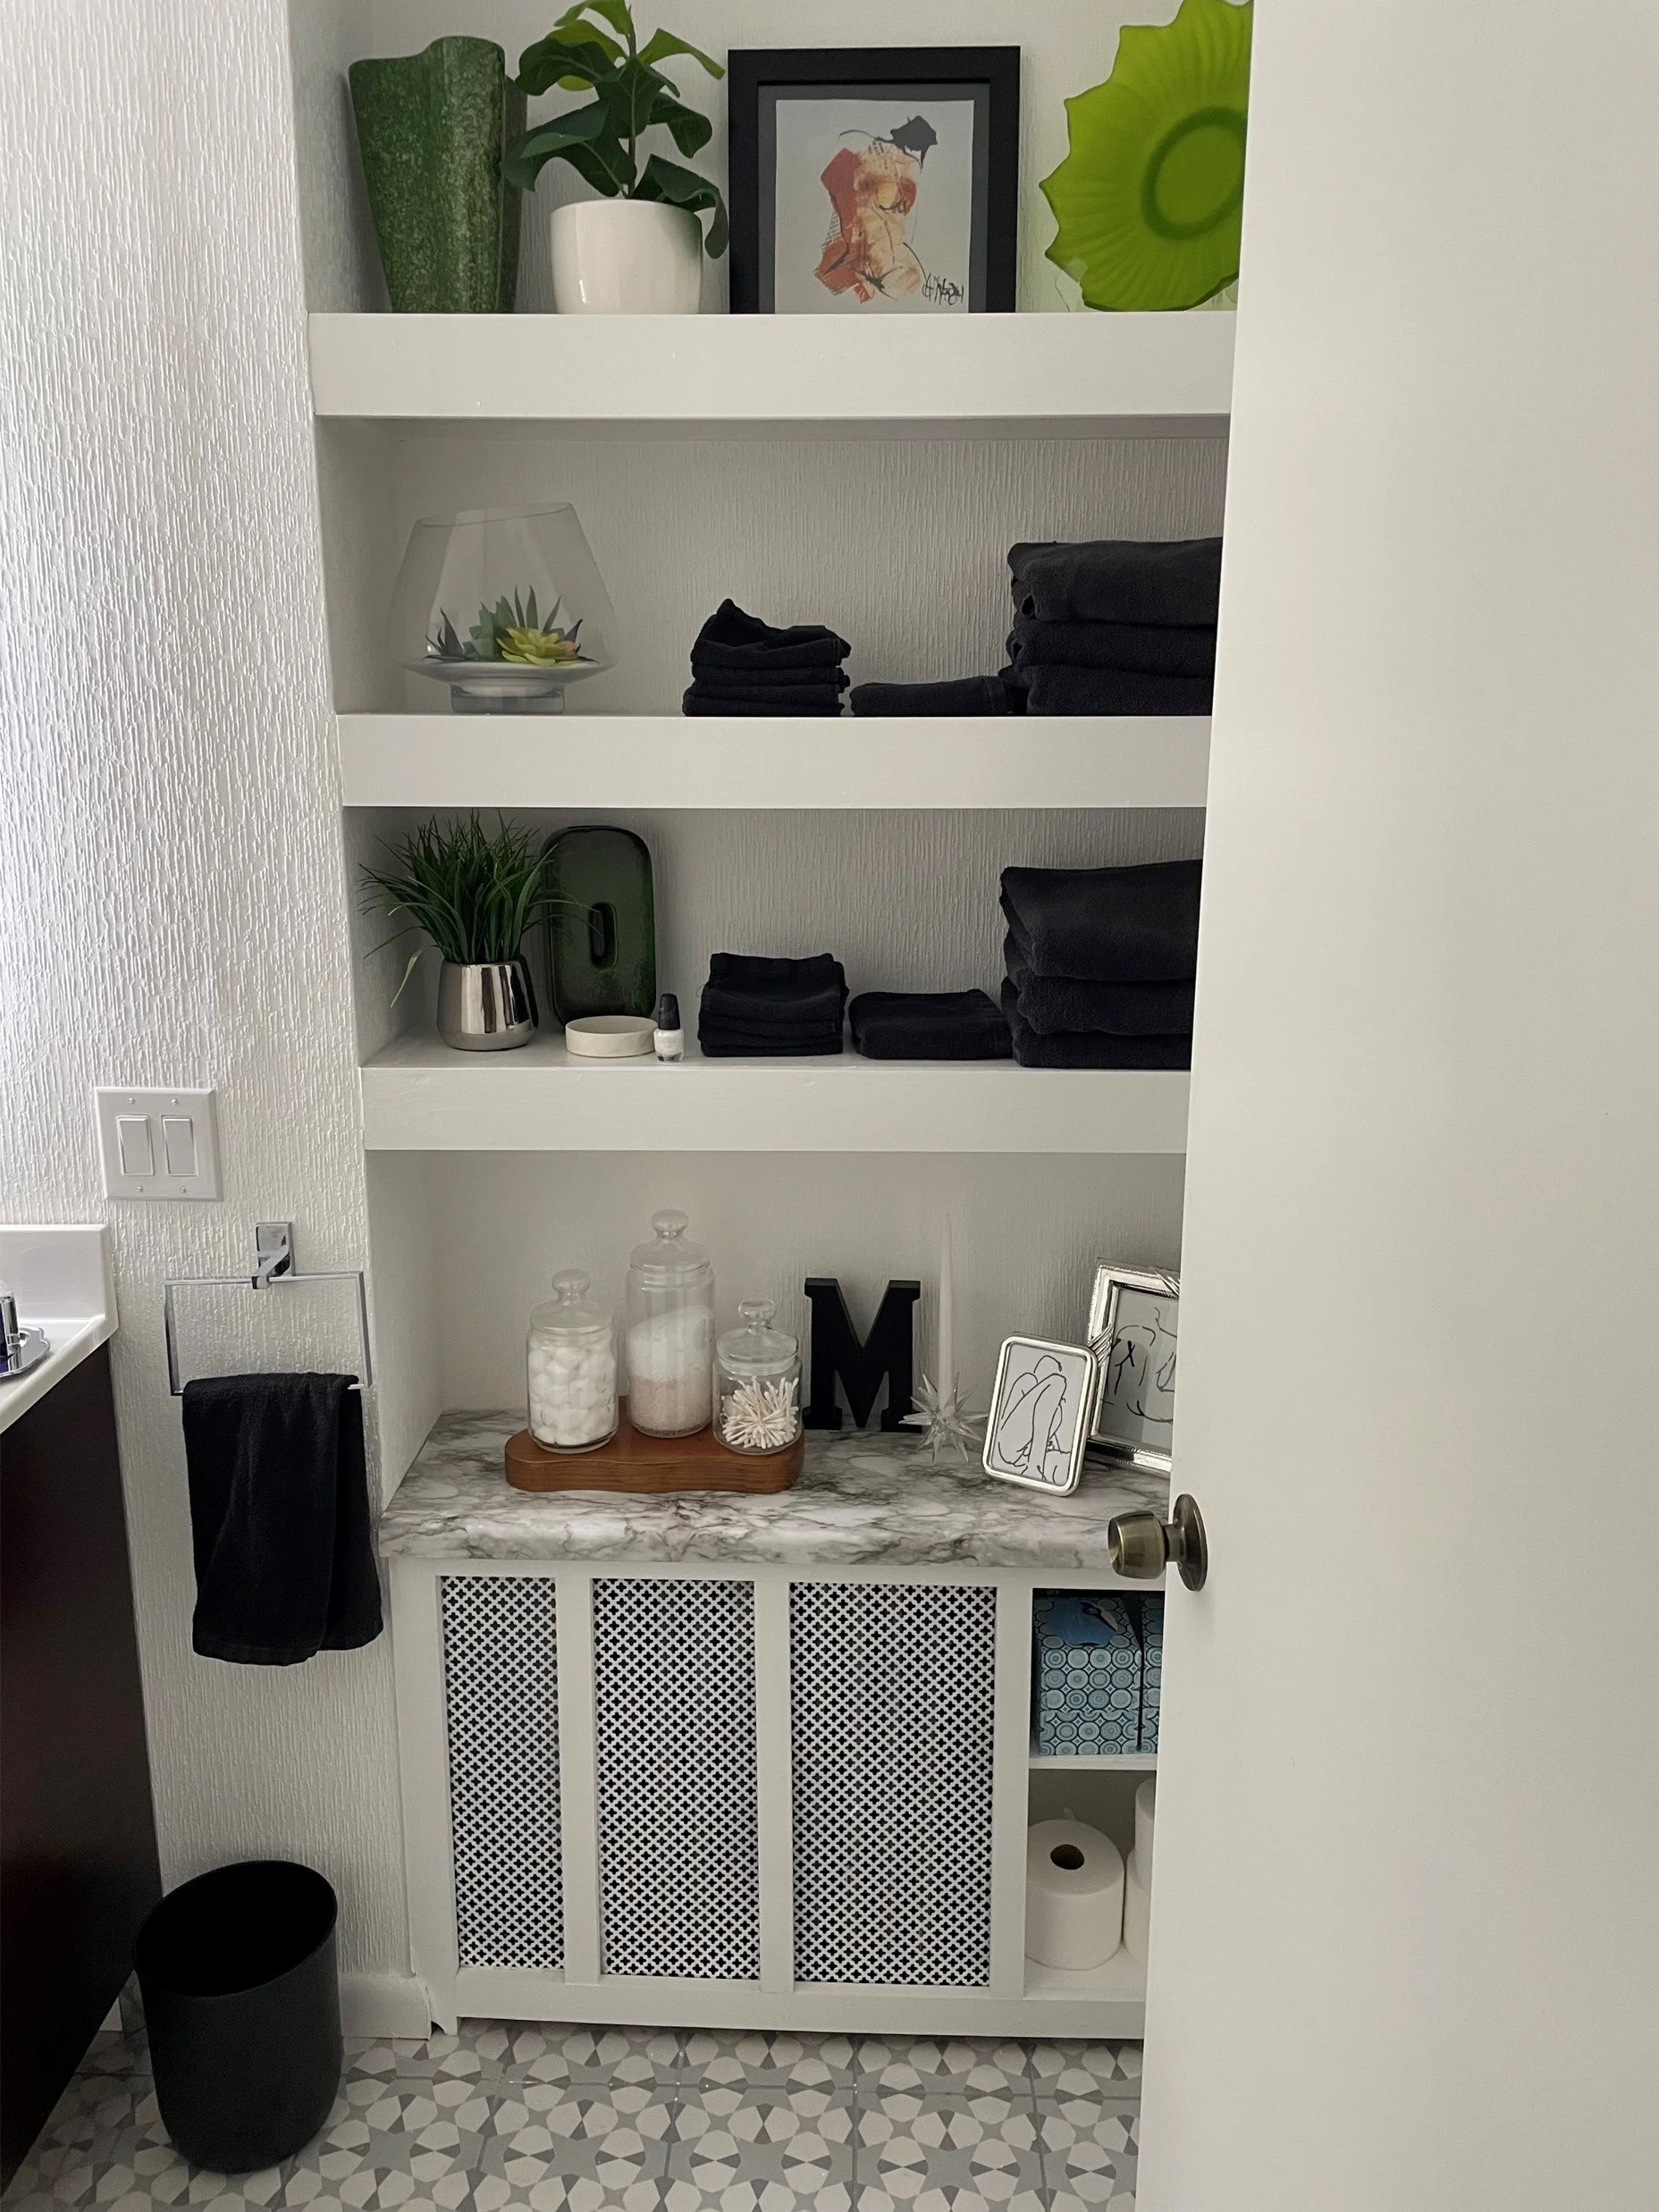
And, most importantly, it functions so much better for me.
That was the goal all along: to give this small, narrow bathroom a modern makeover that was functional, beautiful, and efficient with the space I already had.
It took most of my summer.
There were a few bruises.
There were some questionable decisions.
There was one VERY heavy sink cabinet.
There was a free scrap countertop.
And there is still some grout that needs fixing.
But that's DIY.
You learn. You improvise. You make mistakes. You figure things out.
And eventually, you get to stand back and say, “Yep. I did that.”
And honestly?
That's my favorite part.
I'd love to know what you think of my new bathroom! Please be kind and leave a comment below. I promise I'll read them all—and I'll respond to anyone who wants to talk about the design, the DIY process, or any part of the renovation from start to finish.
Read Next:
Rental-Friendly Small Space Fixes You Can Do in a Weekend
Transform your rental in 2 days without losing your deposit. 8 reversible upgrades: wallpaper, hardware, lighting, floors. Budget: $400-1500.

Michael is Principal designer and blogger at Michael Helwig Interiors in beautiful Buffalo, New York. Since 2011, he’s a space planning expert, offering online interior e-design services for folks living in small homes, or for those with awkward and tricky layouts. He’s a frequent expert contributor to many National media publications and news outlets on topics related to decorating, interior design, diy projects, and more. Michael happily shares his experience to help folks avoid expensive mistakes and decorating disappointments. You can follow him on Pinterest, Instagram and Facebook @interiorsmh.