I'm going to tell you something that might make you angry:
Most galley kitchen advice is completely useless.
Paint it white. Add open shelving. Use glossy surfaces. Get a cart for extra counter space.
Full transparency, I’ve given that advice many times myself.
Here's the problem: None of that solves why your galley kitchen doesn't work. You can paint it every color in the Benjamin Moore deck, but if your fridge door blocks your oven, or your sink is on the wrong end, or there's no ‘landing zone’ near your stove—you're still going to hate cooking in there.
A galley kitchen that 'works' isn't about aesthetics. It's about three things: clearance, sequence, and zones.
That's what we're covering today. Not styling tips. Not aspirational Pinterest boards. The actual space planning principles that make a standard galley kitchen (42-48 inches between counters) functional for real cooking, real traffic, and real life.
If you've ever felt like your galley kitchen is working against you, this is why—and more importantly, this is how to fix it.
Why Most Galley Kitchen Advice Fails: The 3 Myths That Keep You Stuck
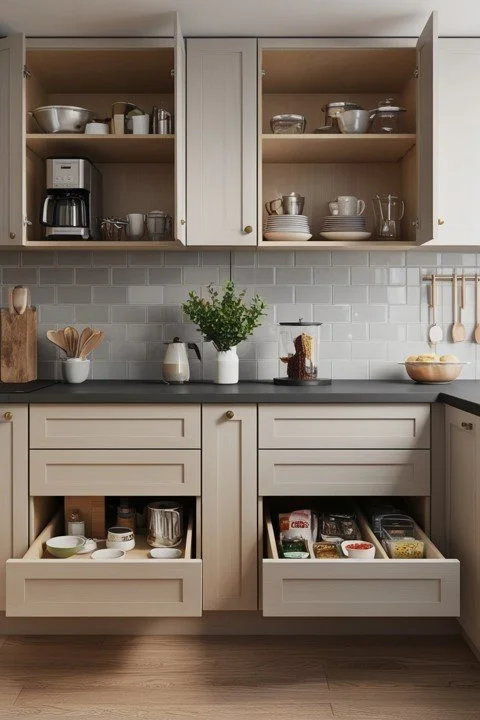
Myth #1: 'You Need More Storage'
The internet will tell you to add floating shelves, magnetic strips, and pegboards to maximize storage and functionality. But here's what they don't tell you: In a galley kitchen, MORE storage in the wrong places makes the problem worse…
The Reality?
You don't need more storage. You need the RIGHT storage in the RIGHT zones. A galley kitchen works when stuff is stored at their point of use—not crammed into whatever cabinet has space. (This also applies to small kitchens too.)
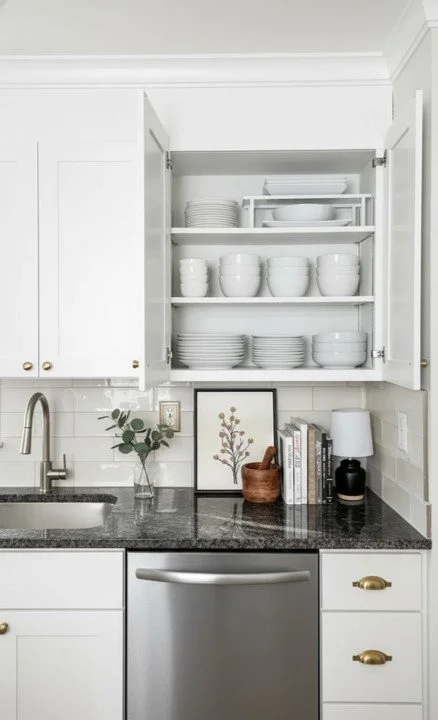
Real Example: Client had a 'storage problem.' After we audited, she had plenty of cabinet space—but her everyday dishes were in the cabinet farthest from the dishwasher. Plates near sink = problem solved, zero new storage added.
Myth #2: 'Open Shelving Makes It Feel Bigger'
Open shelving can work, but in a standard galley kitchen space, which is typically 42-48 inches, it often creates the opposite problem: visual clutter, and that makes the space feel MORE cramped.
Who wouldn’t LOVE a Pinterest worthy “perfectly curated” open shelf, right? But you know how life goes, one random spice shaker gets left out on the shelf, then the car keys land next to that, then the mail gets piled next to the keys, and soon that perfect curation becomes a catch all! The temptation to just put it there for a minute is hard to overcome.
The Reality?
In tight galley kitchens, closed upper cabinets actually create a cleaner visual line. The 'bigger feel' comes from proper spacing, not from exposing your dishes. Save open shelving for one accent area, not your whole kitchen.
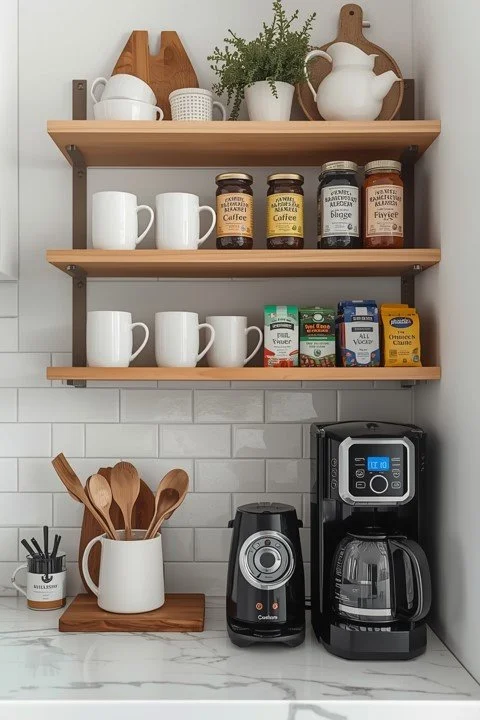
Curtis Adams
For example: Open shelves in smaller kitchens work way better when convenience is prioritized. Put an open shelf over the coffee maker to hold a small group of mugs, some coffee flavors, maybe tea bags… See how the shelf pertains to the functionality of what’s below it?
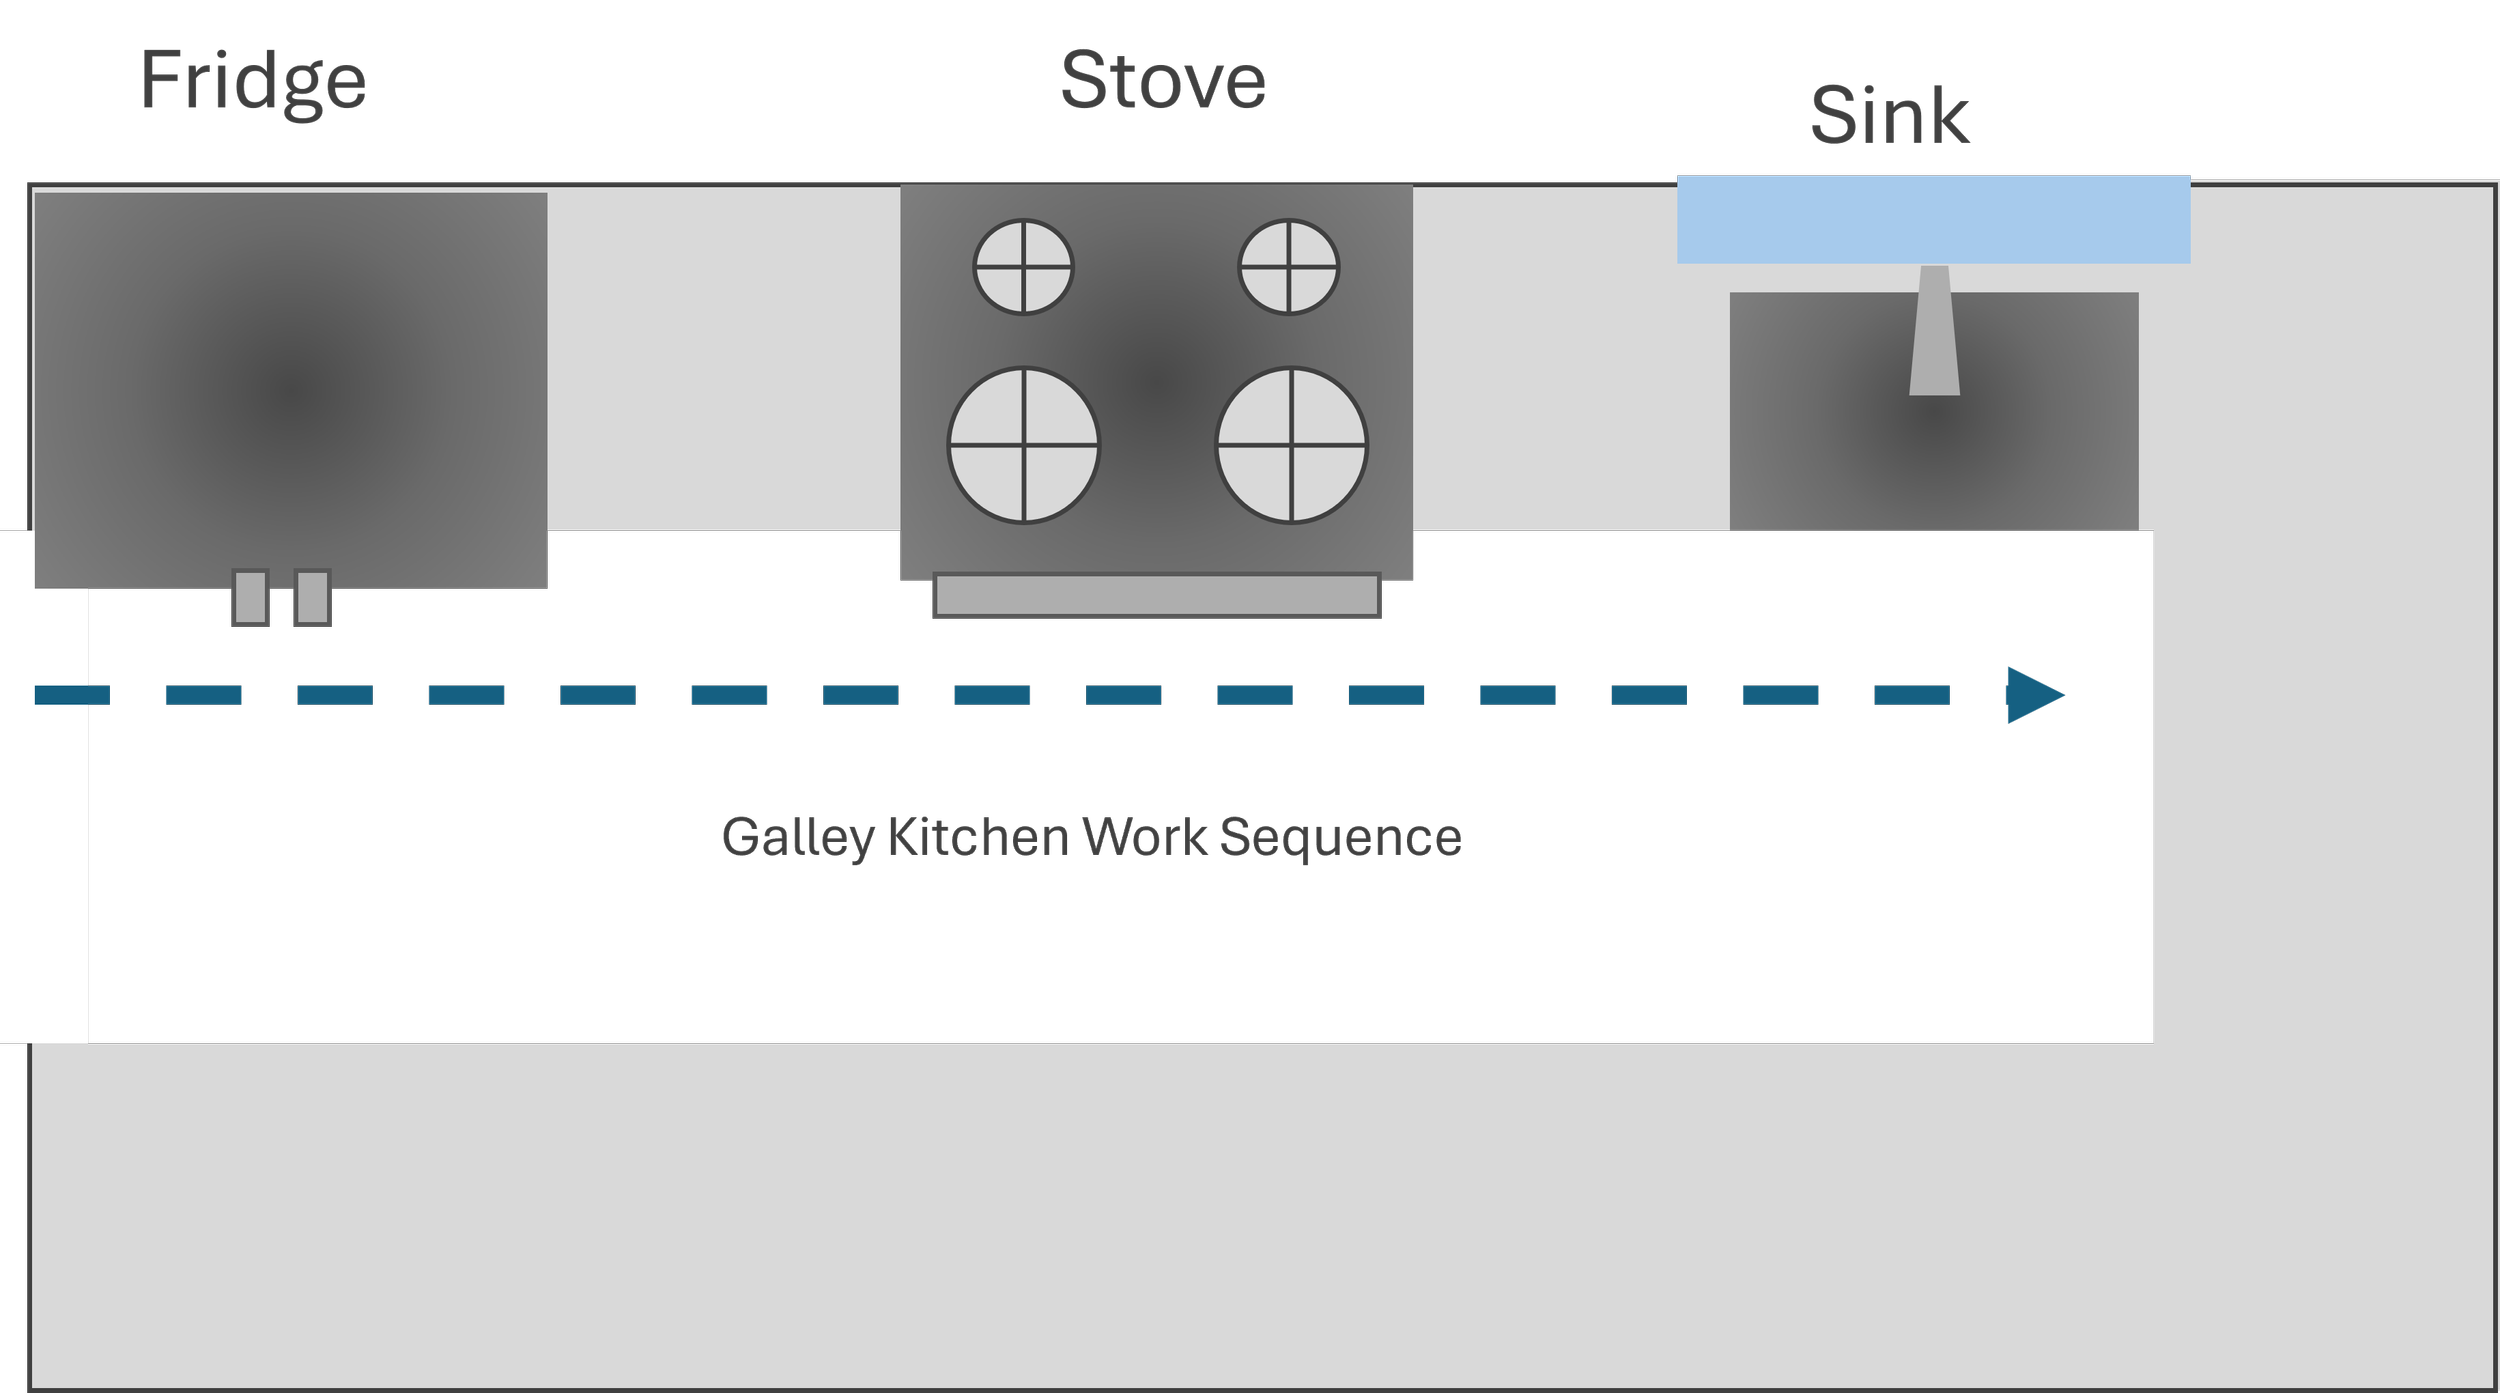
Myth #3: 'The Work Triangle Still Applies'
The classic work triangle (fridge, sink, stove forming a triangle) is gospel in kitchen design. But in a galley? It's almost impossible to make that work and trying to force it creates dysfunction.

The Reality?
Galley kitchens work on the WORK SEQUENCE principle, not the work triangle. It's about linear flow: fridge → prep → cook → serve. Get that sequence right, and the triangle becomes irrelevant. (More on this in a second…)
The Foundation: Three Non-Negotiable Clearances Every Galley Needs
Before we talk about what to put where, we need to talk about space. These clearances are make-or-break for a functional galley kitchen.
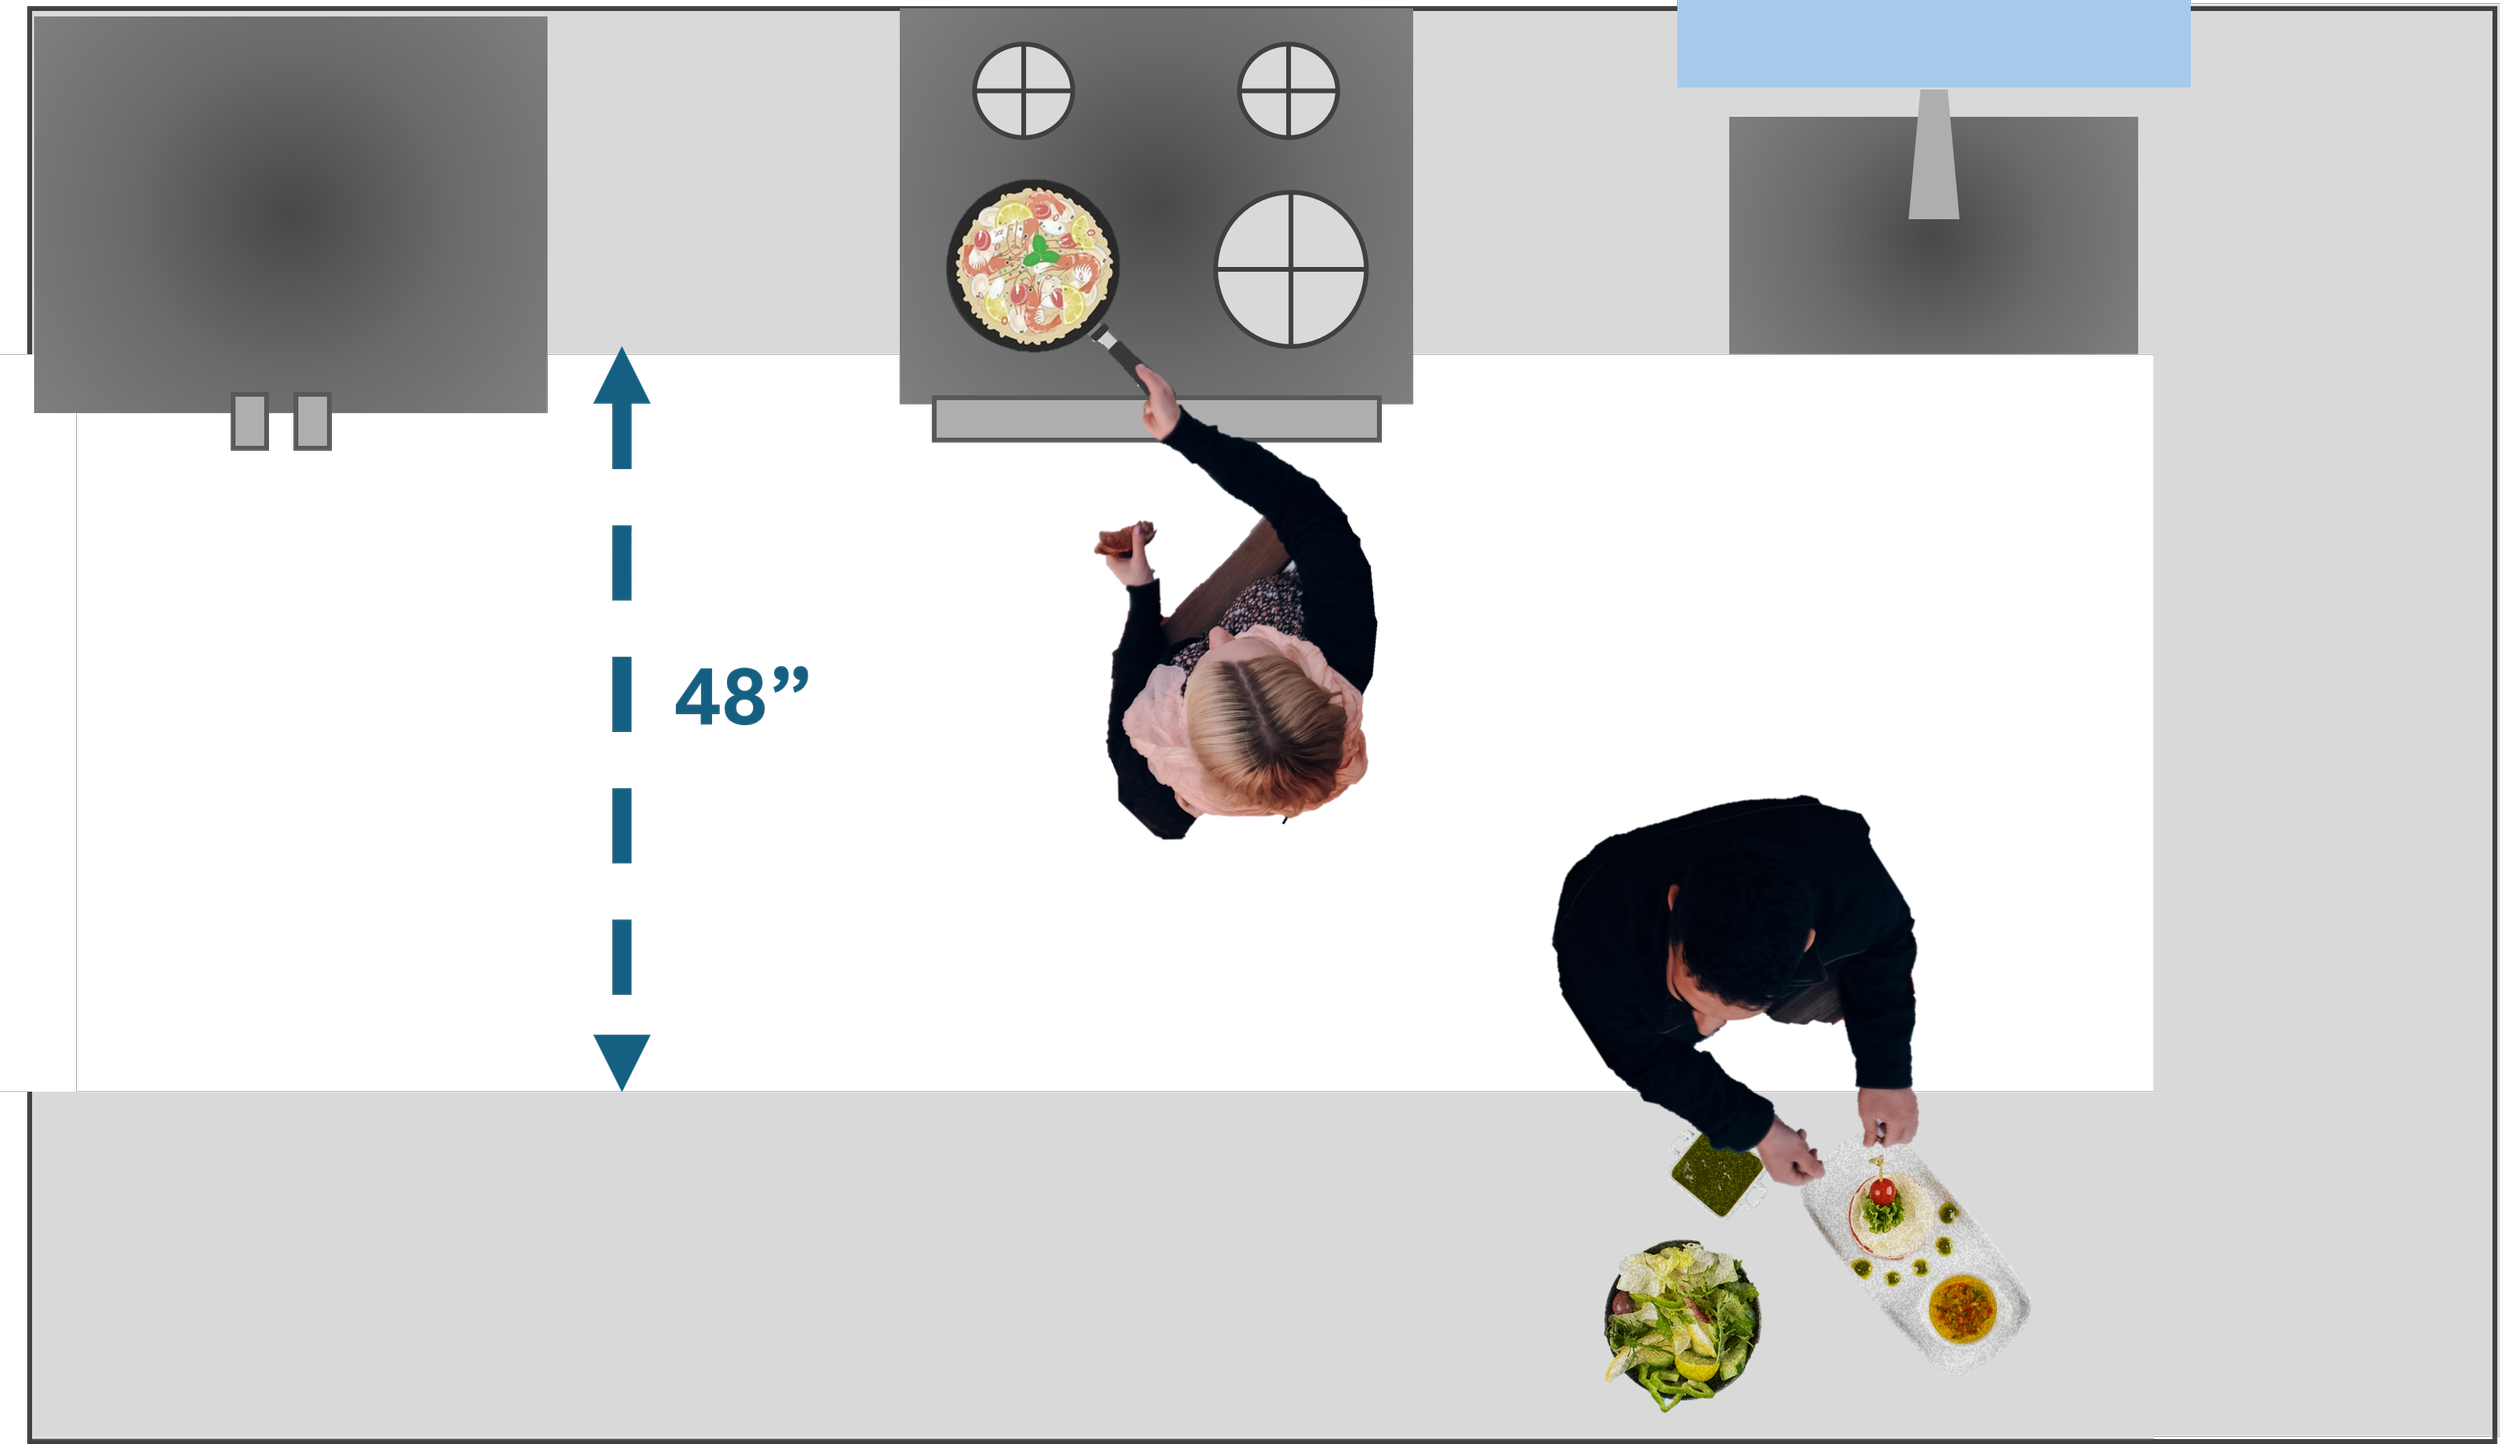
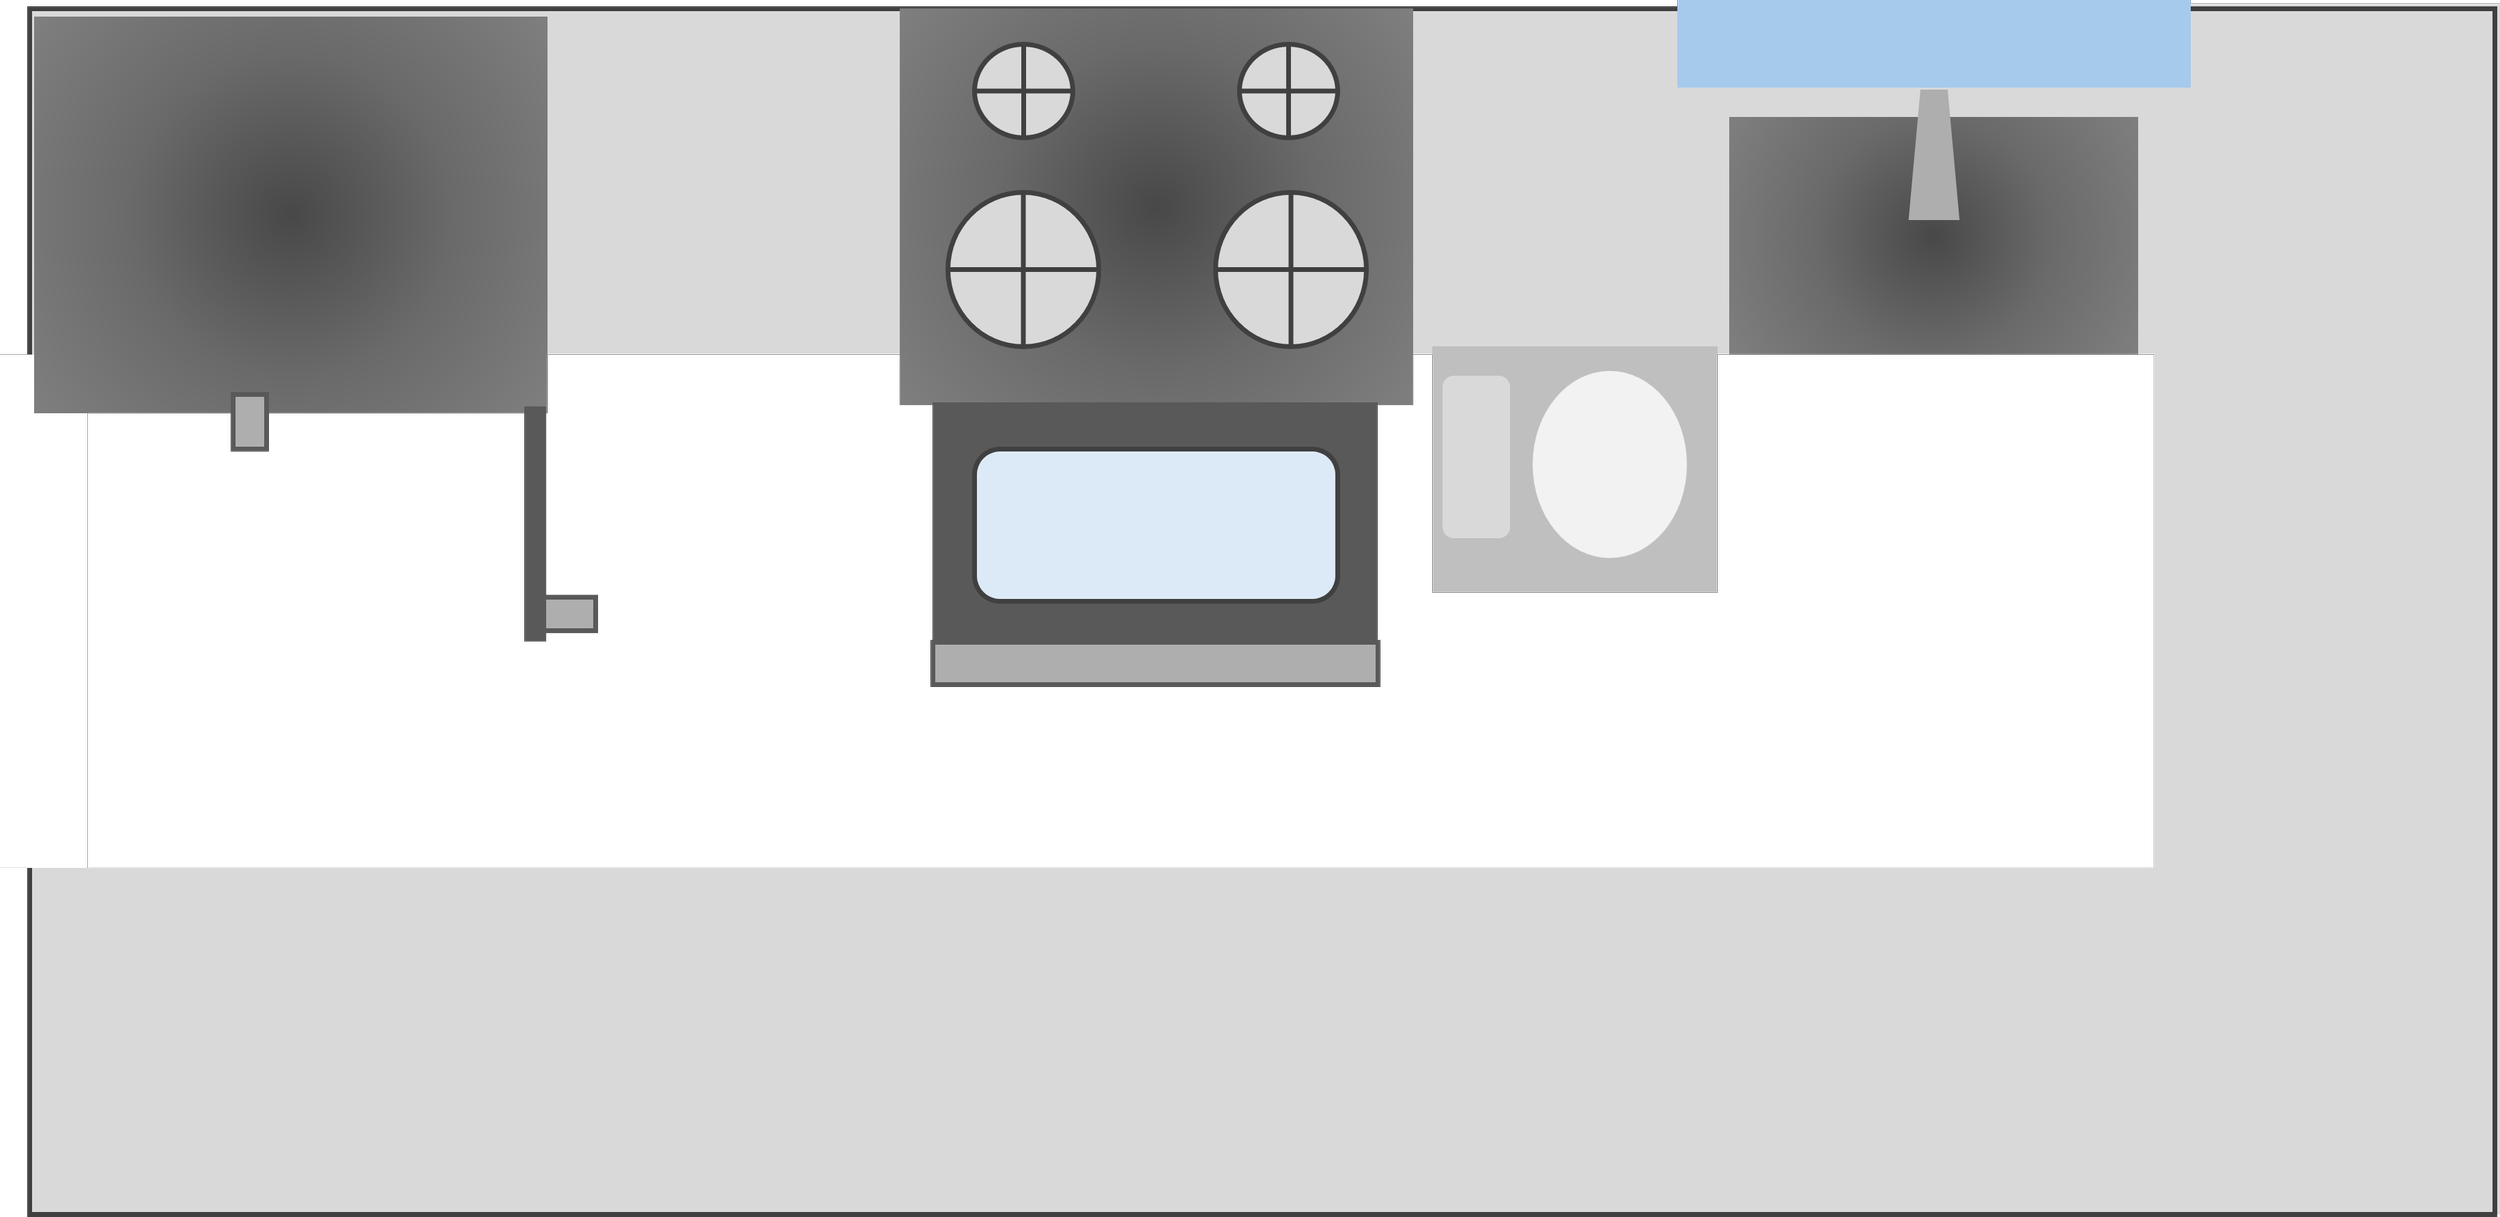
Clearance #1: The Magic 42-48 Inches Between Counters
42 inches minimum: One person can cook comfortably. Opening cabinets and appliances works.
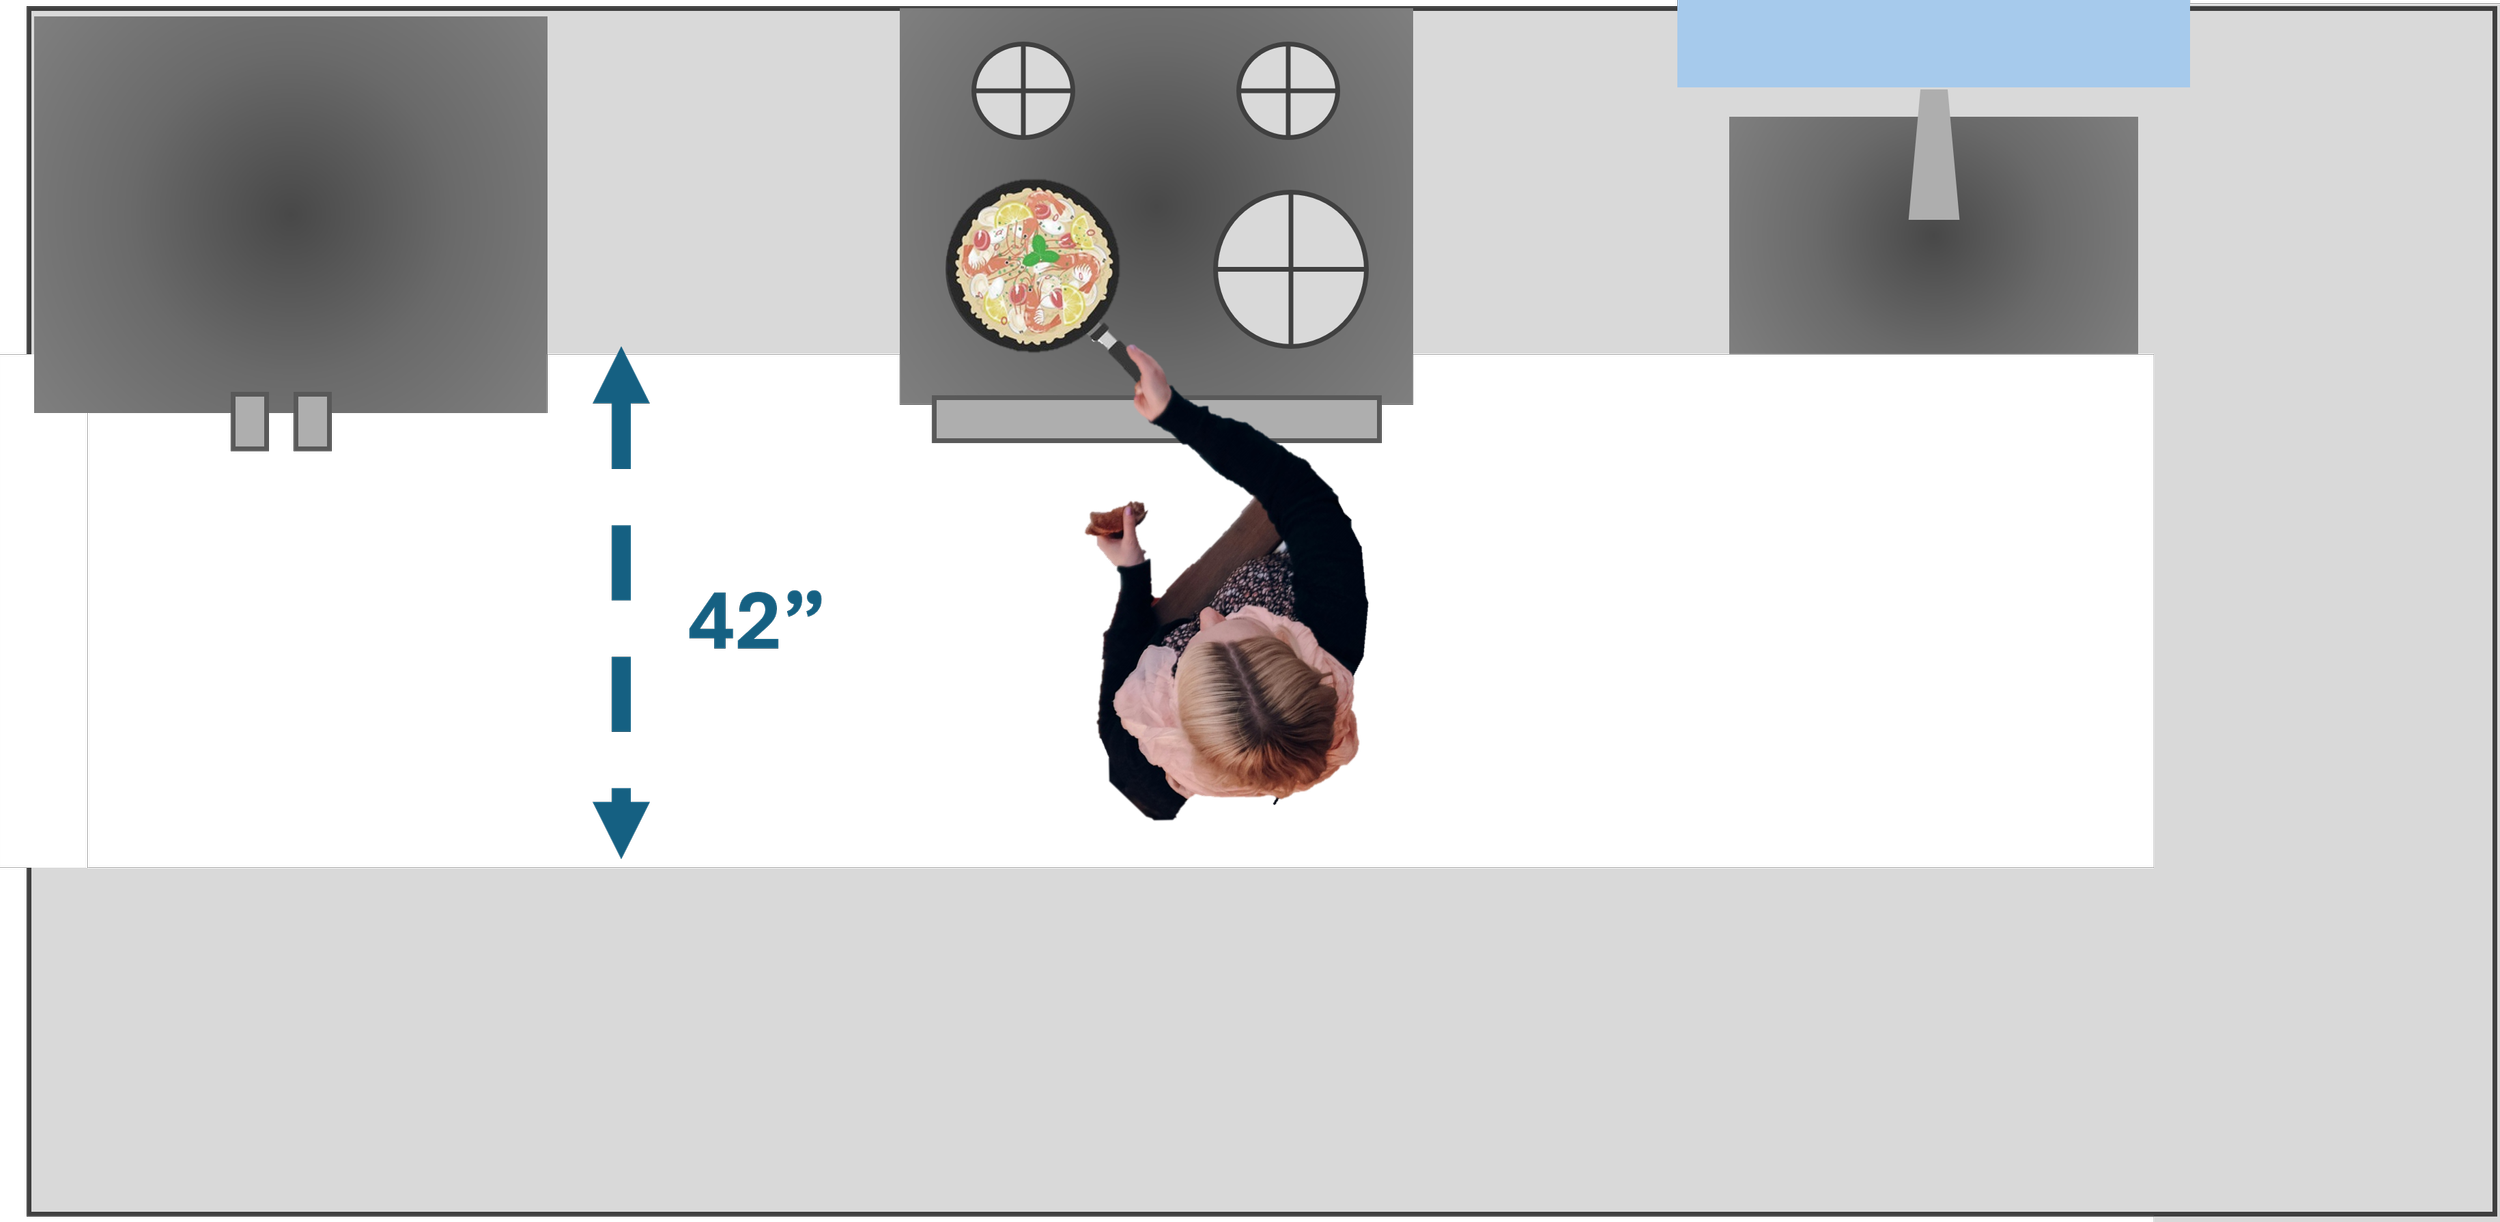
45-48 inches ideal: Two people can pass each other. You can open the dishwasher and still walk by.
Less than 42 inches: Not technically a galley—it's a single-wall kitchen with storage opposite. Different rules apply. (And that is a post for another day.)
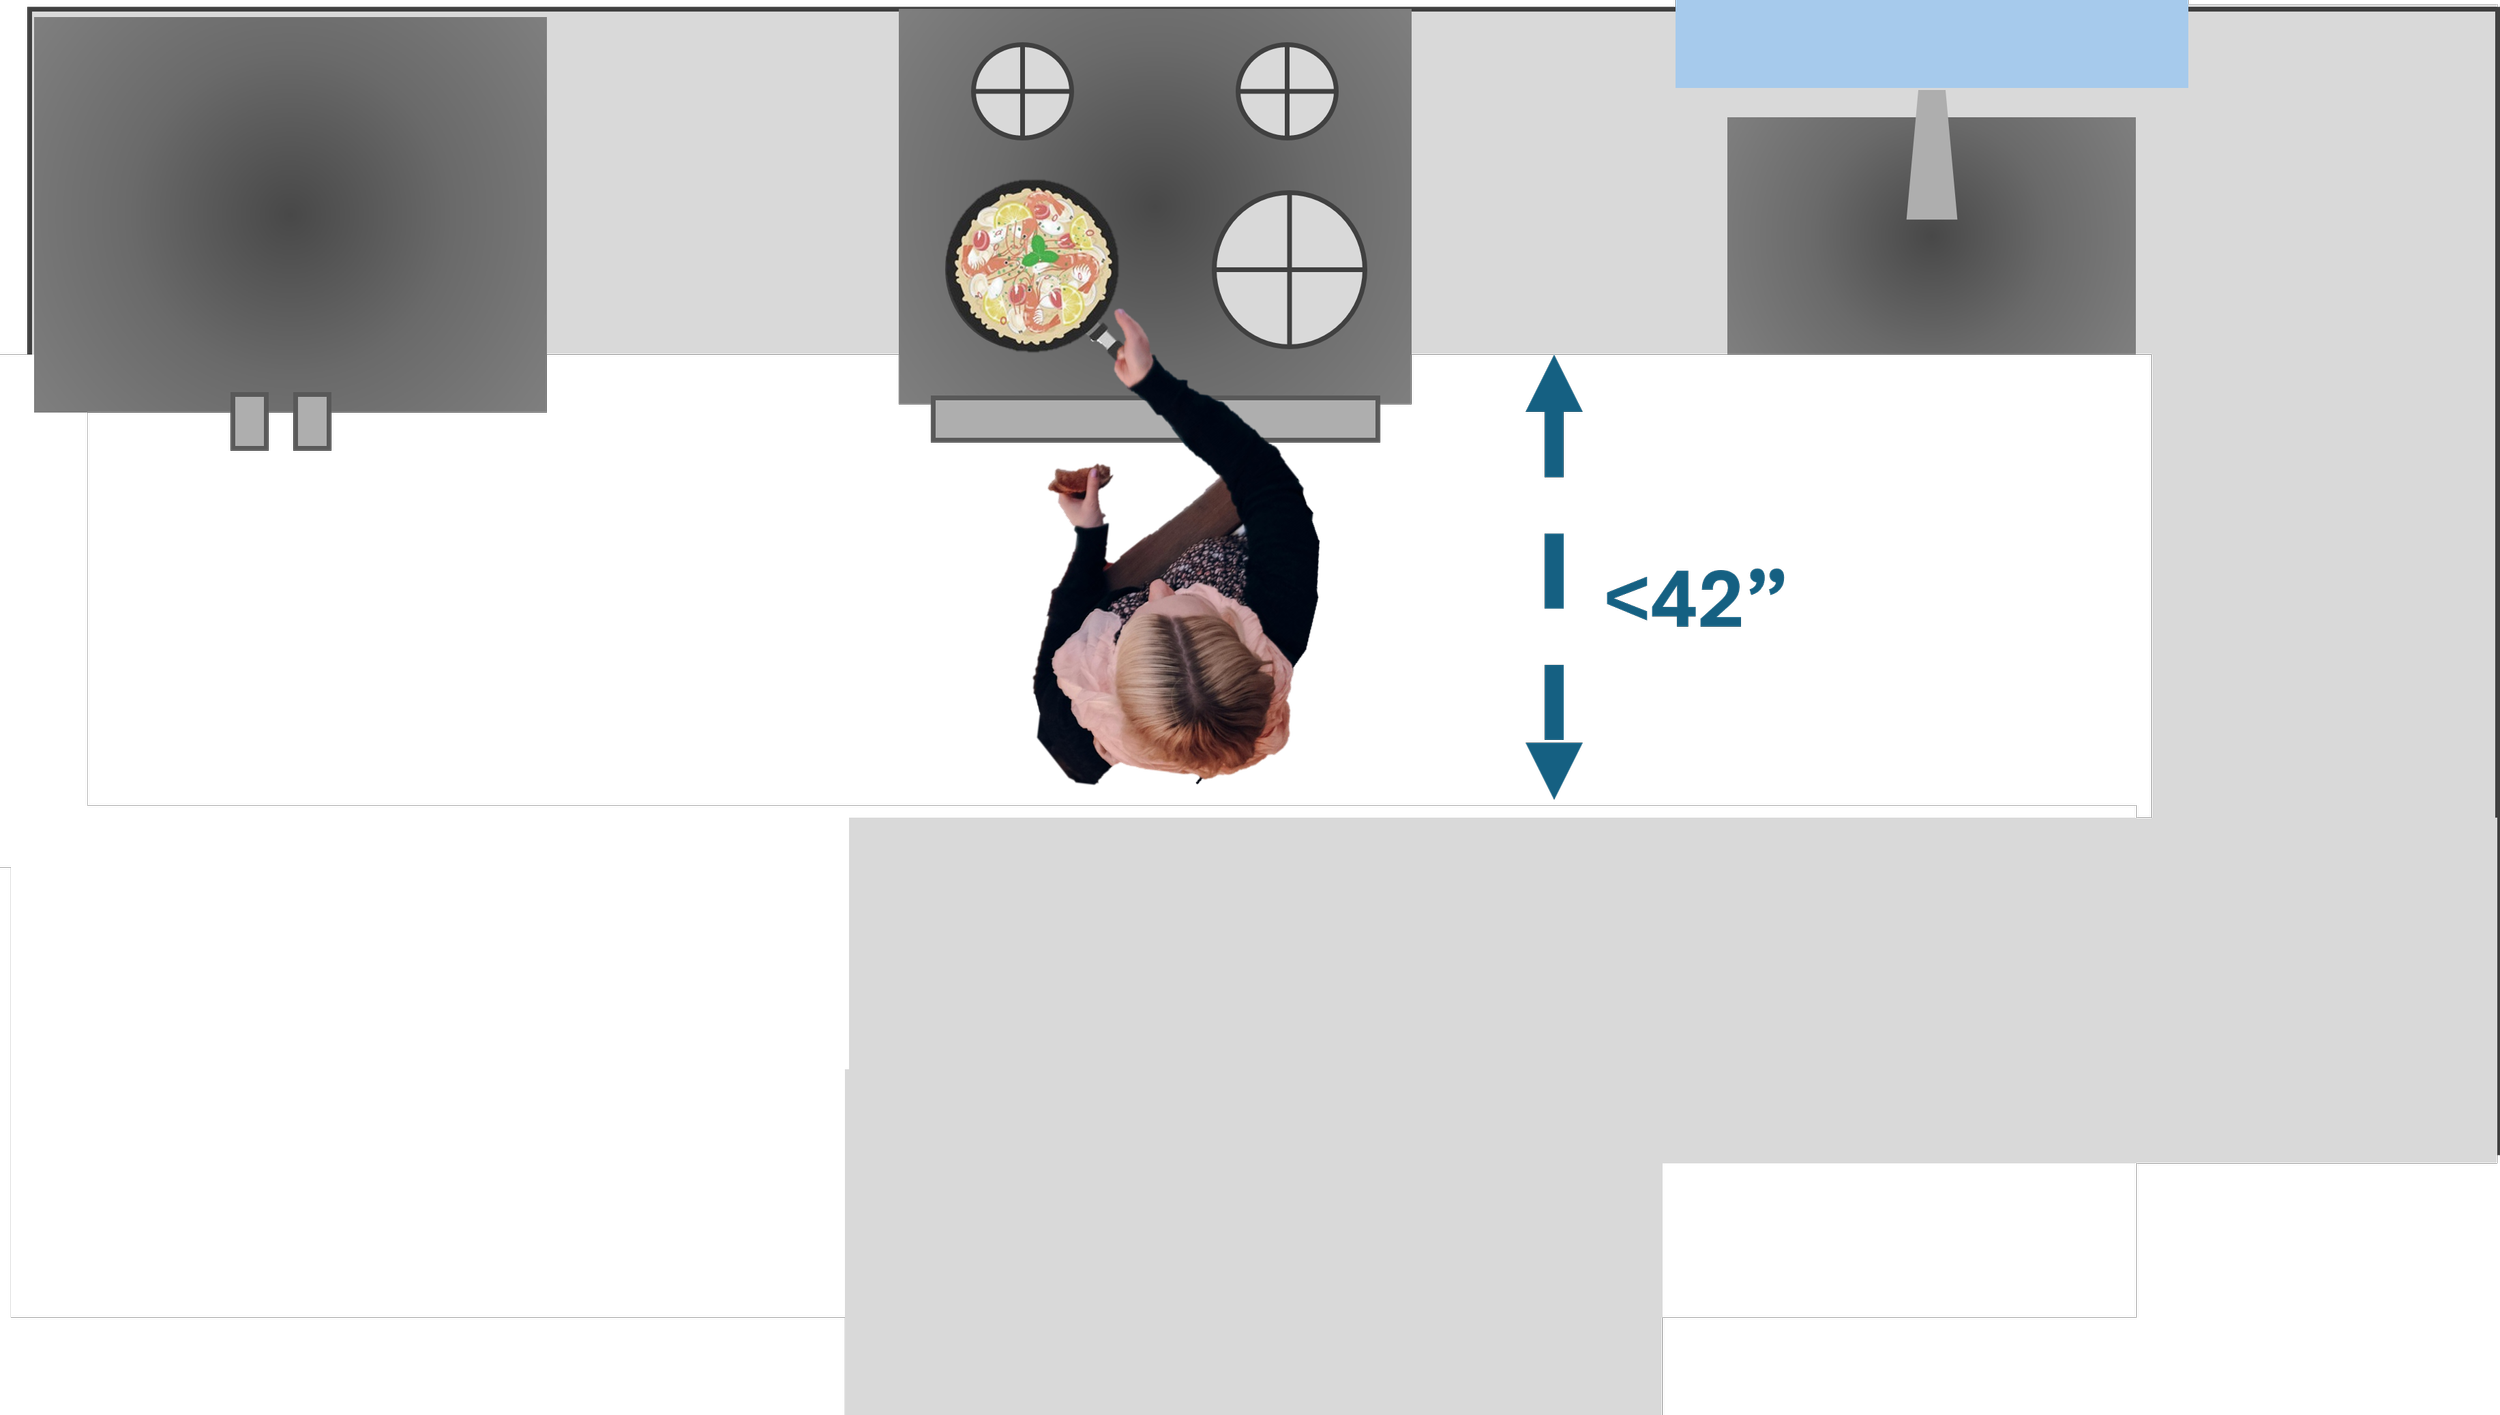
Critical: Measure from counter edge to counter edge, NOT wall to wall. Your actual middle aisle is smaller than you think.
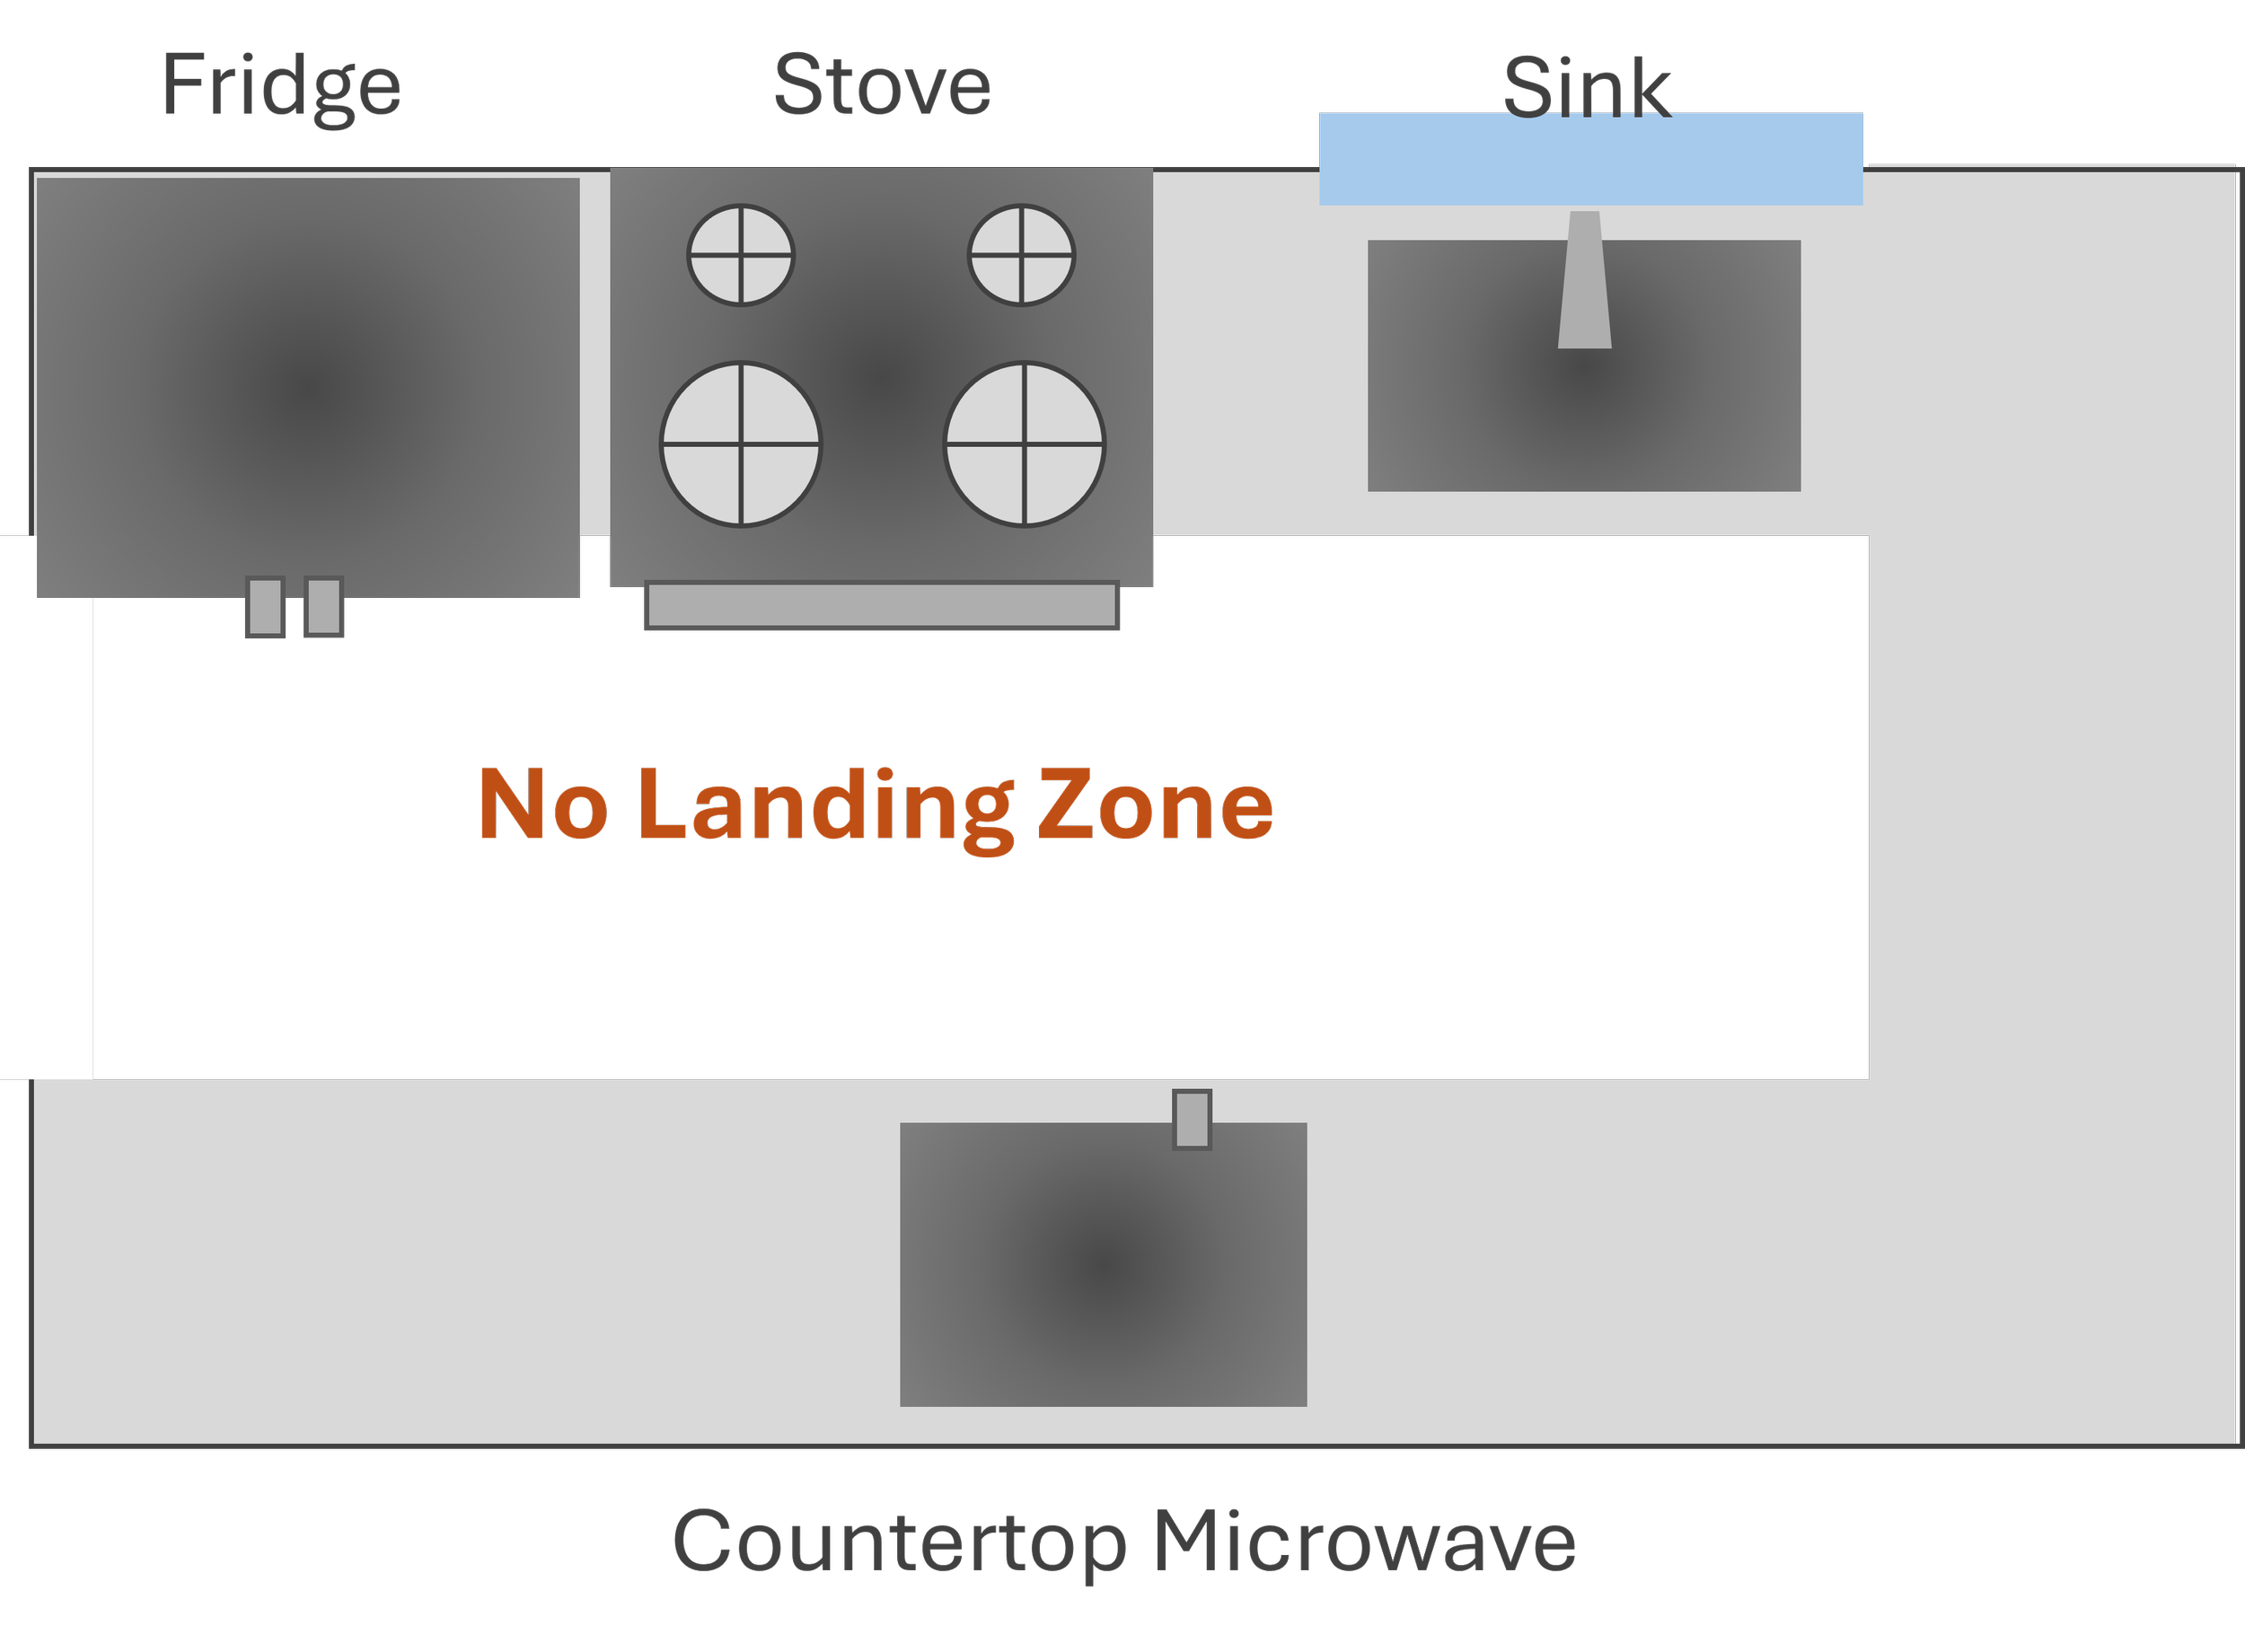
Clearance #2: The 15-Inch Landing Zone Idea
Every major appliance needs a landing zone—counter space immediately beside it where you can set things down.
Stove: 15 inches on at least one side (both sides is better)
Sink: 18 inches on at least one side for dish drying
Fridge: 15 inches on the handle side for unloading groceries
Microwave: If on the countertop,15 inches beside it
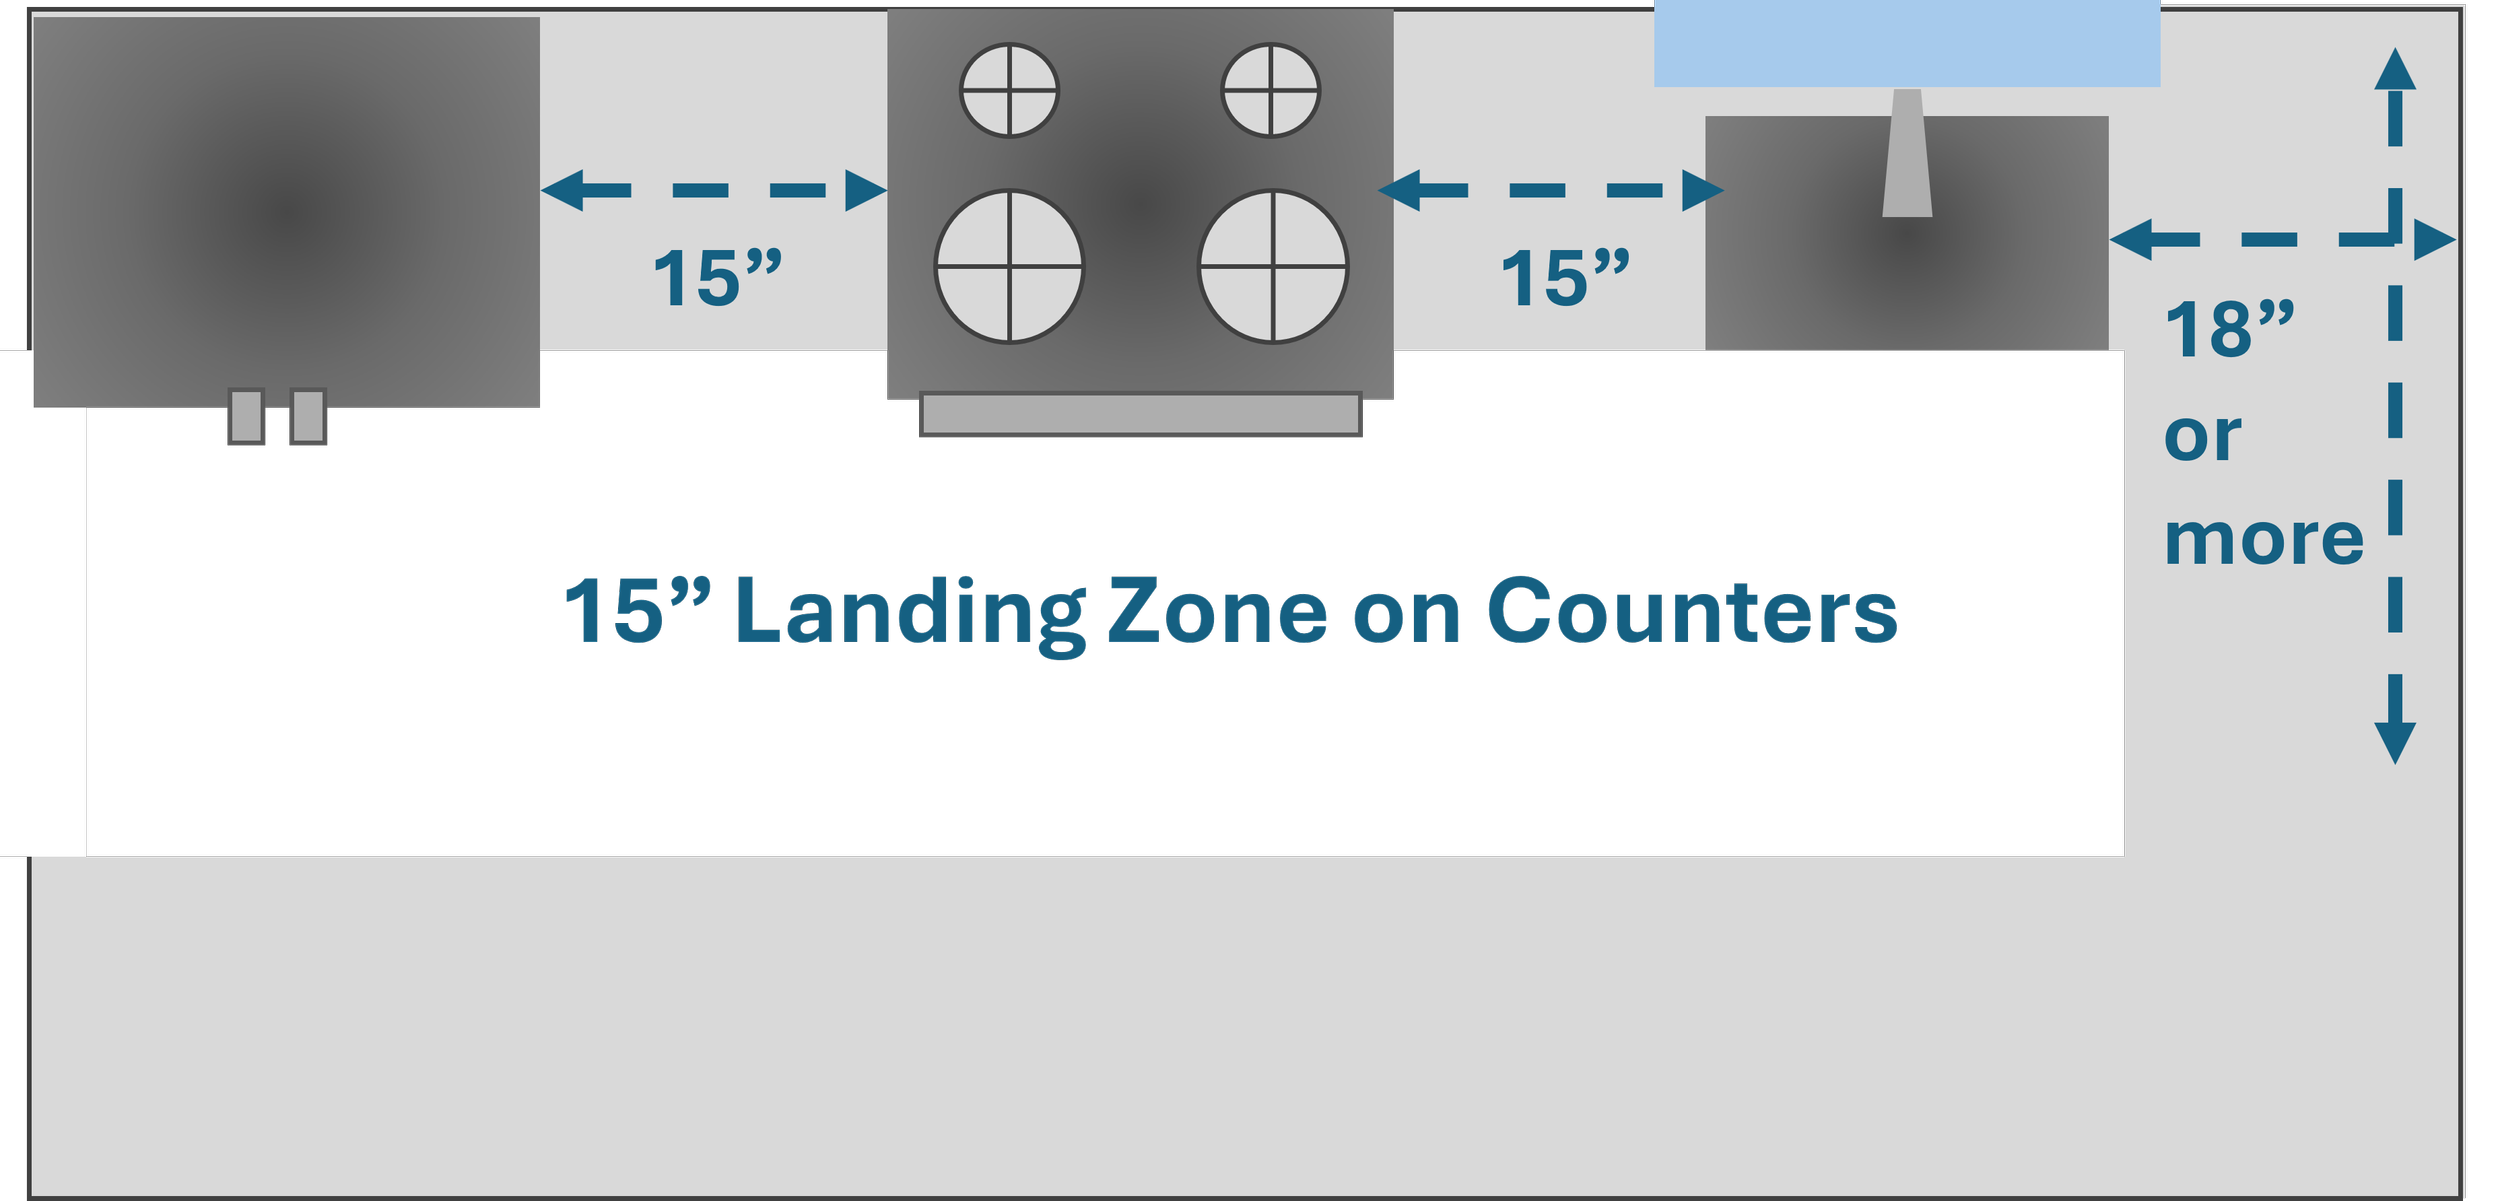
Why this matters: Without landing zones, you're constantly turning, reaching across the galley, or setting stuff on the stove because there's nowhere else to put it. This is where most galley kitchens fail.
Tip: If you’re in the planning stages of your galley kitchen design, think a lot about where you’re going to put down bags of groceries, or how much time and effort it will take to prepare a weekday meal. Efficiency of movement is important in small kitchens and some counter space, especially in those landing zones, will make a HUGE difference.
Clearance #3: The Door Swing Test
Every door, drawer, and appliance door needs to open fully without blocking the walkway or hitting something across from it.
Common failures:
Fridge door swings into the sink area (blocks sink use)
Dishwasher door opens and blocks the entire walkway
Oven door extends across the galley and hits the opposite cabinet
Lower cabinet doors hit each other when opened simultaneously
Tip: If your fridge door is the problem, see if you can reverse the door swing. Most fridges have this capability. It's a 30-minute fix that solves years of frustration.
The Work Sequence: Arranging Your Galley for How You Actually Cook
Again, let’s forget the work triangle. In a galley kitchen, function comes from linear sequence. Here's the order that works:
The Ideal Galley Sequence: Fridge → Prep → Cook → Serve/Clean
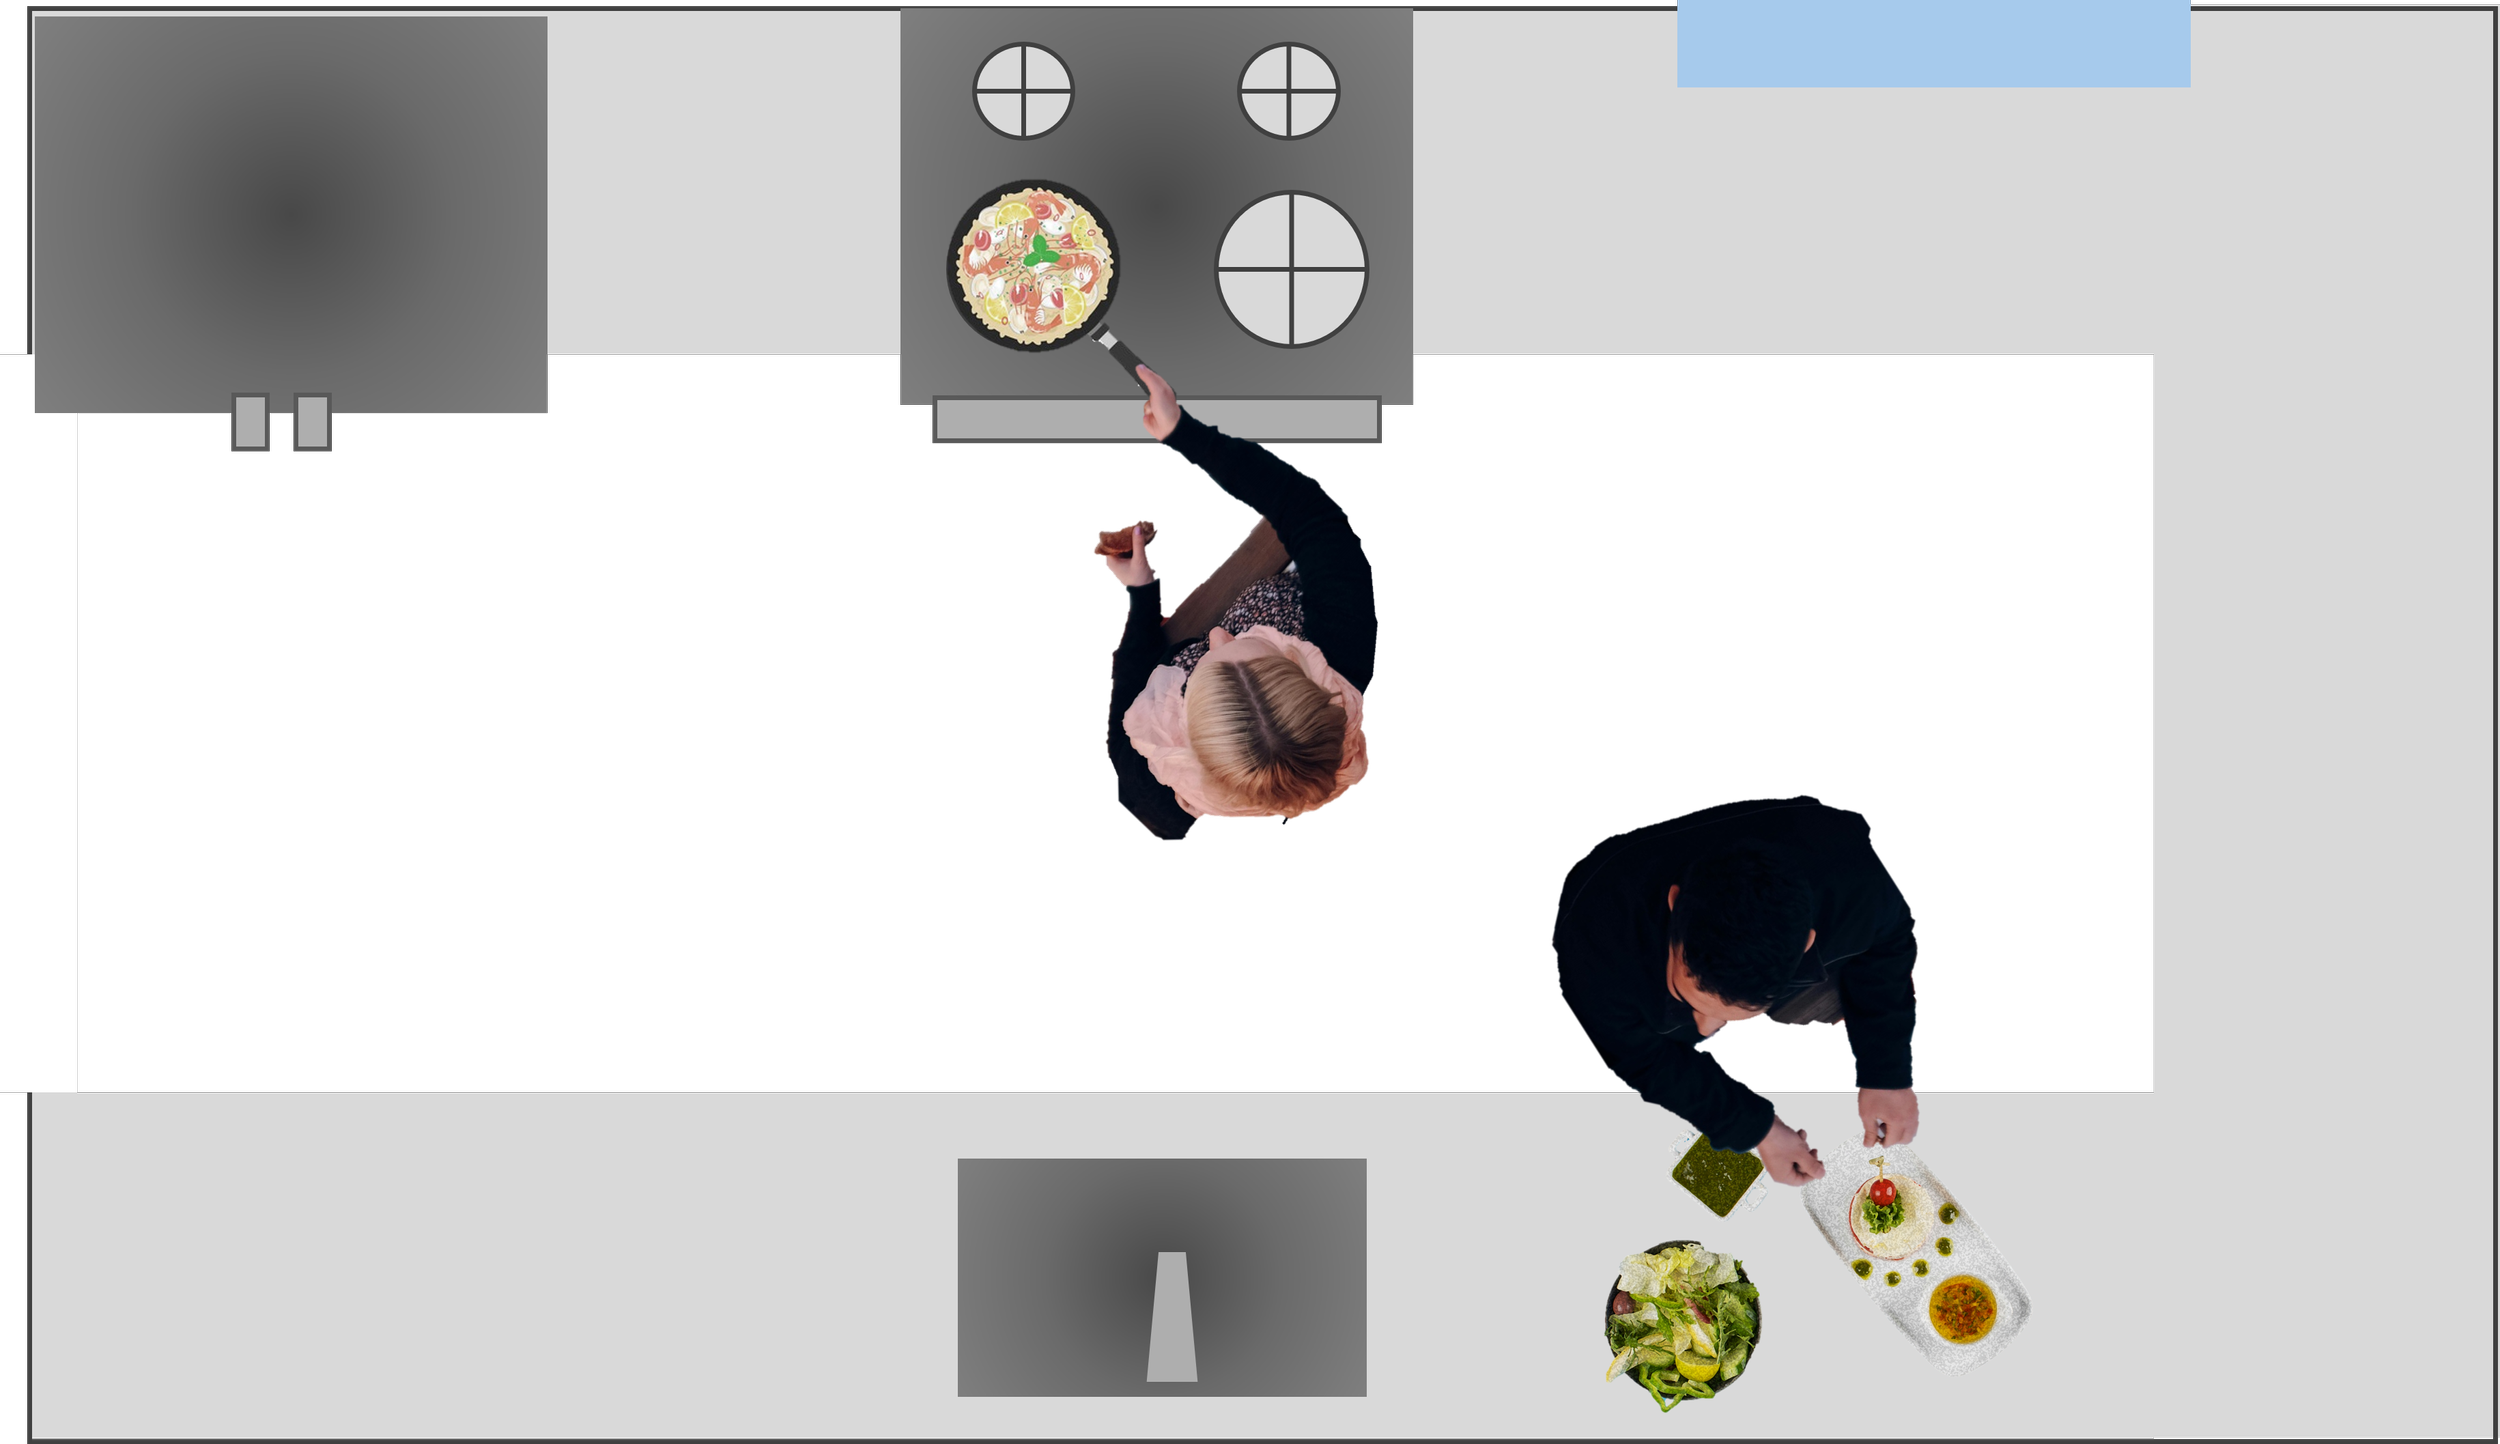
Think about how you cook: You get ingredients from the fridge, prep them on the counter, cook them on the stove, then serve or clean up at the sink. Your galley should follow this flow in a straight line.
Let’s make a quick pasta dish for a Tuesday night. Cooked pasta and sauce are in the fridge. Your pans are in the bottom cabinet, beside the fridge. You cook pasta, protein and/or veggies on the stovetop. You drain the pasta water leaving the colander in the sink. Then you serve the pasta and sauce on a plate from the cabinet next to the sink. It’s all in a straight line and super functional.
Zone 1: The Cold Zone (Fridge End)
What goes here:
Refrigerator (ideally at the entrance end of the galley)
Pantry items or tall cabinet for dry goods
Coffee station (if you're a morning coffee person)
Grocery unloading zone (15-inch counter beside fridge)
Why this works: Fridge at the entrance means you can grab food and go without walking through the entire galley. It also means groceries get unloaded at the first stop, not carried through the whole kitchen.
Zone 2: The Prep Zone (Middle Section)
What goes here:
• Maximum uninterrupted counter space (36-48 inches ideal)
Knife block and cutting boards
Mixing bowls stored in cabinets below
Most-used spices and oils within arm's reach
Trash/compost access (pull-out drawer or nearby)
Critical rule: This counter space must be UNINTERRUPTED. No microwave, no dish rack, no appliances. This is your workspace. Protect it!
Zone 3: The Cook Zone (Stove)
What goes here:
Stove/cooktop (with 15-inch landing zone on at least one side)
Pots and pans in the cabinets directly below
Cooking utensils in a drawer or crock on counter
Potholders and trivets within reach
Oven mitts hung nearby
Haider Syed
Why placement matters: Your stove should NOT be at the end of the galley near a doorway. Hot pots + traffic = dangerous. Mid-galley or toward the far end works better.
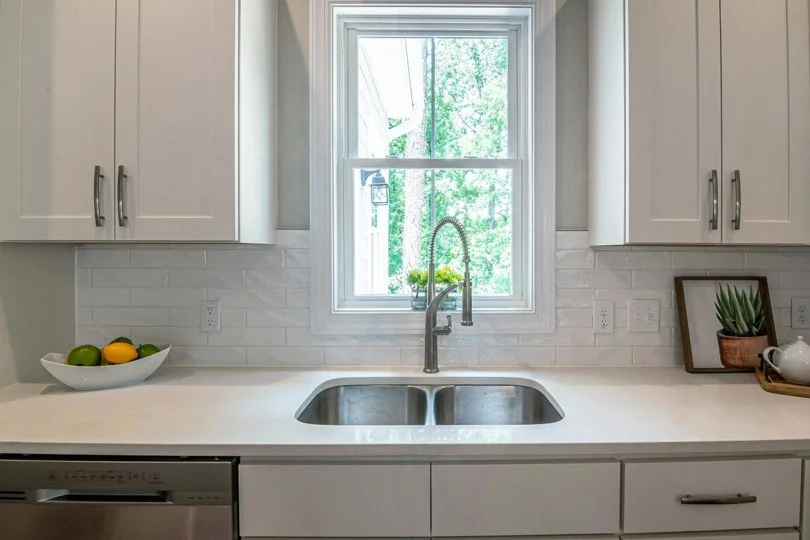
Zone 4: The Clean Zone (Sink End)
What goes here:
Sink (ideally centered under a window if you have one)
Dishwasher immediately beside sink
Dish drying area (18-inch counter space on other side of sink)
Everyday dishes in upper cabinet nearest dishwasher
Cleaning supplies under sink
Haider Syed
The dishwasher rule: Why should it open next to the sink, not farther away from it? If it opens away, you're walking around an open dishwasher door to load it. Small detail, massive frustration.
Before & After: 4 Real Galley Kitchen Layouts That Actually Work
Let me show you how these principles play out in real kitchens. These are actual client transformations—not aspirational magazine spreads.
Layout #1: The 'Broken Sequence' Fix
BEFORE:
Left wall: Fridge at entrance, then 20 inches of counter, then sink, then stove at far end
Right wall: Pantry cabinet, dishwasher, then 36 inches of counter space
Problem: Sequence was backwards (fridge → sink → stove), and the only prep space was on the opposite wall from where she cooked.
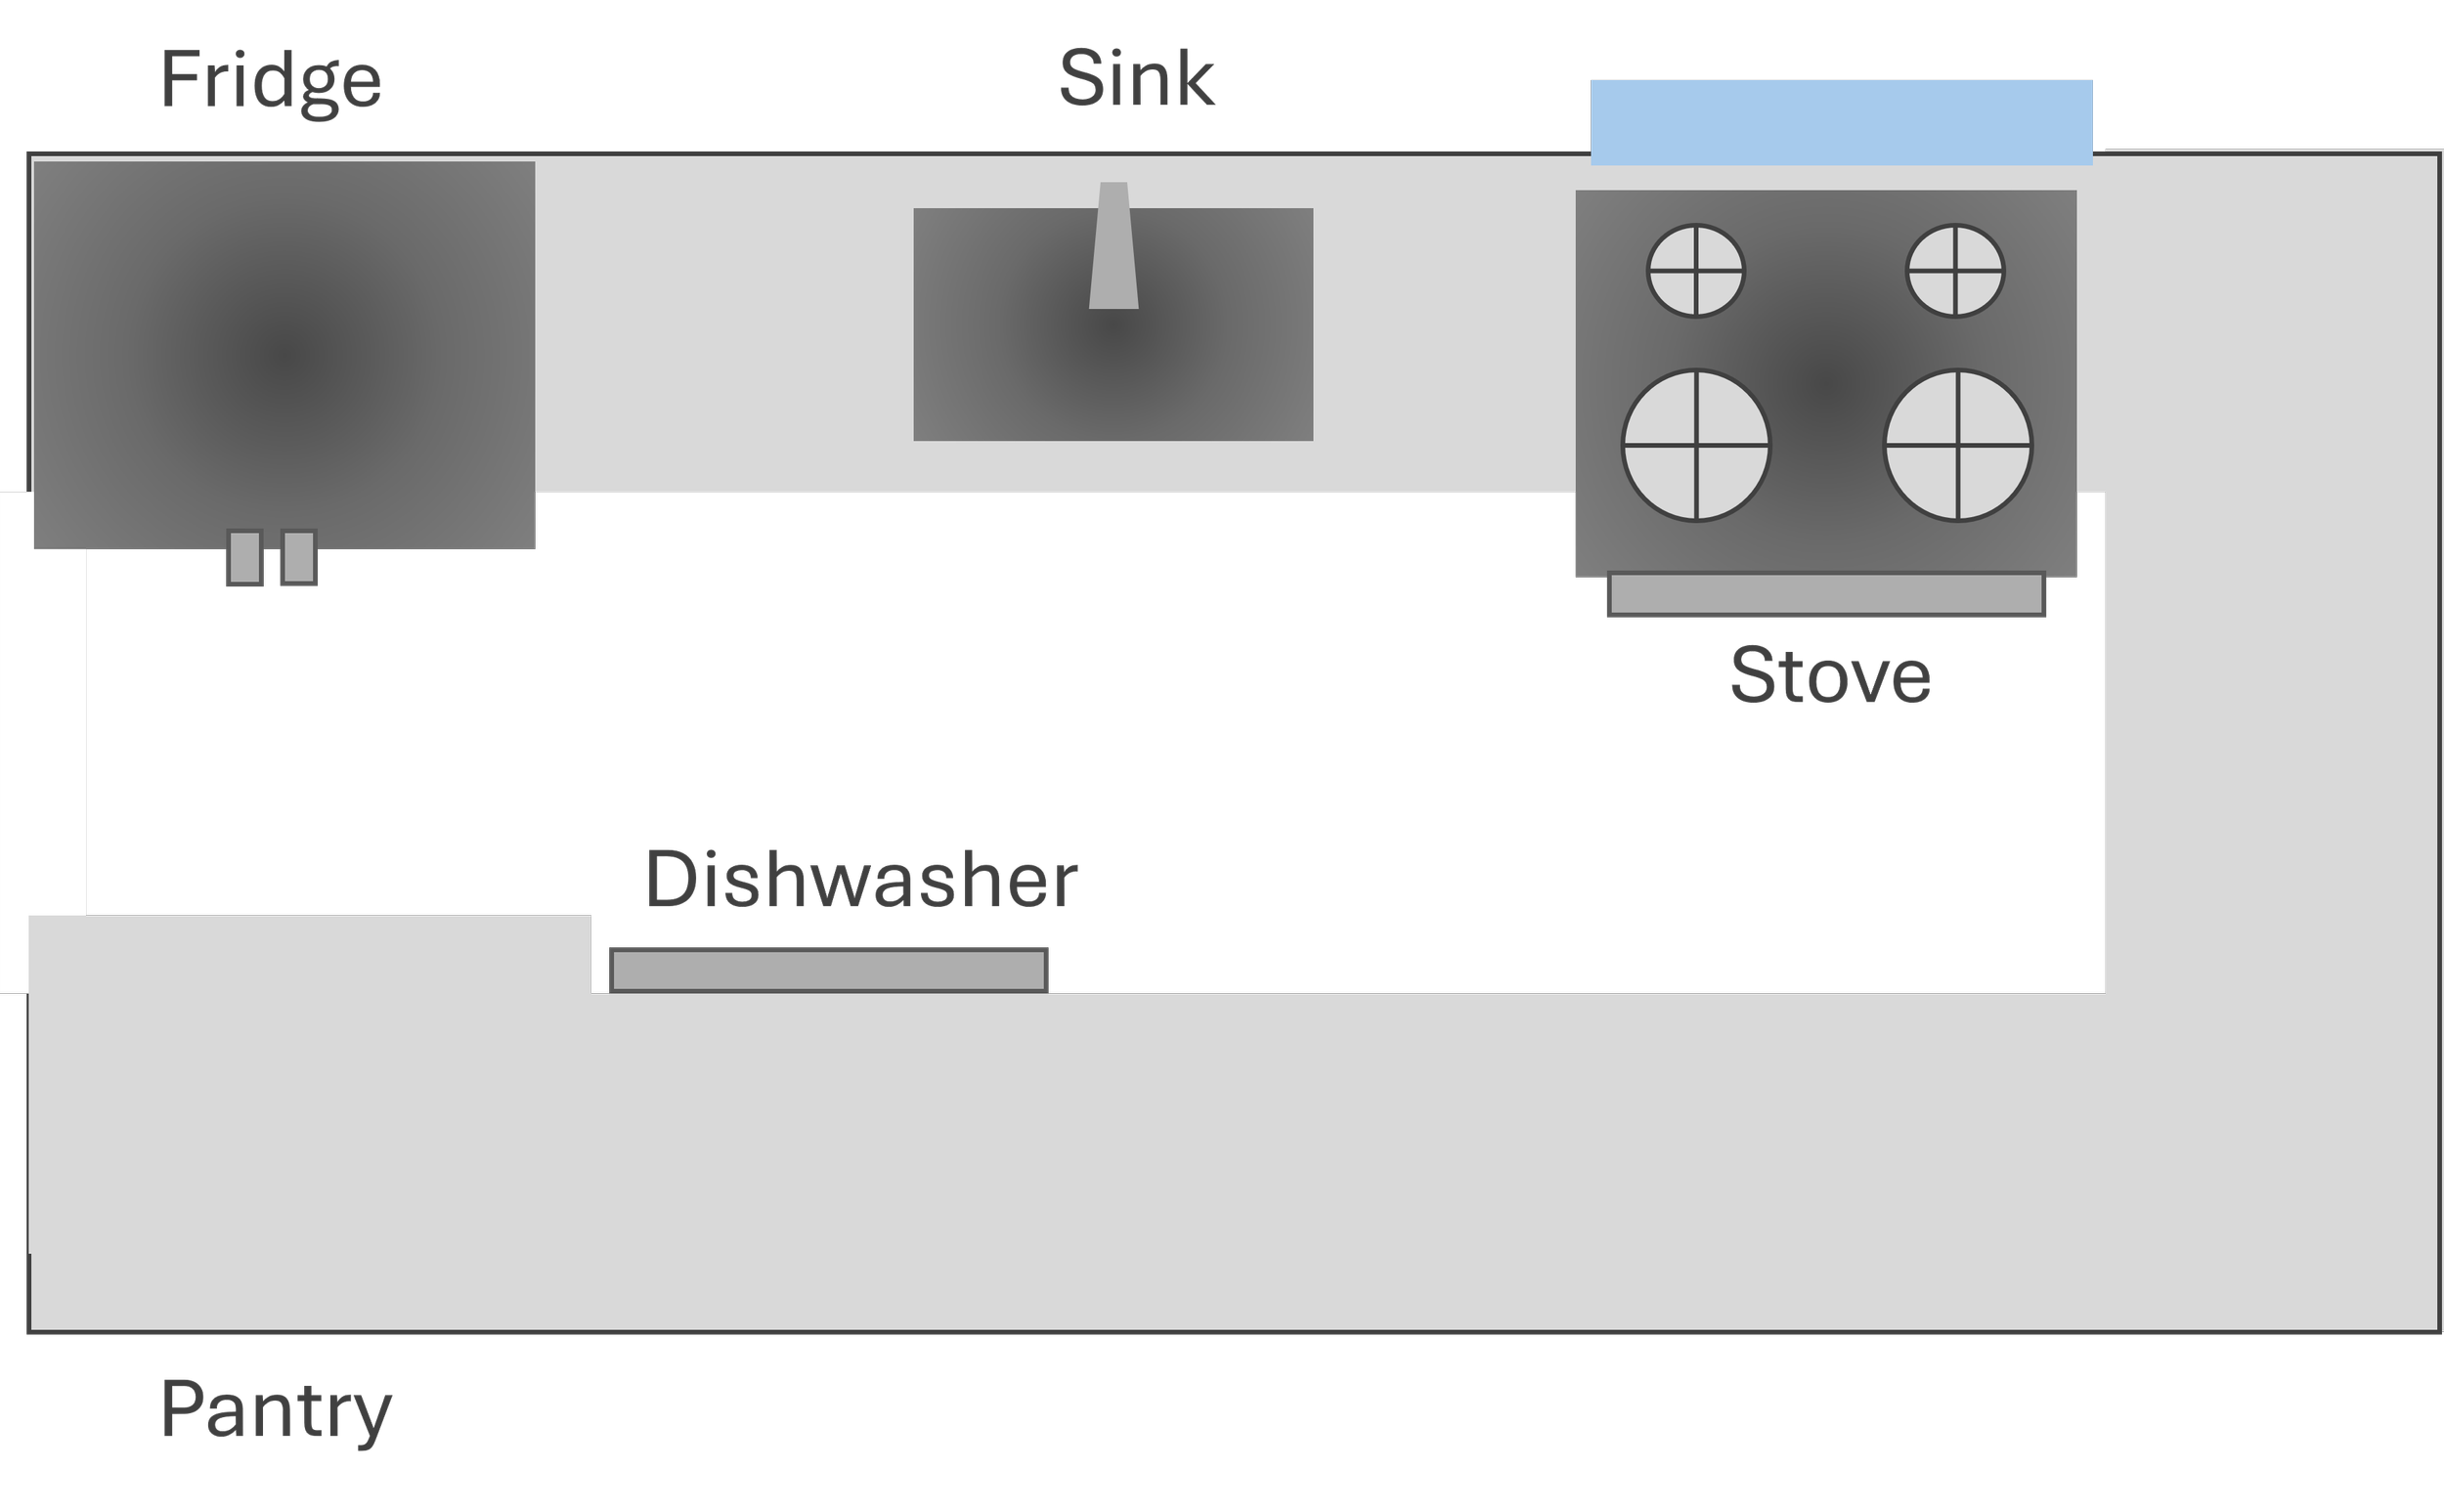
AFTER:
Left wall: Fridge at entrance, then 36 inches of prep counter, then stove
Right wall: Pantry cabinet, then sink with 18 inches on each side, dishwasher at far end
Solution: Swapped sink and stove positions. Now the sequence flows: fridge → prep (same wall) → stove (same wall) → sink (opposite wall) → dishwasher. Linear flow achieved.
The Change: Required a plumber to move sink 6 feet. Cost $800. Transformed how the kitchen functioned. Sometimes a small renovation is worth it.
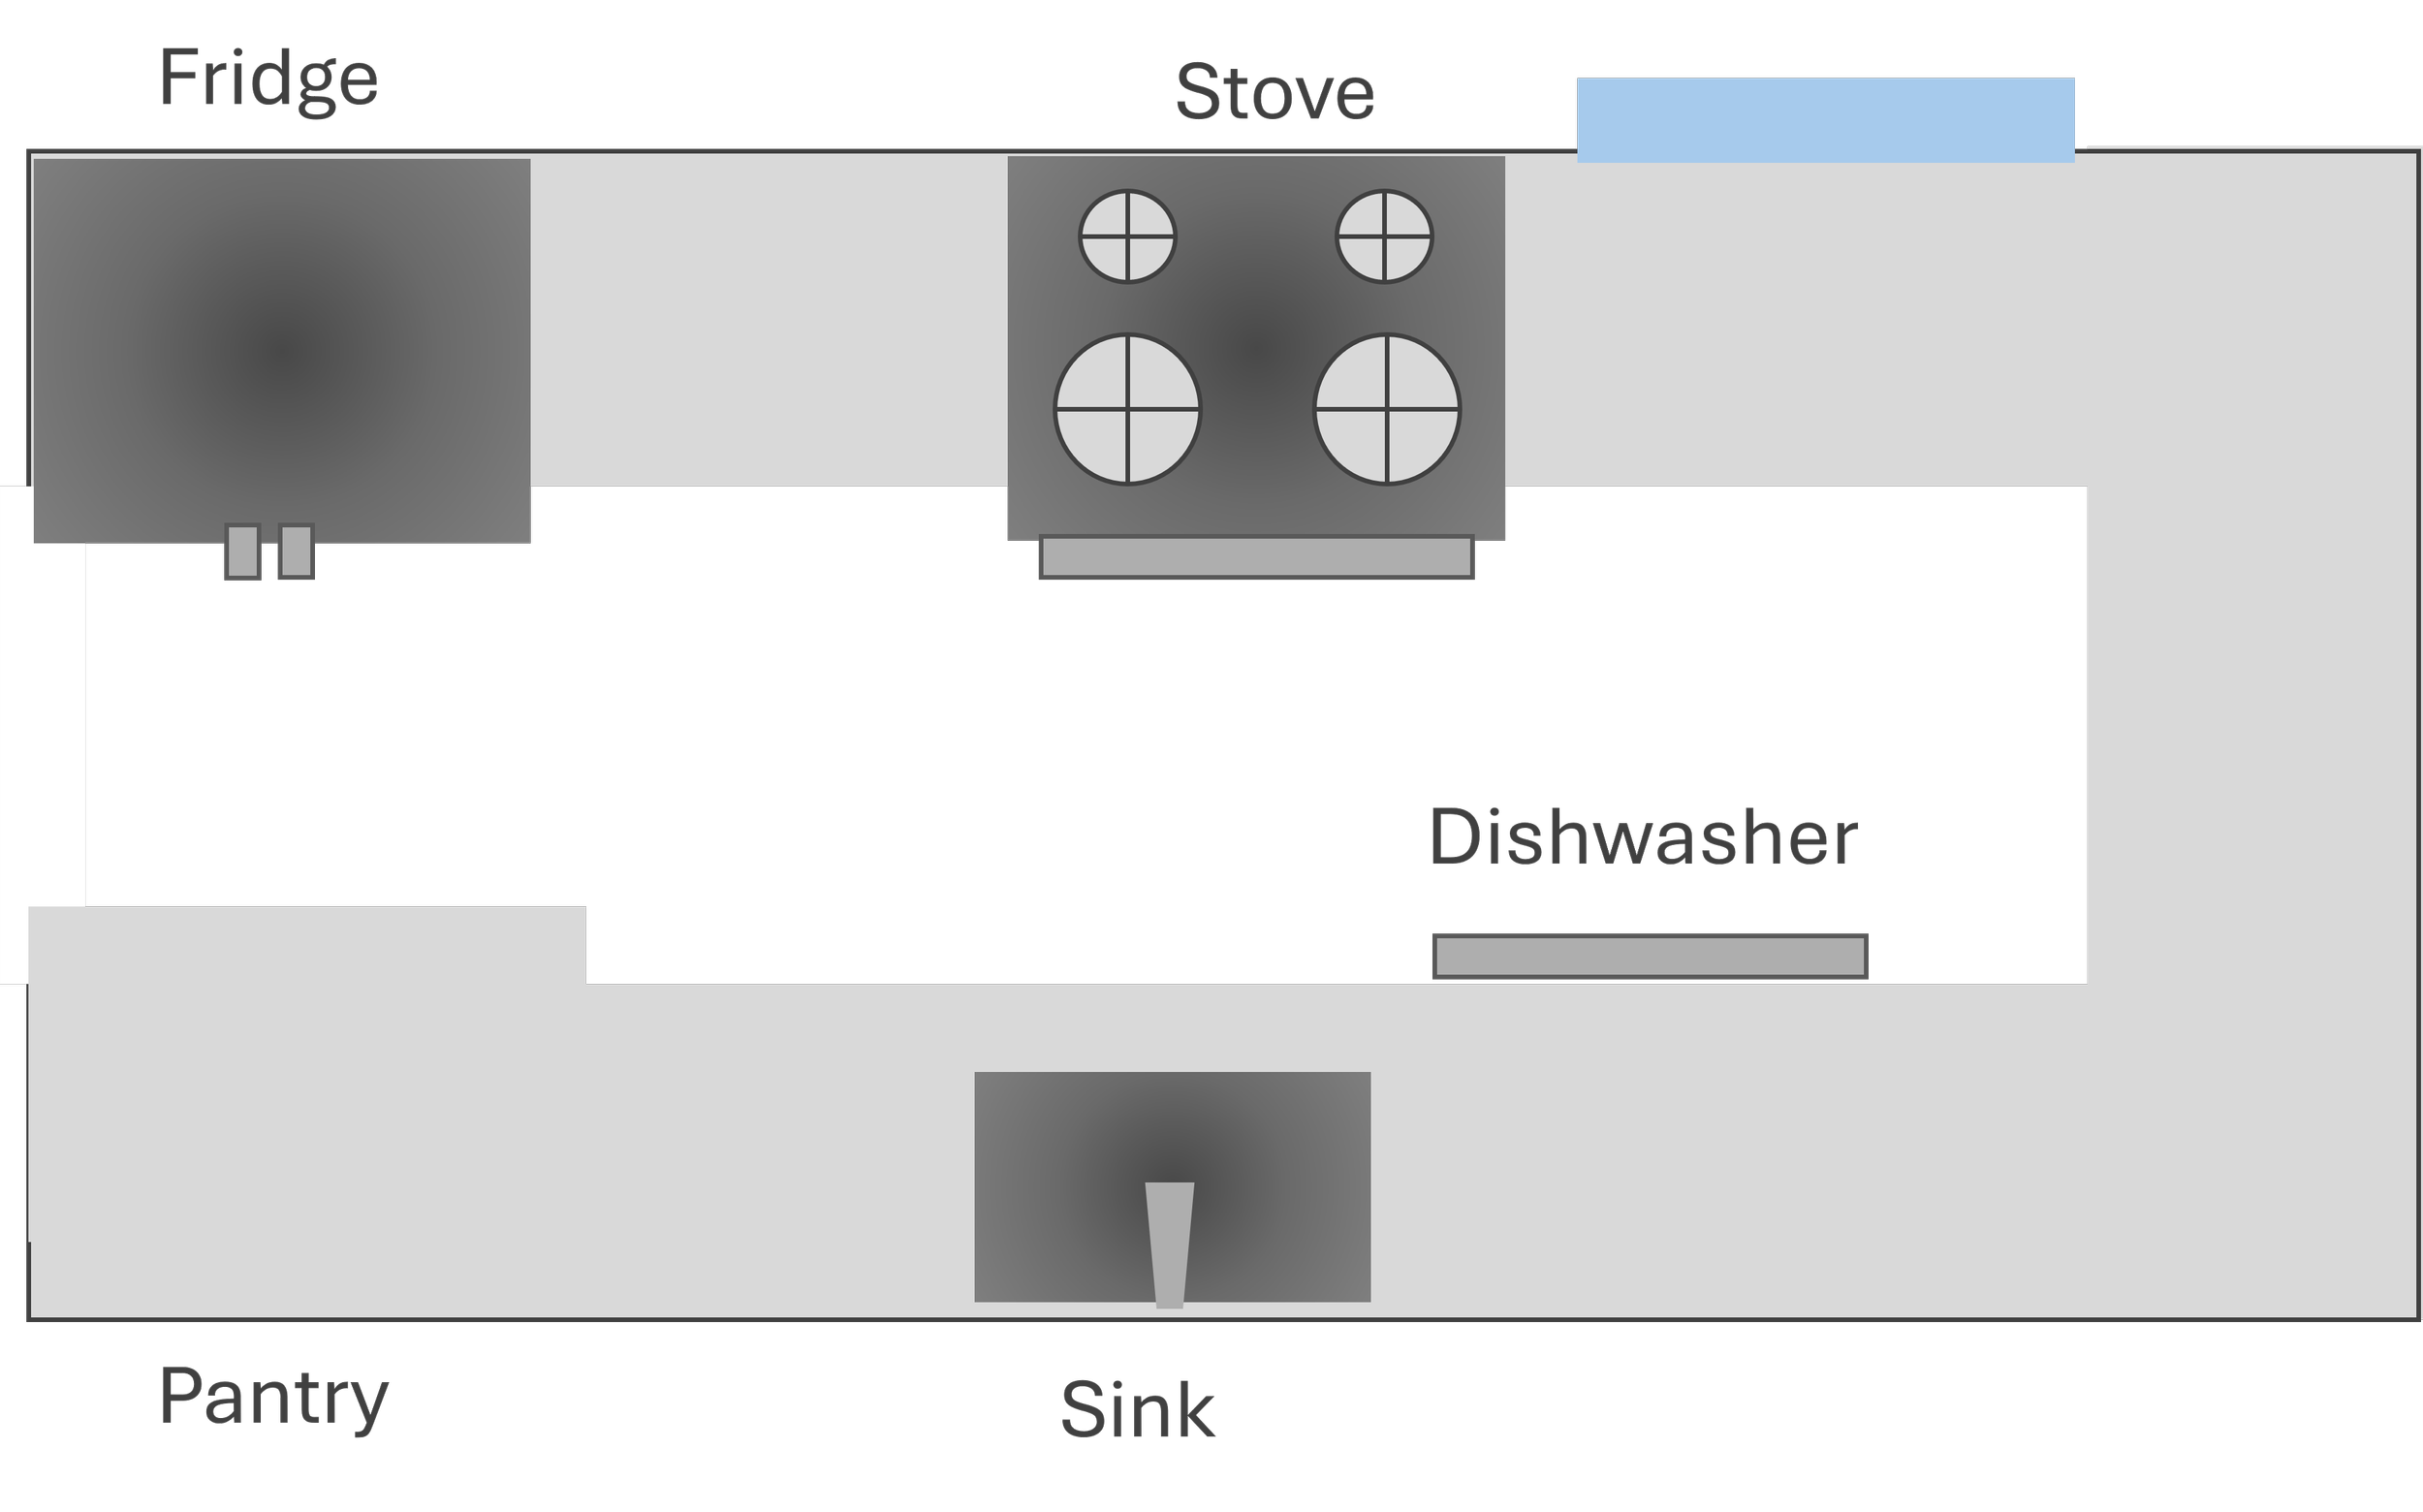
Layout #2: The 'No Landing Zone' Disaster
BEFORE:
Left wall: Fridge, then stove IMMEDIATELY next to fridge (zero counter between), then sink
Right wall: 60 inches of continuous counter space (with microwave taking up 18 inches)
Problem: No counter beside the stove meant every pot went from stove to across-the-galley to set down. Dangerous with hot food.
AFTER:
Left wall: Fridge, then 18-inch counter, then stove, then sink
Right wall: Microwave moved to above-stove position (opposite wall), creating 60 inches of uninterrupted prep space
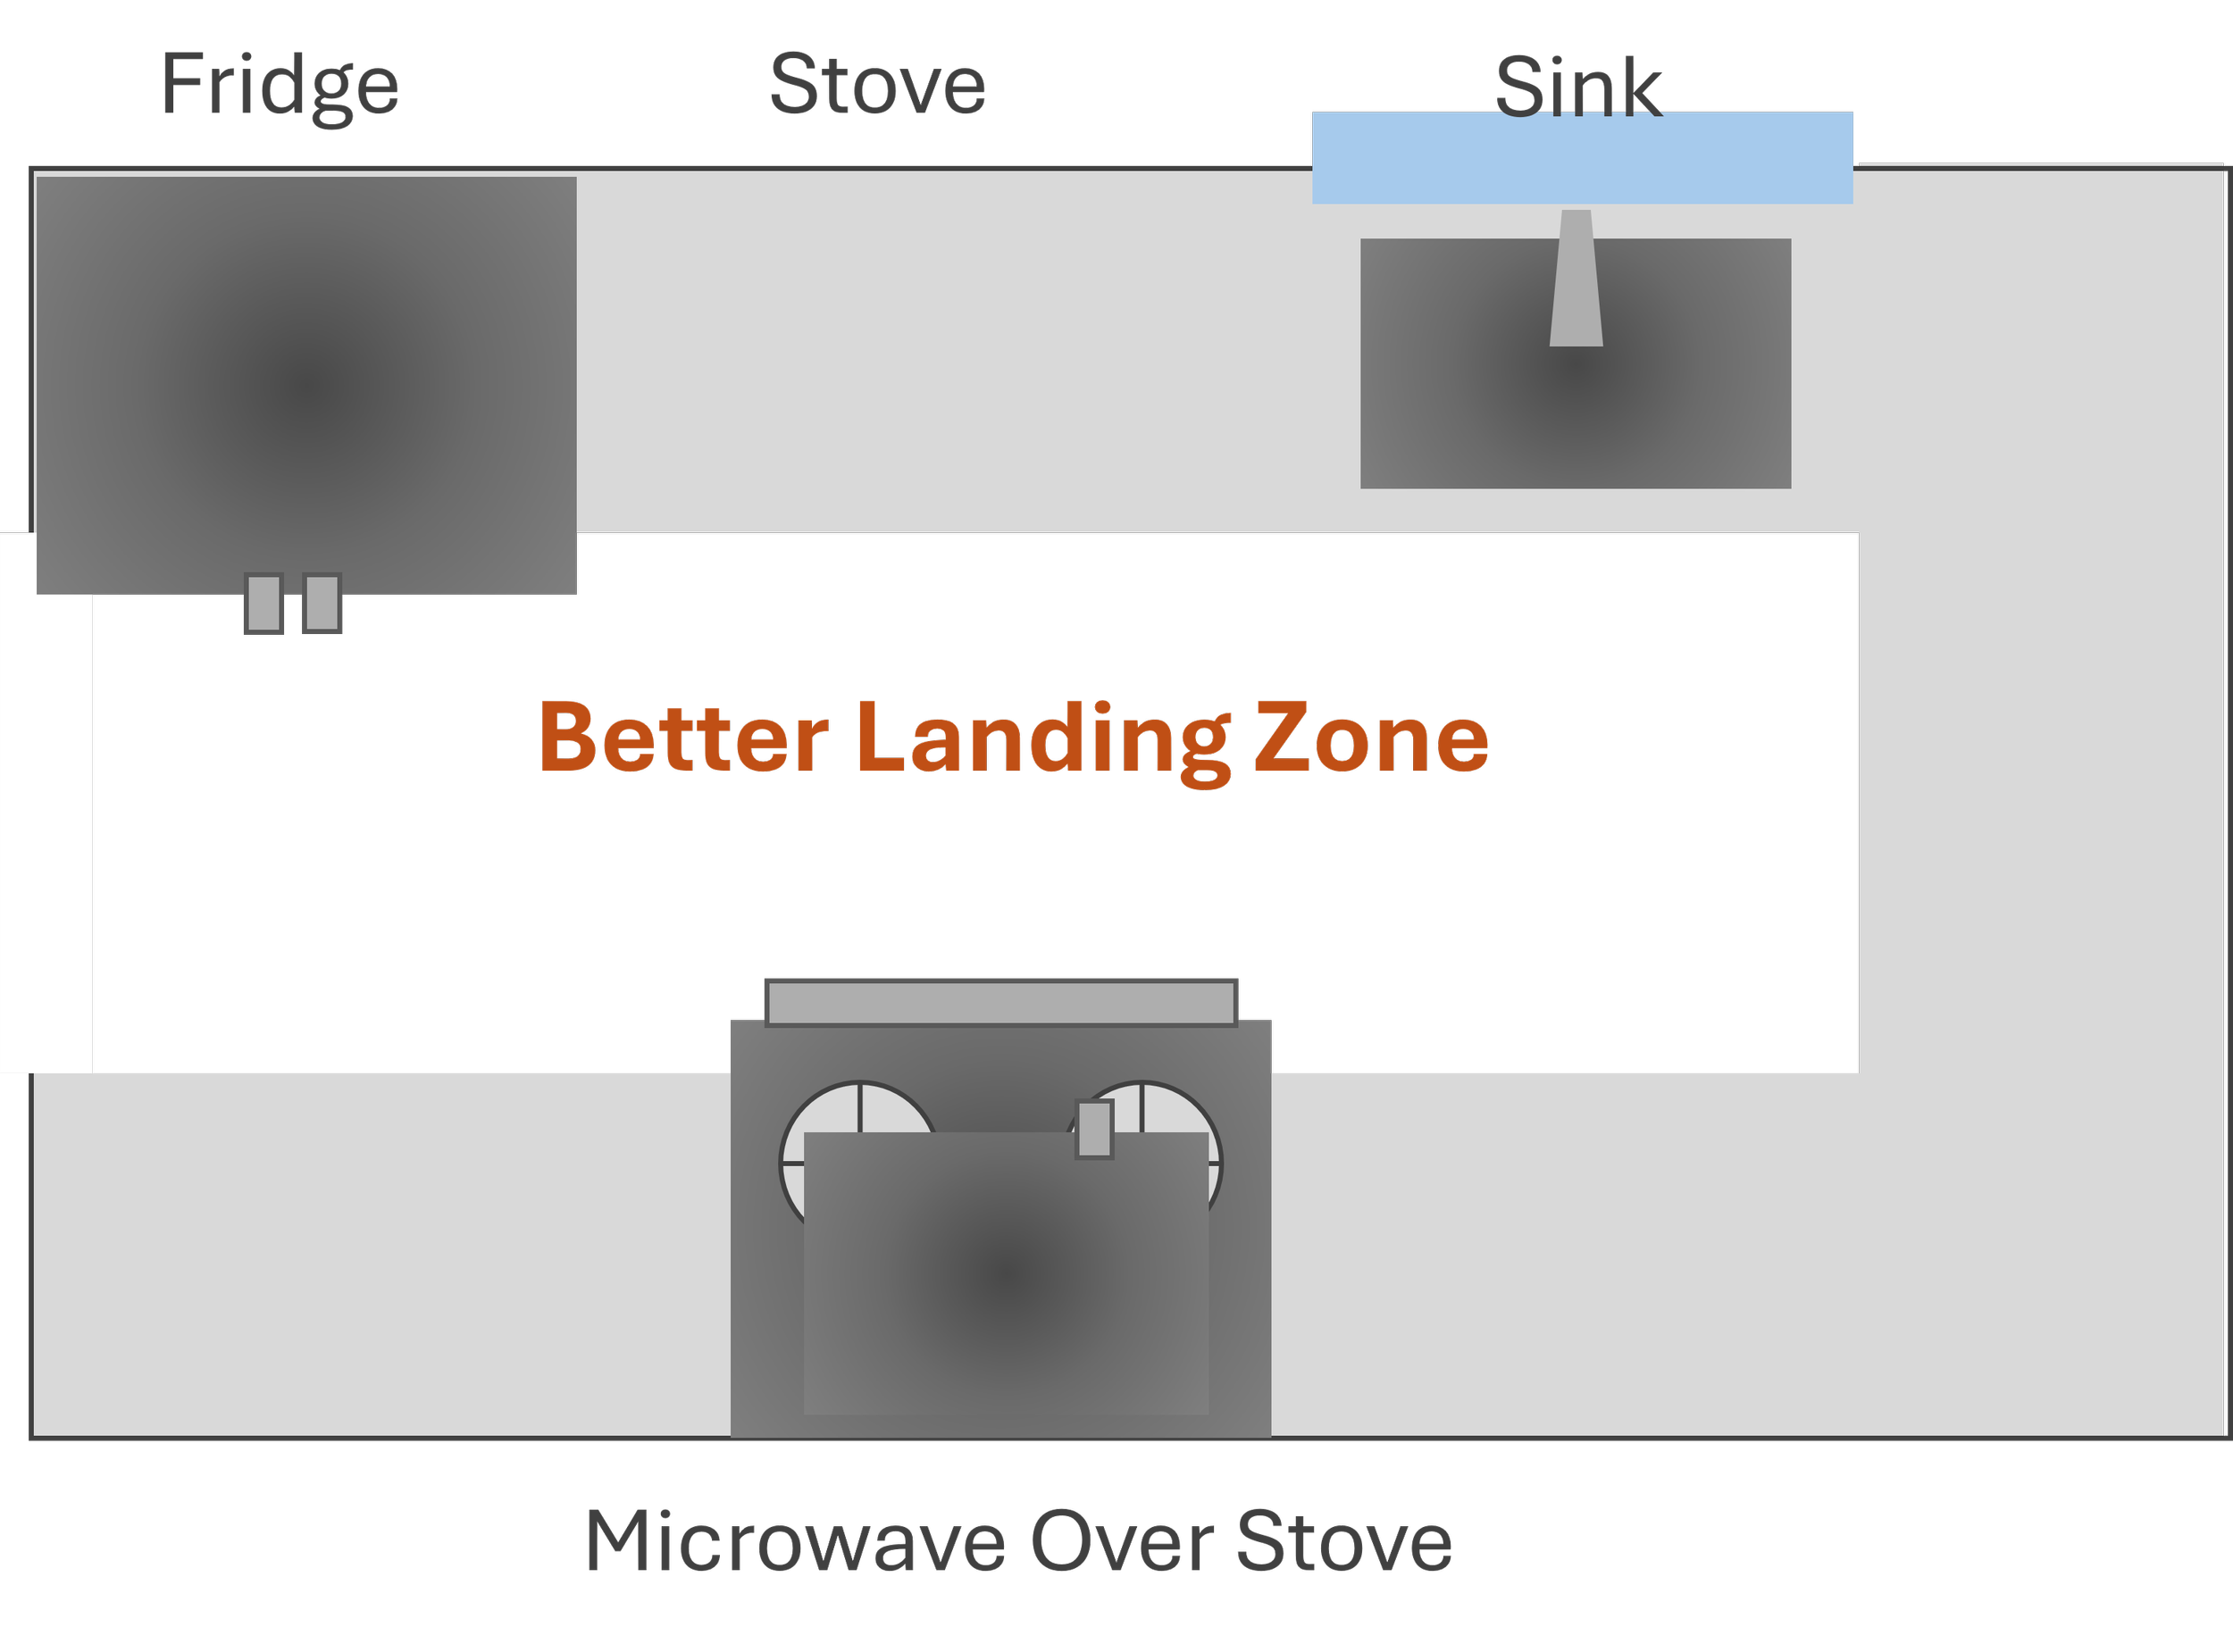
Solution: Moved microwave to over-the-range position (above the stove on the opposite wall). This created 18 inches between fridge and stove, AND opened up prep counter on the right wall.
The Change: $200 for an over-the-range microwave mount. Solved two problems: added landing zone + maximized prep counter.
Layout #3: The 'Traffic Jam' Kitchen
BEFORE:
Left wall: Fridge at entrance (door opens INTO galley), stove, then sink at far end
Right wall: Pantry, dishwasher, counter space
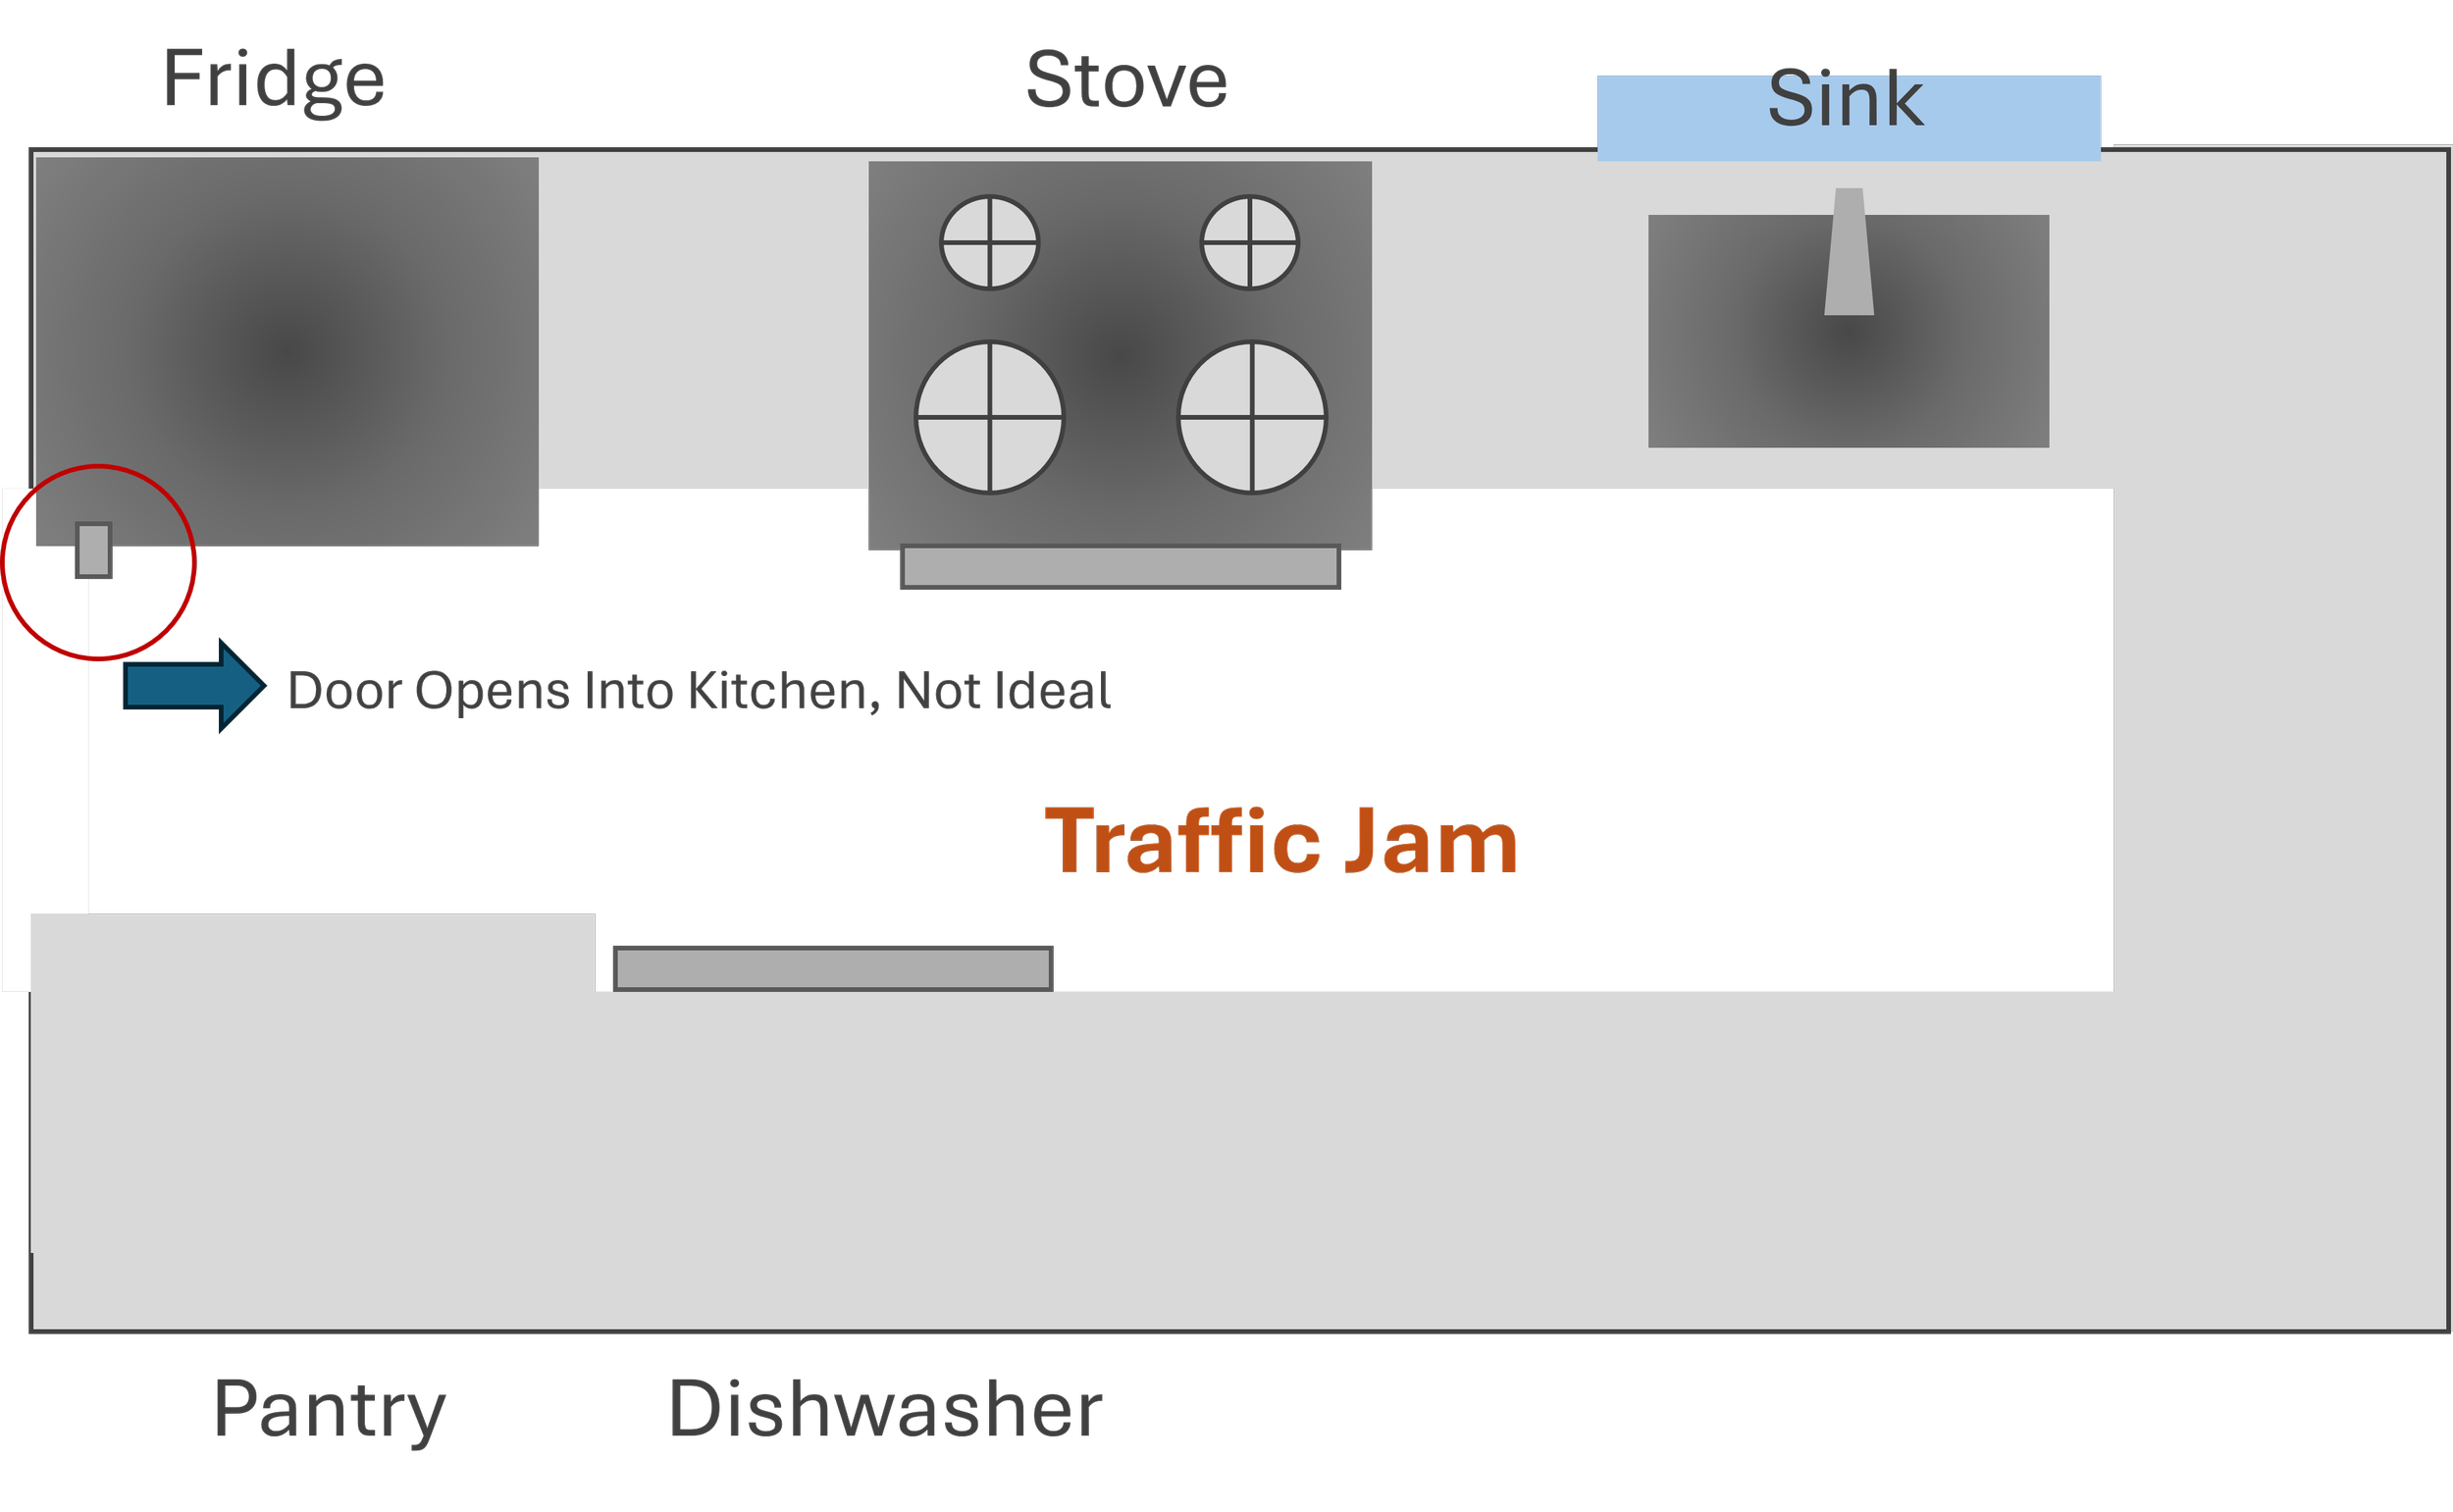
Problem: Fridge door opened into the galley walkway, blocking passage every time someone got food. In a busy family kitchen, this created constant traffic jams.
AFTER:
Left wall: Same layout BUT reversed the fridge door swing so it opens toward the wall, not into the galley
Right wall: No changes needed

Solution: Simply reversed the fridge door hinge. The fridge door now opens parallel to the wall, not into the walkway.
The Change: Free. Most people don't realize fridge doors can be reversed. Check your manual—this might solve your problem today.
Layout #4: The 'Everything's Crammed In' Problem
BEFORE:
Left wall: Fridge, 12-inch counter, stove, 10-inch counter, sink
Right wall: Dishwasher, pantry cabinet, 24 inches of counter (with coffee maker, toaster, knife block, dish rack)
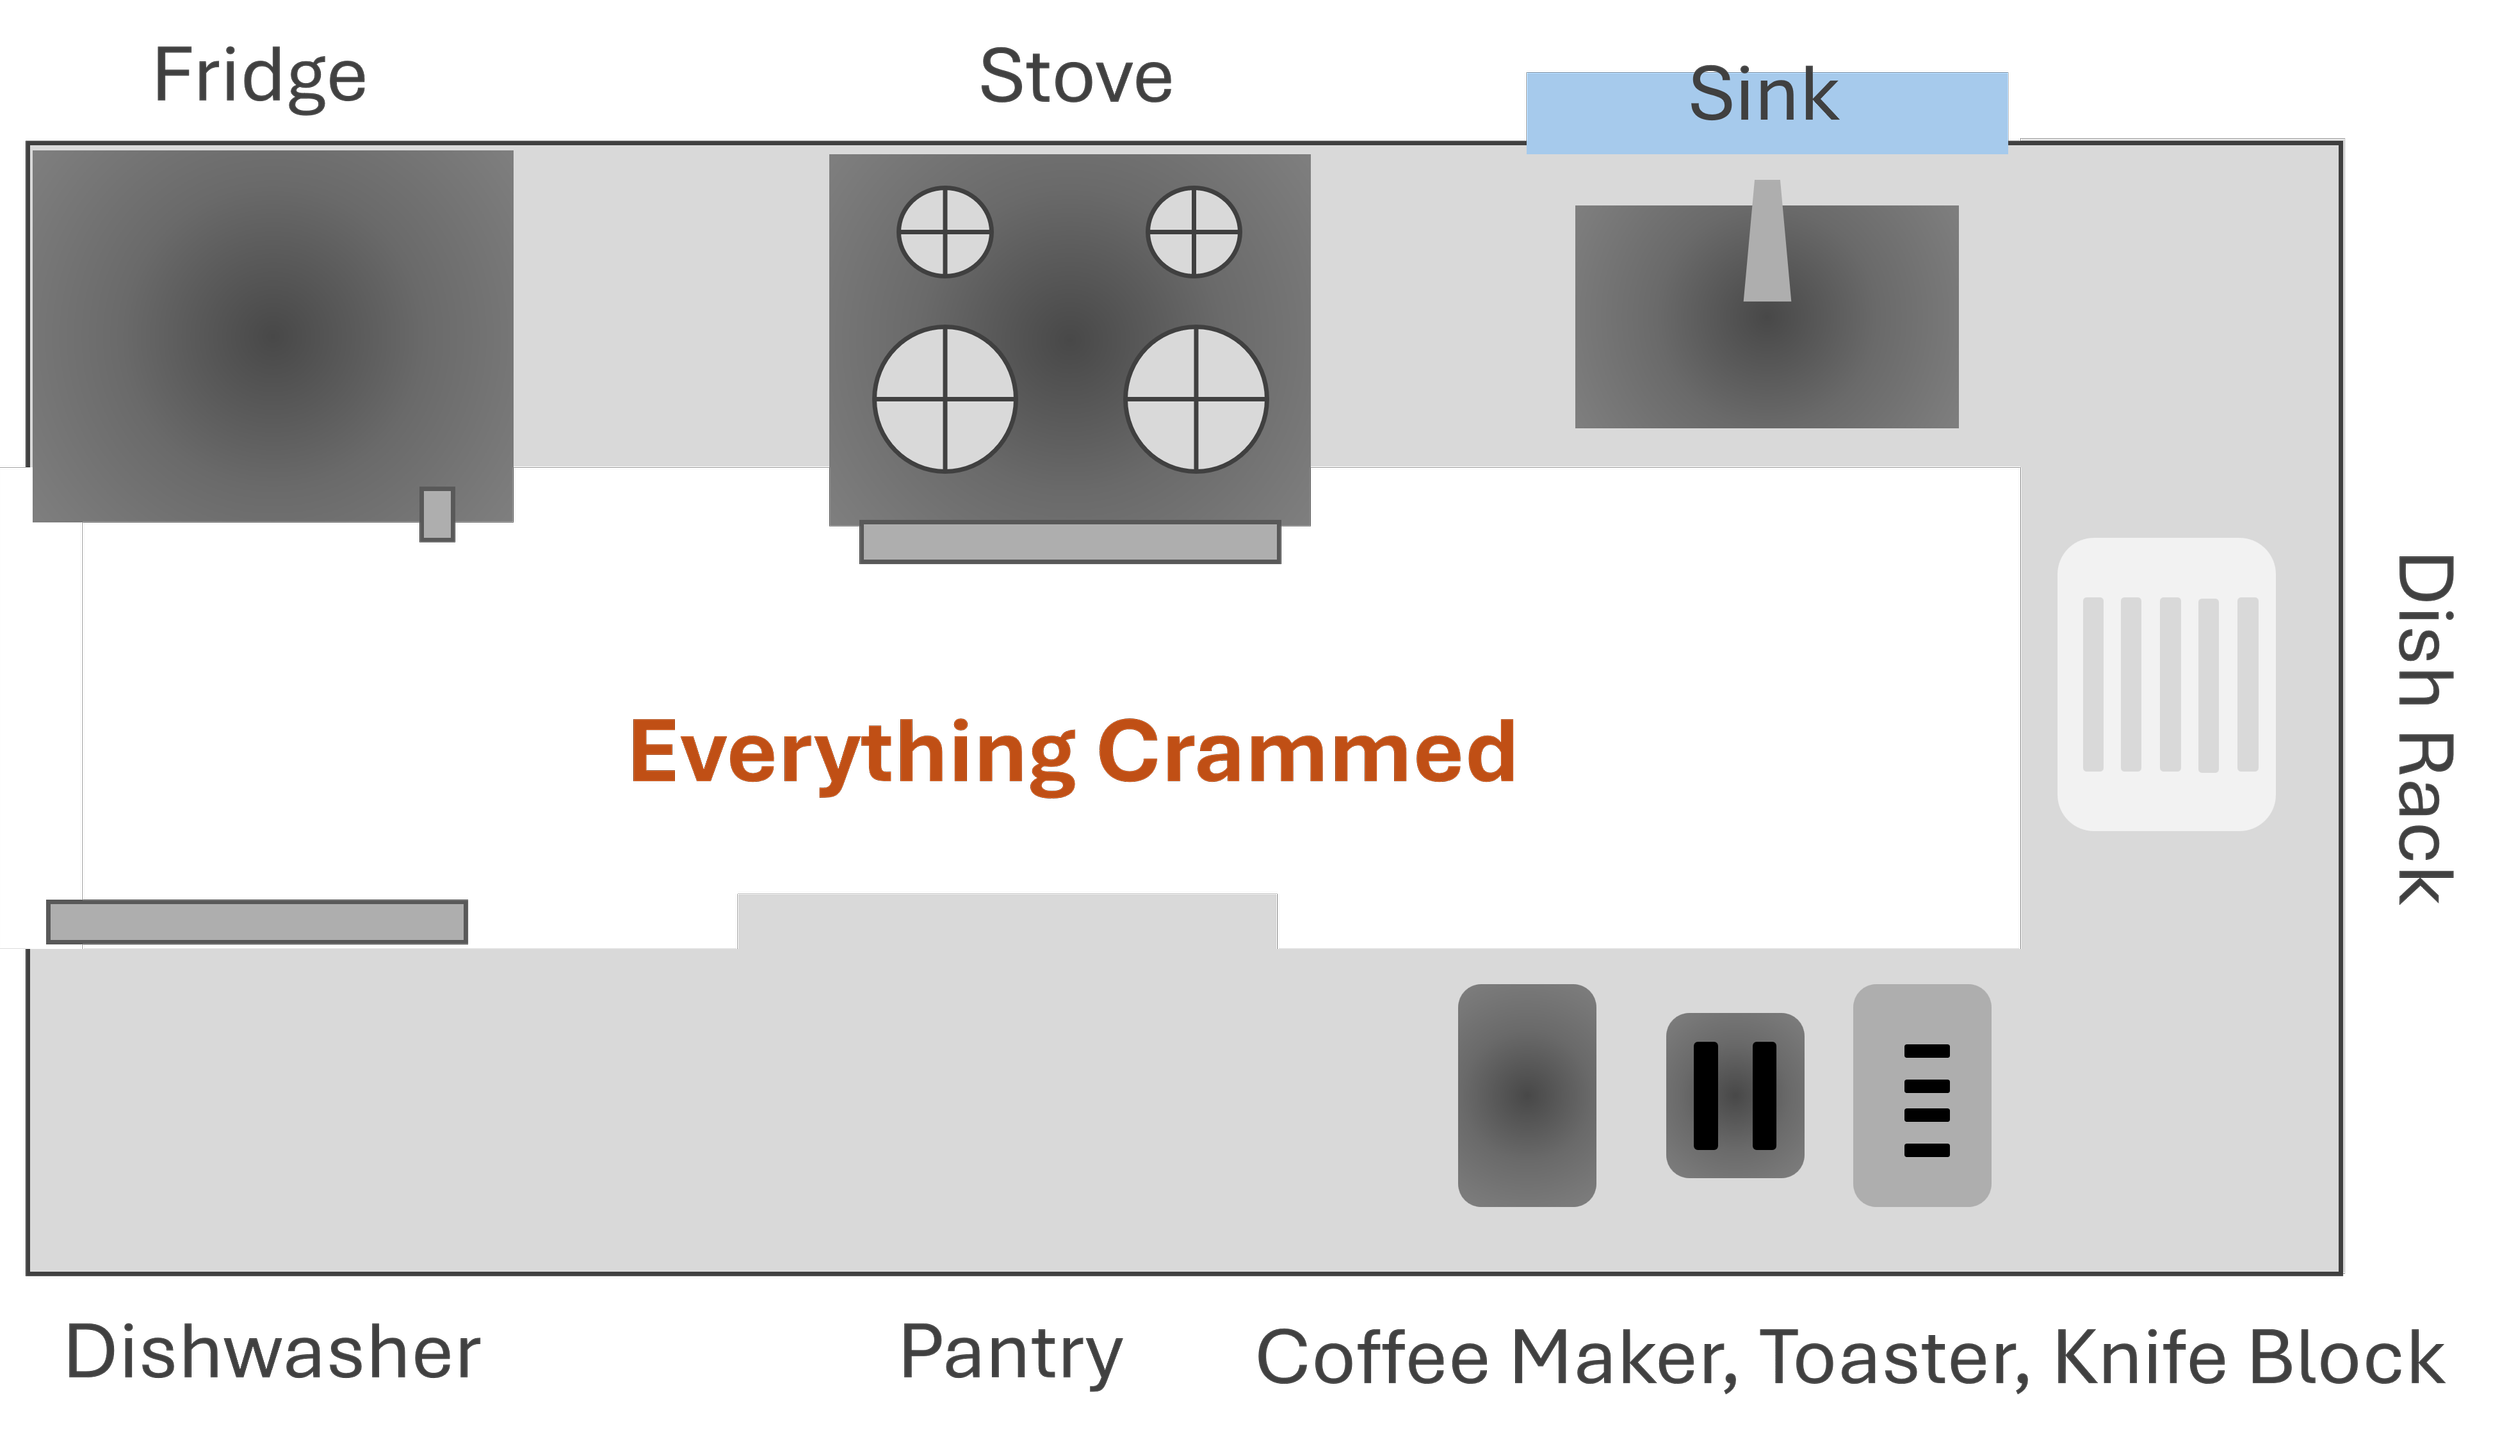
Problem: Tried to fit too much into a standard galley. No usable prep space because counters were either too short or covered in appliances.
AFTER:
Left wall: Fridge, 18-inch counter, stove, 18-inch counter, sink
Right wall: Dishwasher, pantry, 36 inches of CLEAR counter (all small appliances removed)
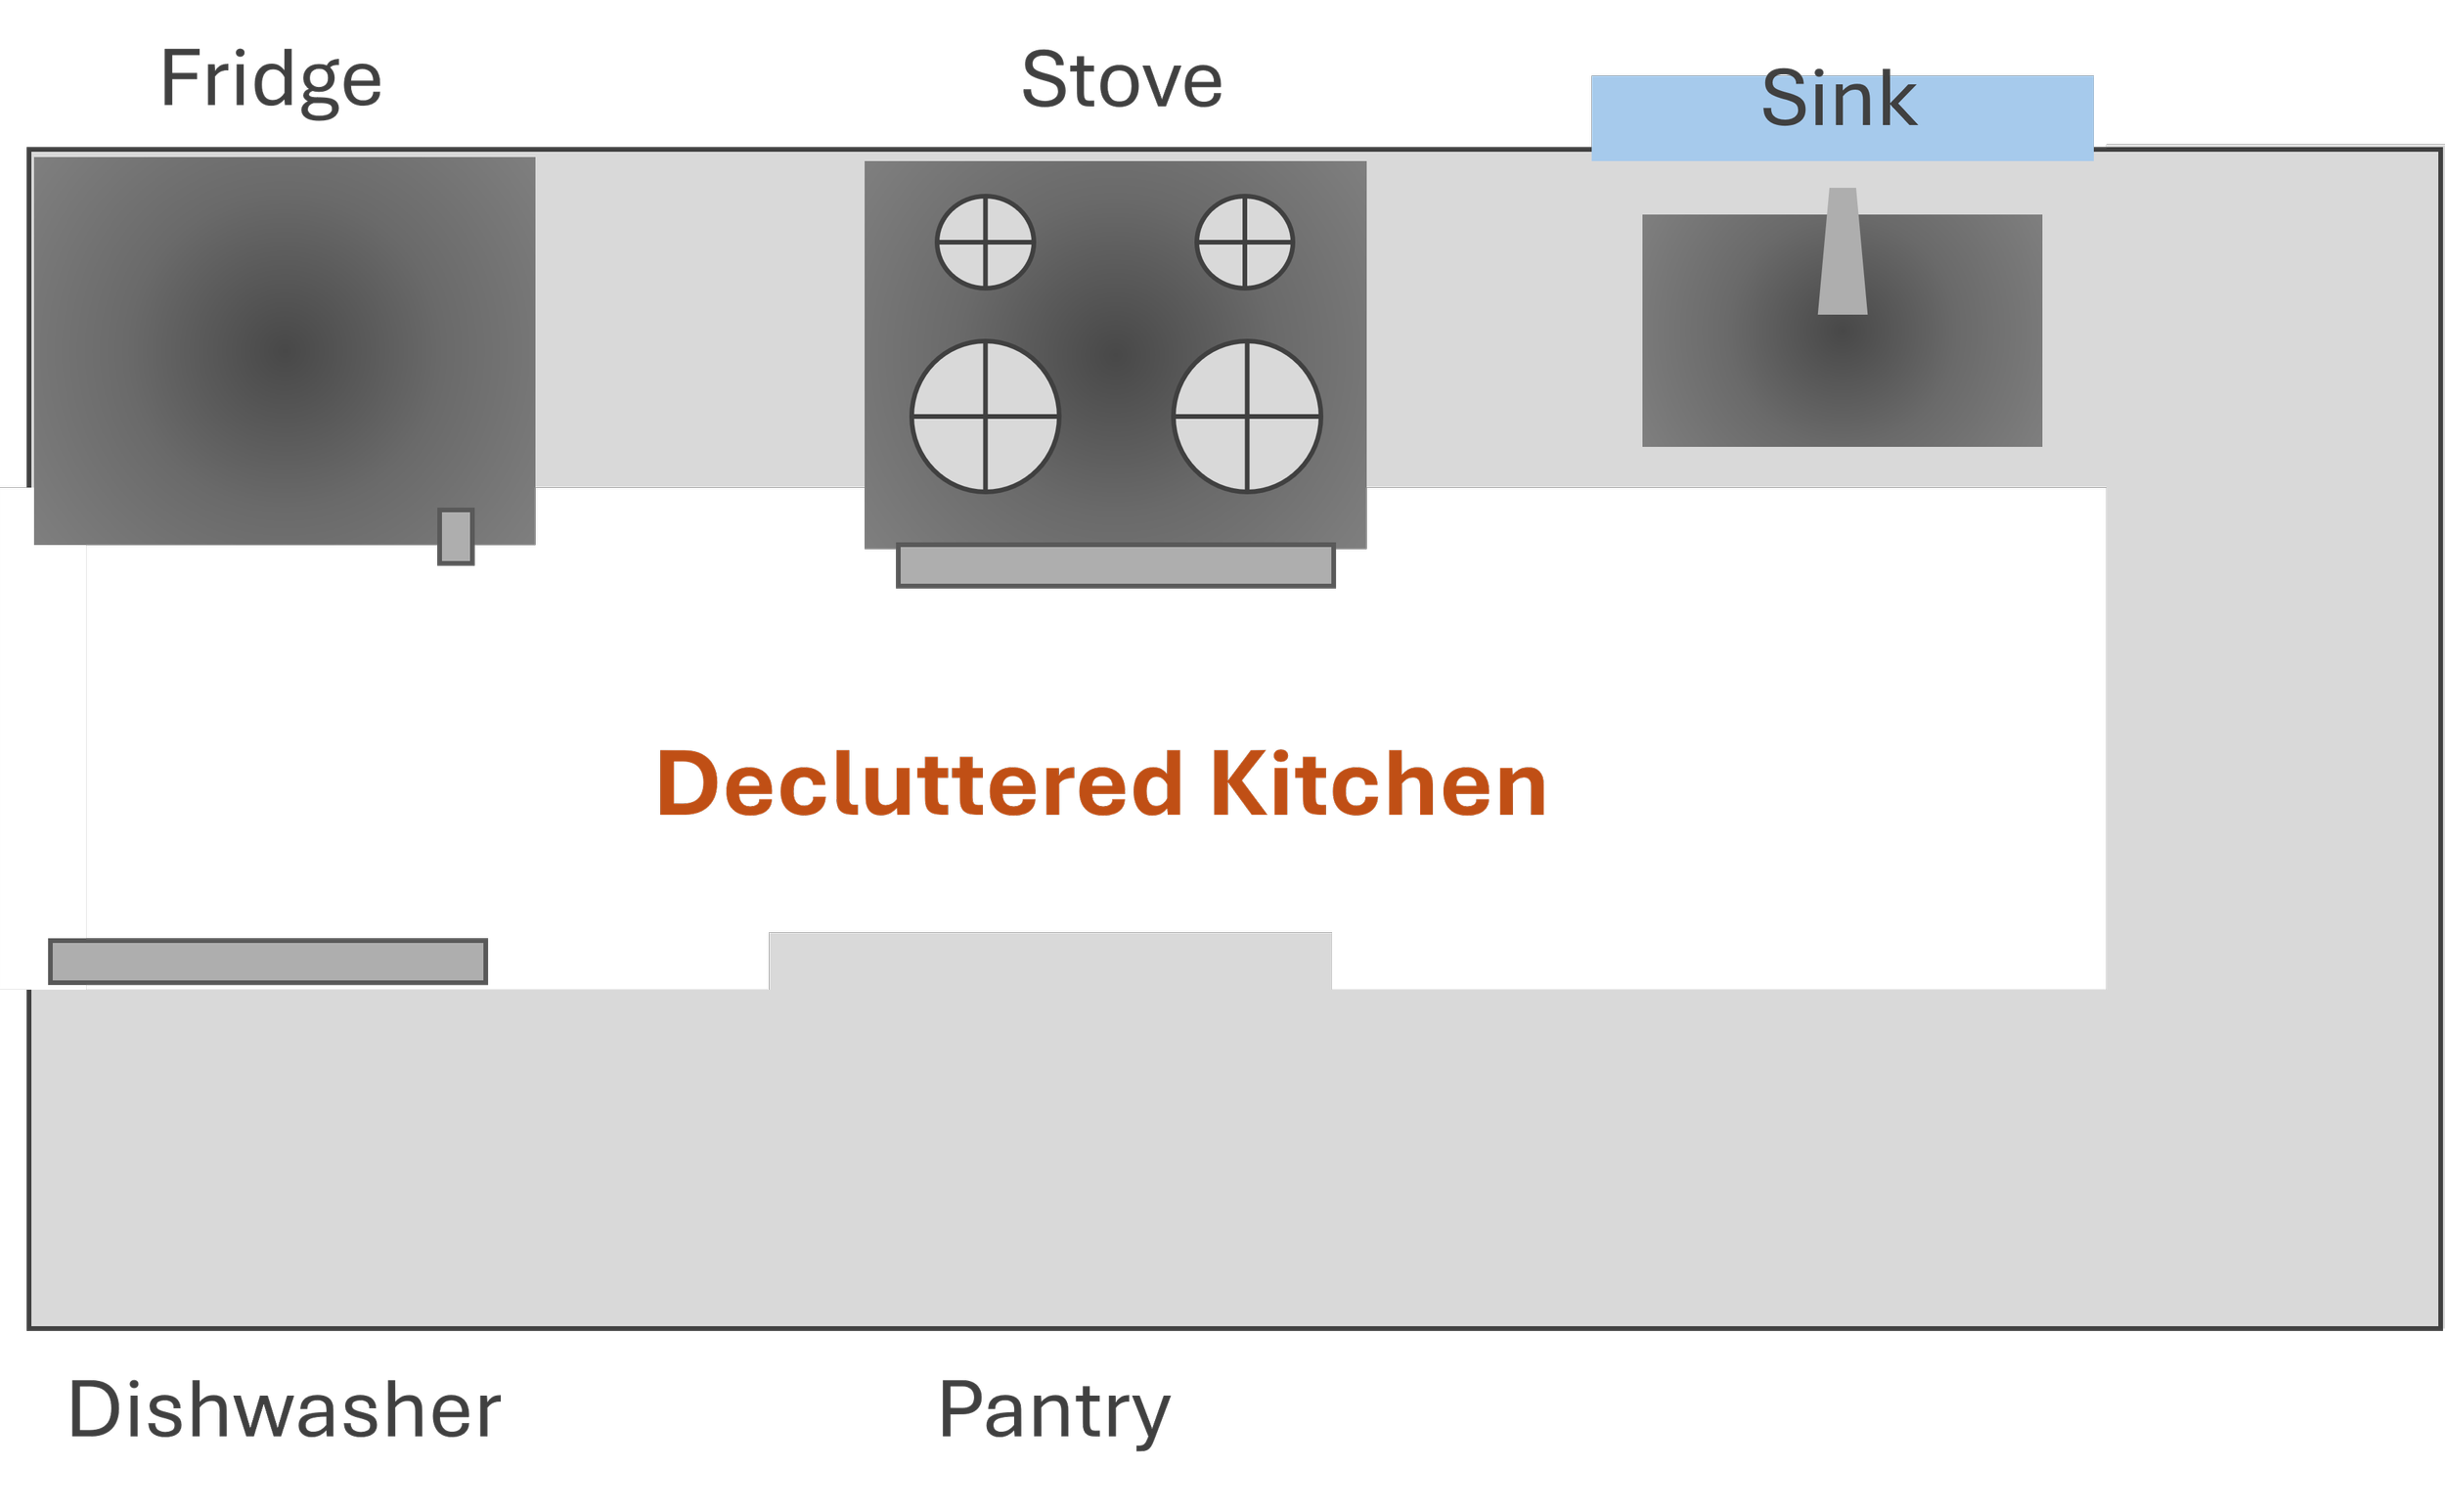
Solution: Ruthlessly eliminated counter clutter. Toaster and coffee maker moved to a cart in the adjoining breakfast nook. Knife block hung on wall. Dish rack replaced with towel-dry method.
The Change: $75 for a rolling cart in the next room. The secret: Galley kitchens can't be 'all things.' They're for cooking. Everything else gets relocated.T
The Two-Cook Strategy: How to Share a Galley Without Colliding
Most galley kitchen advice assumes one cook. But if two people need to work simultaneously, you need a different approach.
The Side-Assignment System
Instead of both people working linearly through the galley, assign each person one SIDE of the galley for their primary work zone.
Cook 1 (Left Side):
Uses left-side prep counter
Works at stove (if stove is on left)
Stays primarily on left side of galley
Cook 2 (Right Side):
Uses right-side prep counter
Handles sink/cleaning duties (if sink is on right)
Stays primarily on right side
They cross paths only when absolutely necessary—not constantly competing for the same counter or appliance.
The Essential Two-Cook Rules
Rule 1: Each side needs its own prep counter. Minimum 24 inches per side.
Rule 2: Duplicate key tools on both sides. Cutting board, knife, mixing bowl. No fighting over basics.
Rule 3: Stagger your tasks. One person preps while other cooks. Both cooking simultaneously only works if you have 48+ inches between counters.
Rule 4: Announce when opening dishwasher or oven. These block the entire walkway. Communication prevents collisions.
The Dining Dilemma: Where to Actually Eat in a Galley Kitchen
Here's a bummer of a drawback: A standard galley kitchen (42-48 inches between counters) cannot accommodate eat-in dining. There's just no room for a table when you have a narrow aisle as your floor space.
Your Three Realistic Options
Option 1: The End-of-Galley Bar (Best Solution)
If your galley opens to another room, add a small peninsula or bar-height counter at the exit end. This creates a casual eating spot that doesn't intrude into the work zone.
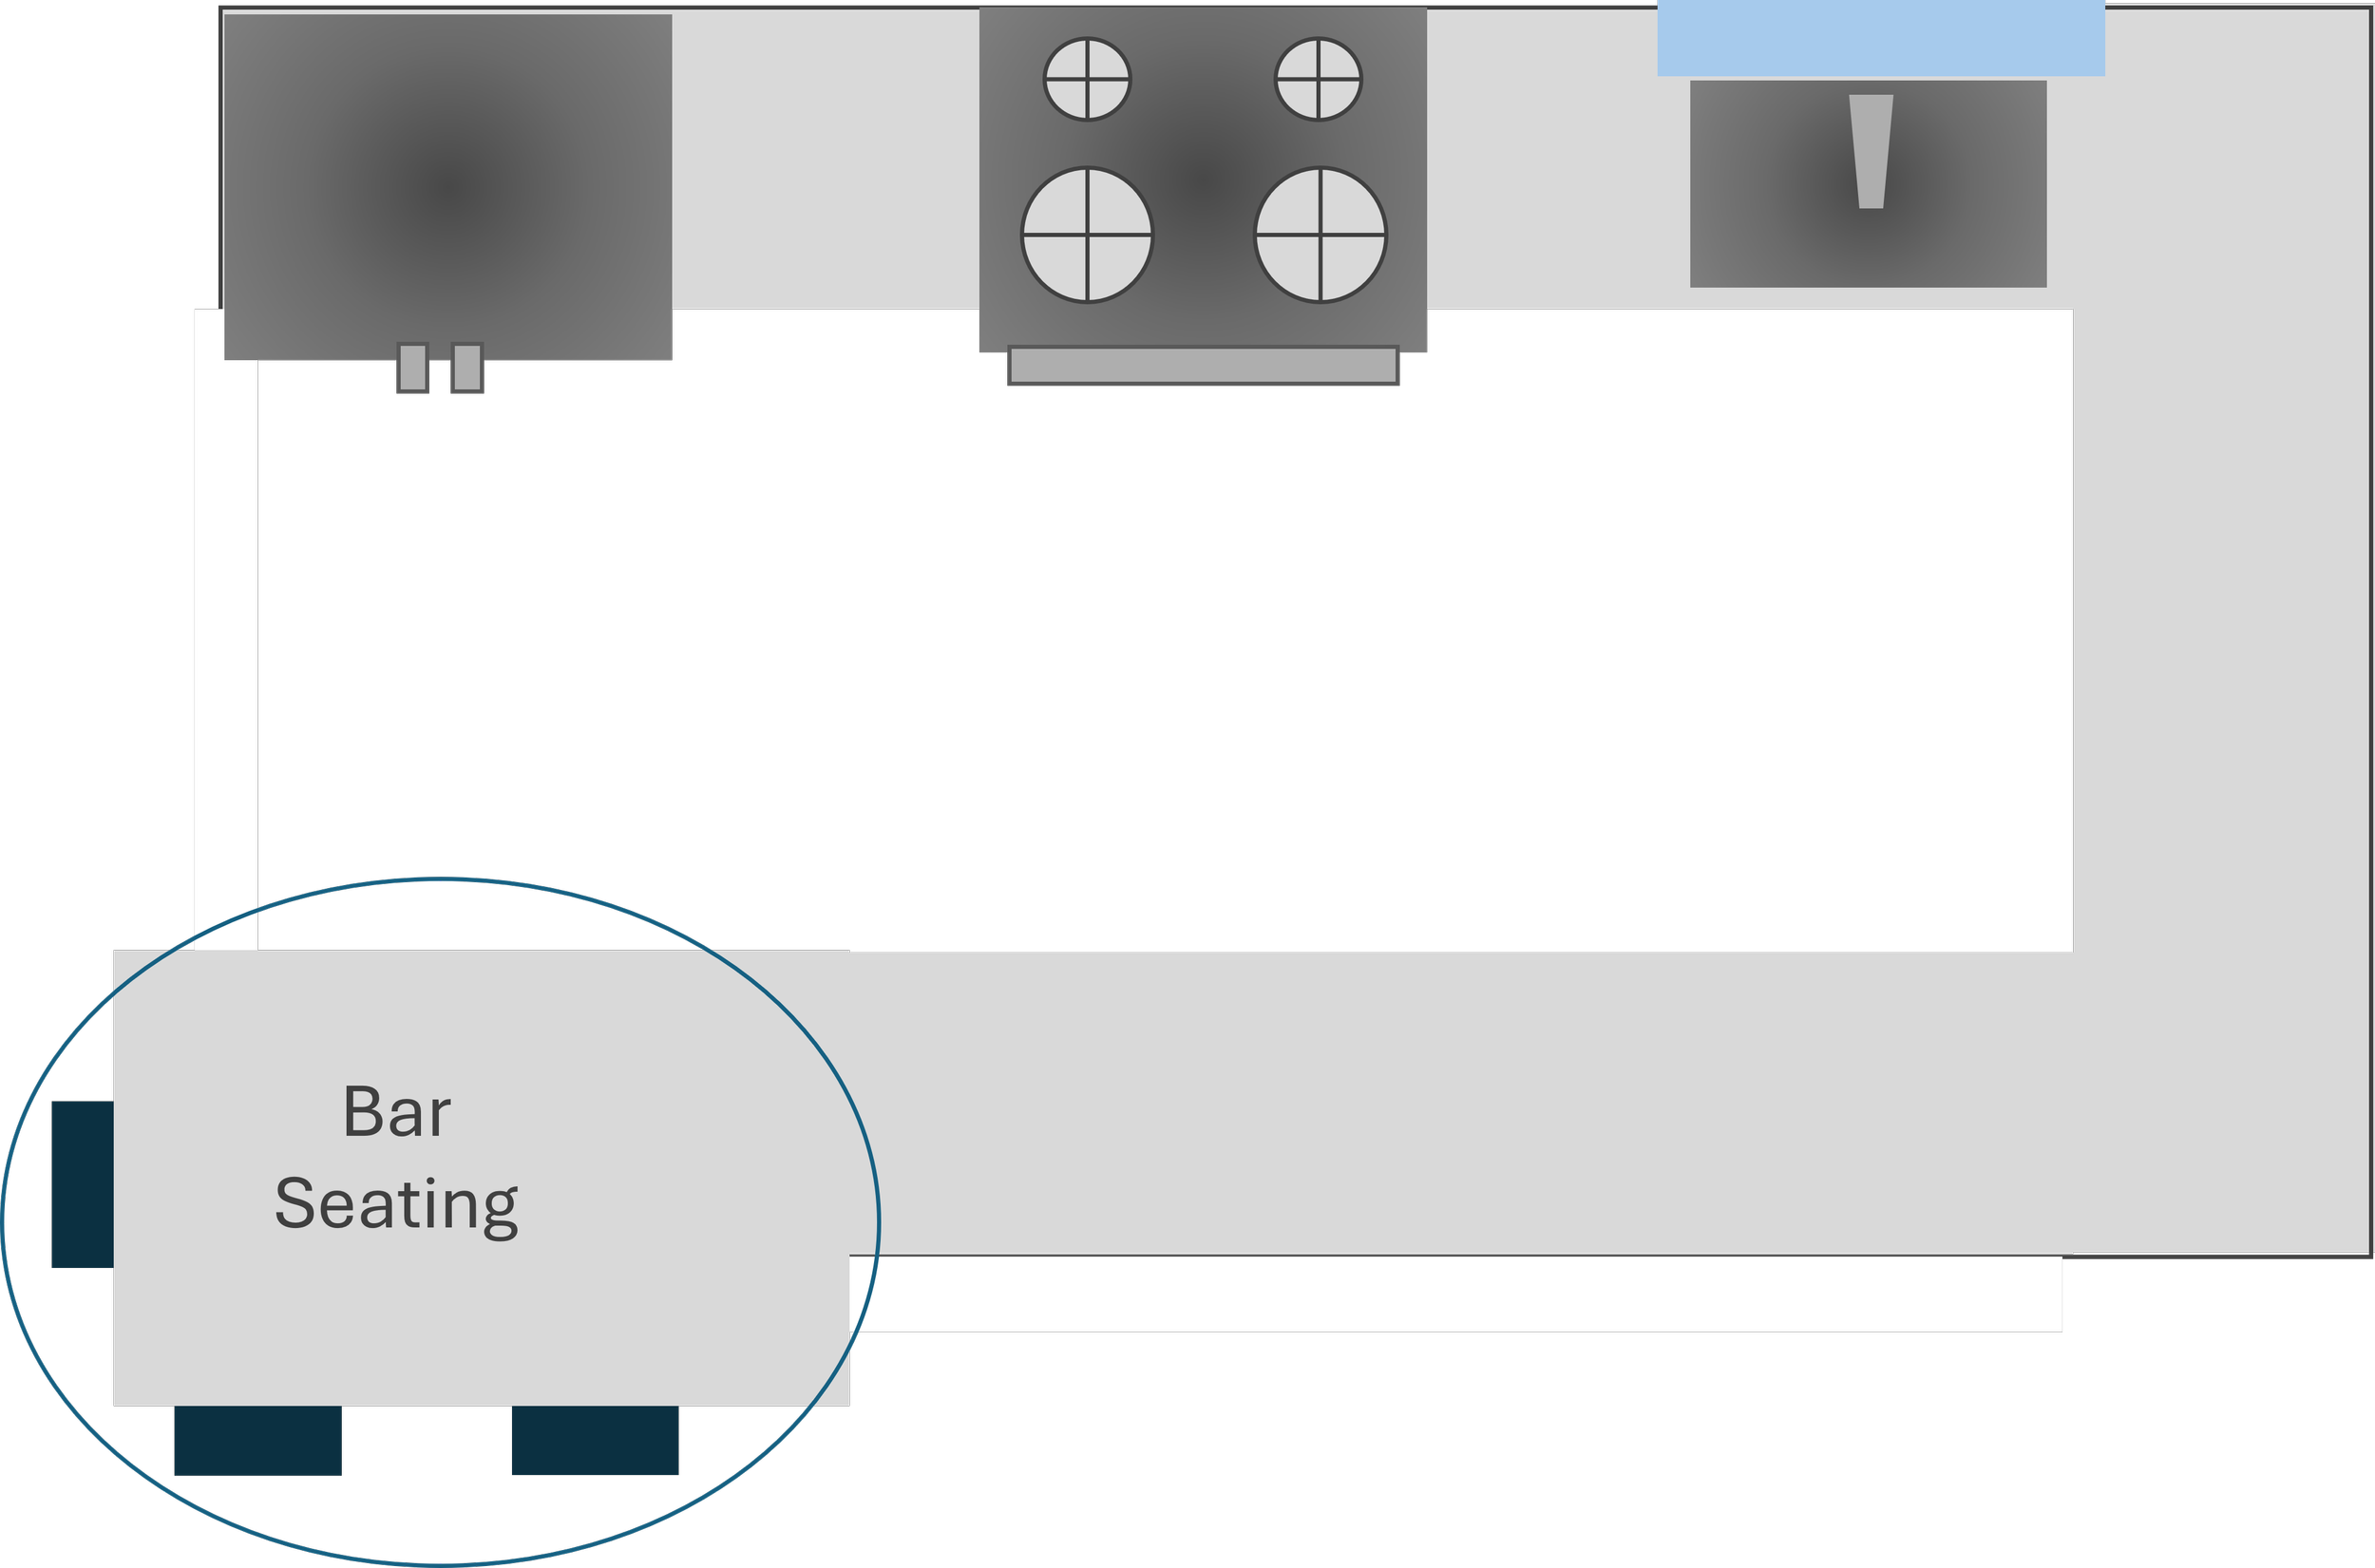
Dimensions: 36-42 inches wide, 12-18 inches deep
Seats 2-3 people on bar stools
Doubles as a landing zone for serving food
Option 2: The Adjacent Dining Space (Most Common)
Accept that dining happens in the next room. This isn't a failure—it's reality. Focus your galley on cooking function, not trying to squeeze in eating space.
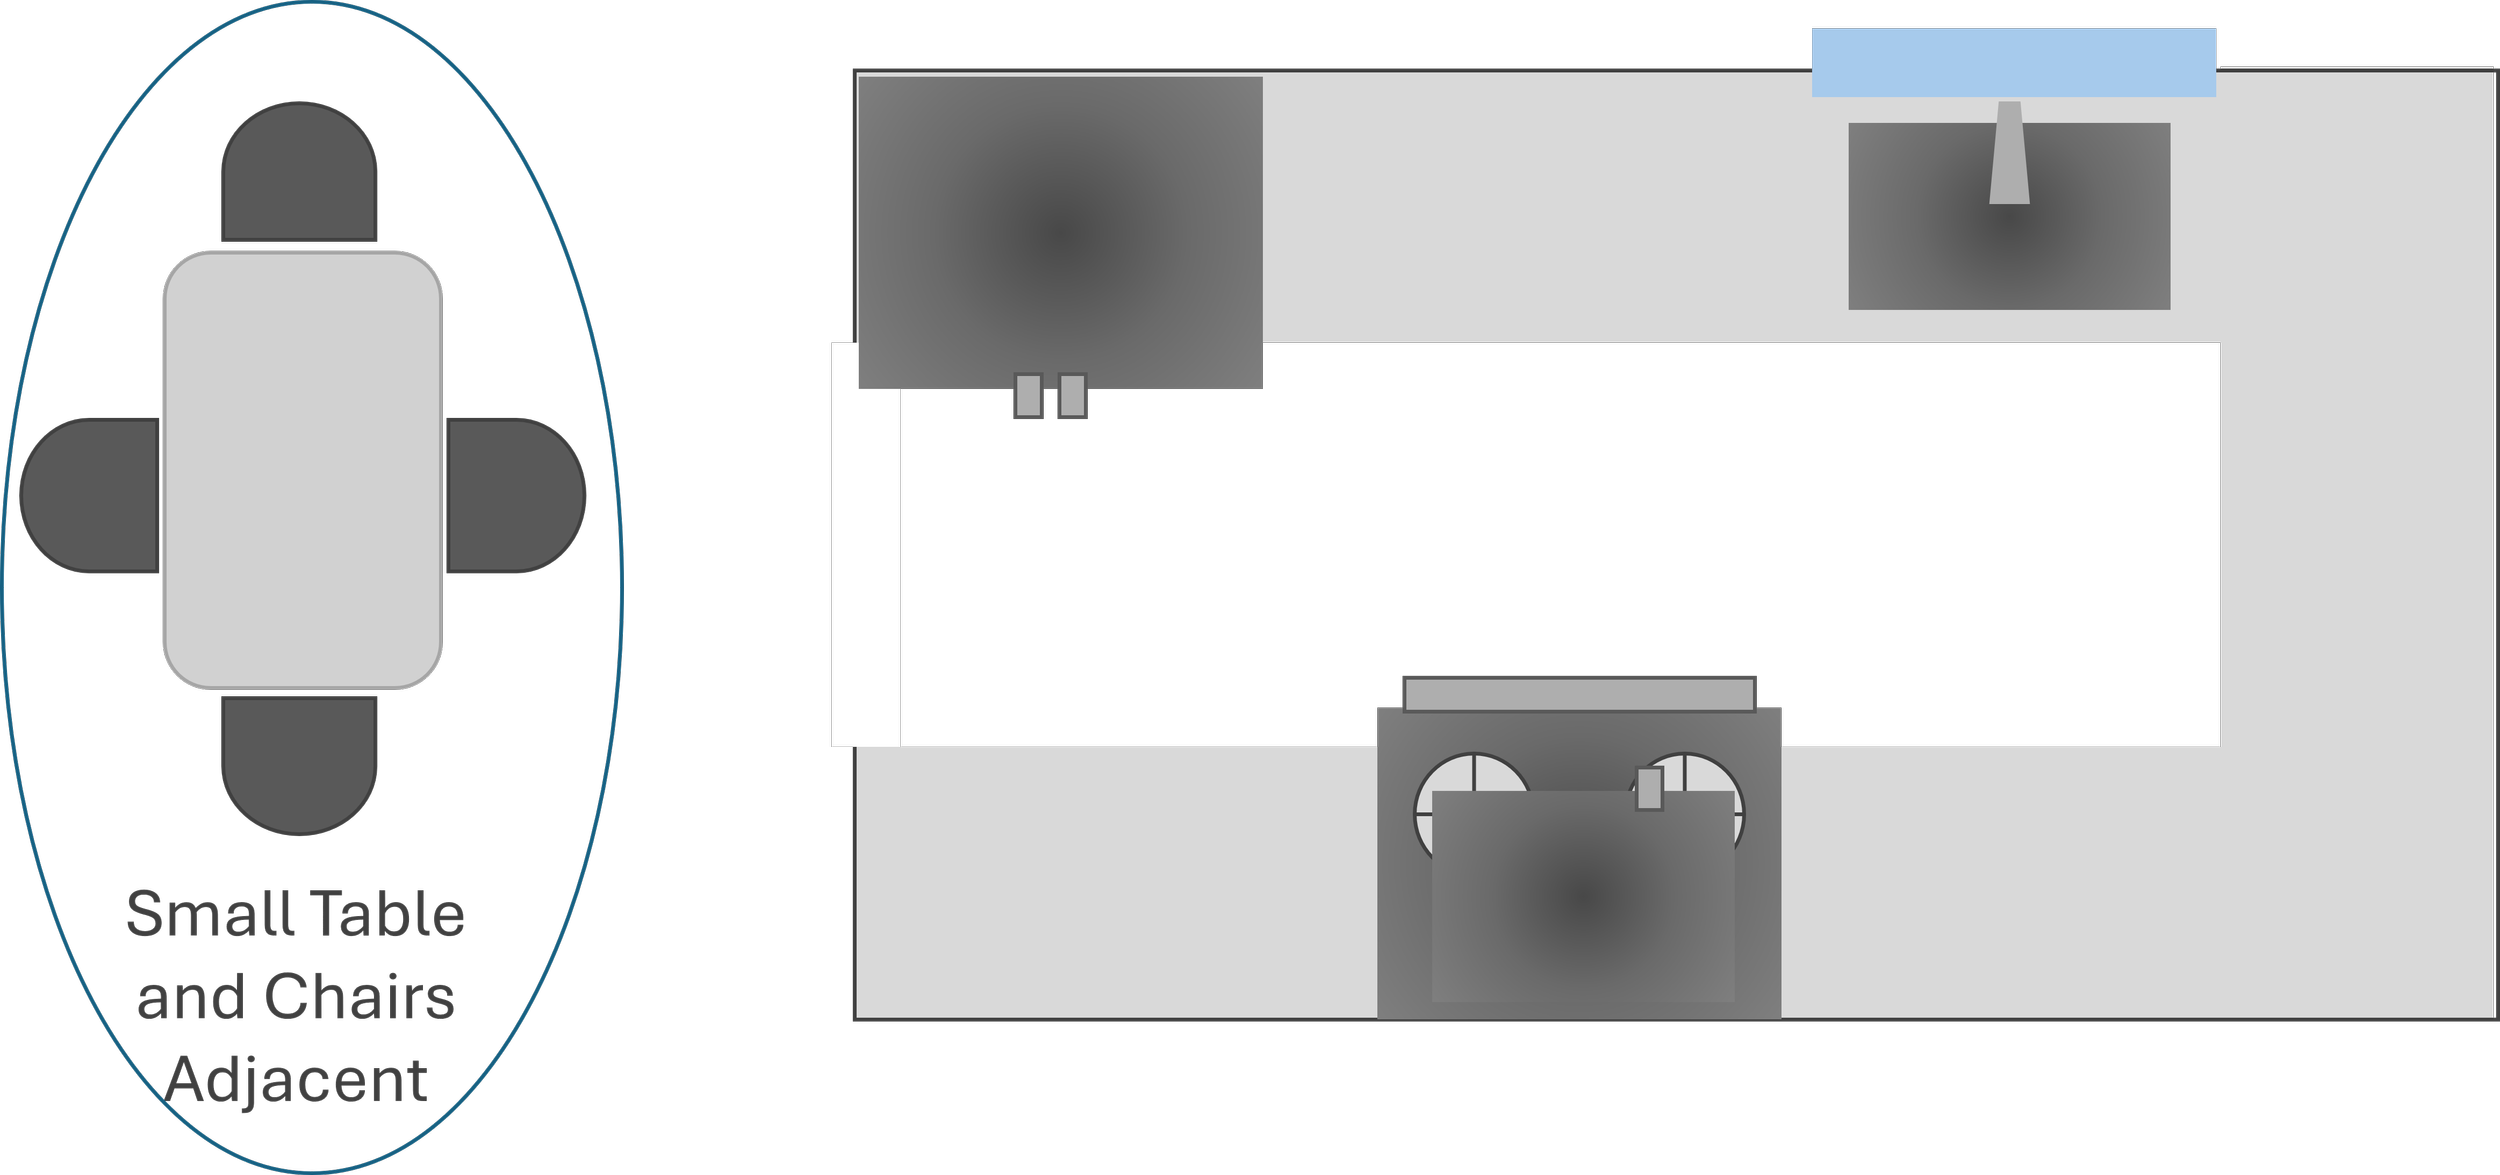
Place a small table just outside the galley exit
Use a rolling cart to transport food from galley to table
Keep the 'serving zone' at the galley exit clear
Option 3: The Fold-Down Table (Last Resort)
If you absolutely need eat-in dining and have NO adjacent space, a wall-mounted fold-down table can work—but it comes with compromises.
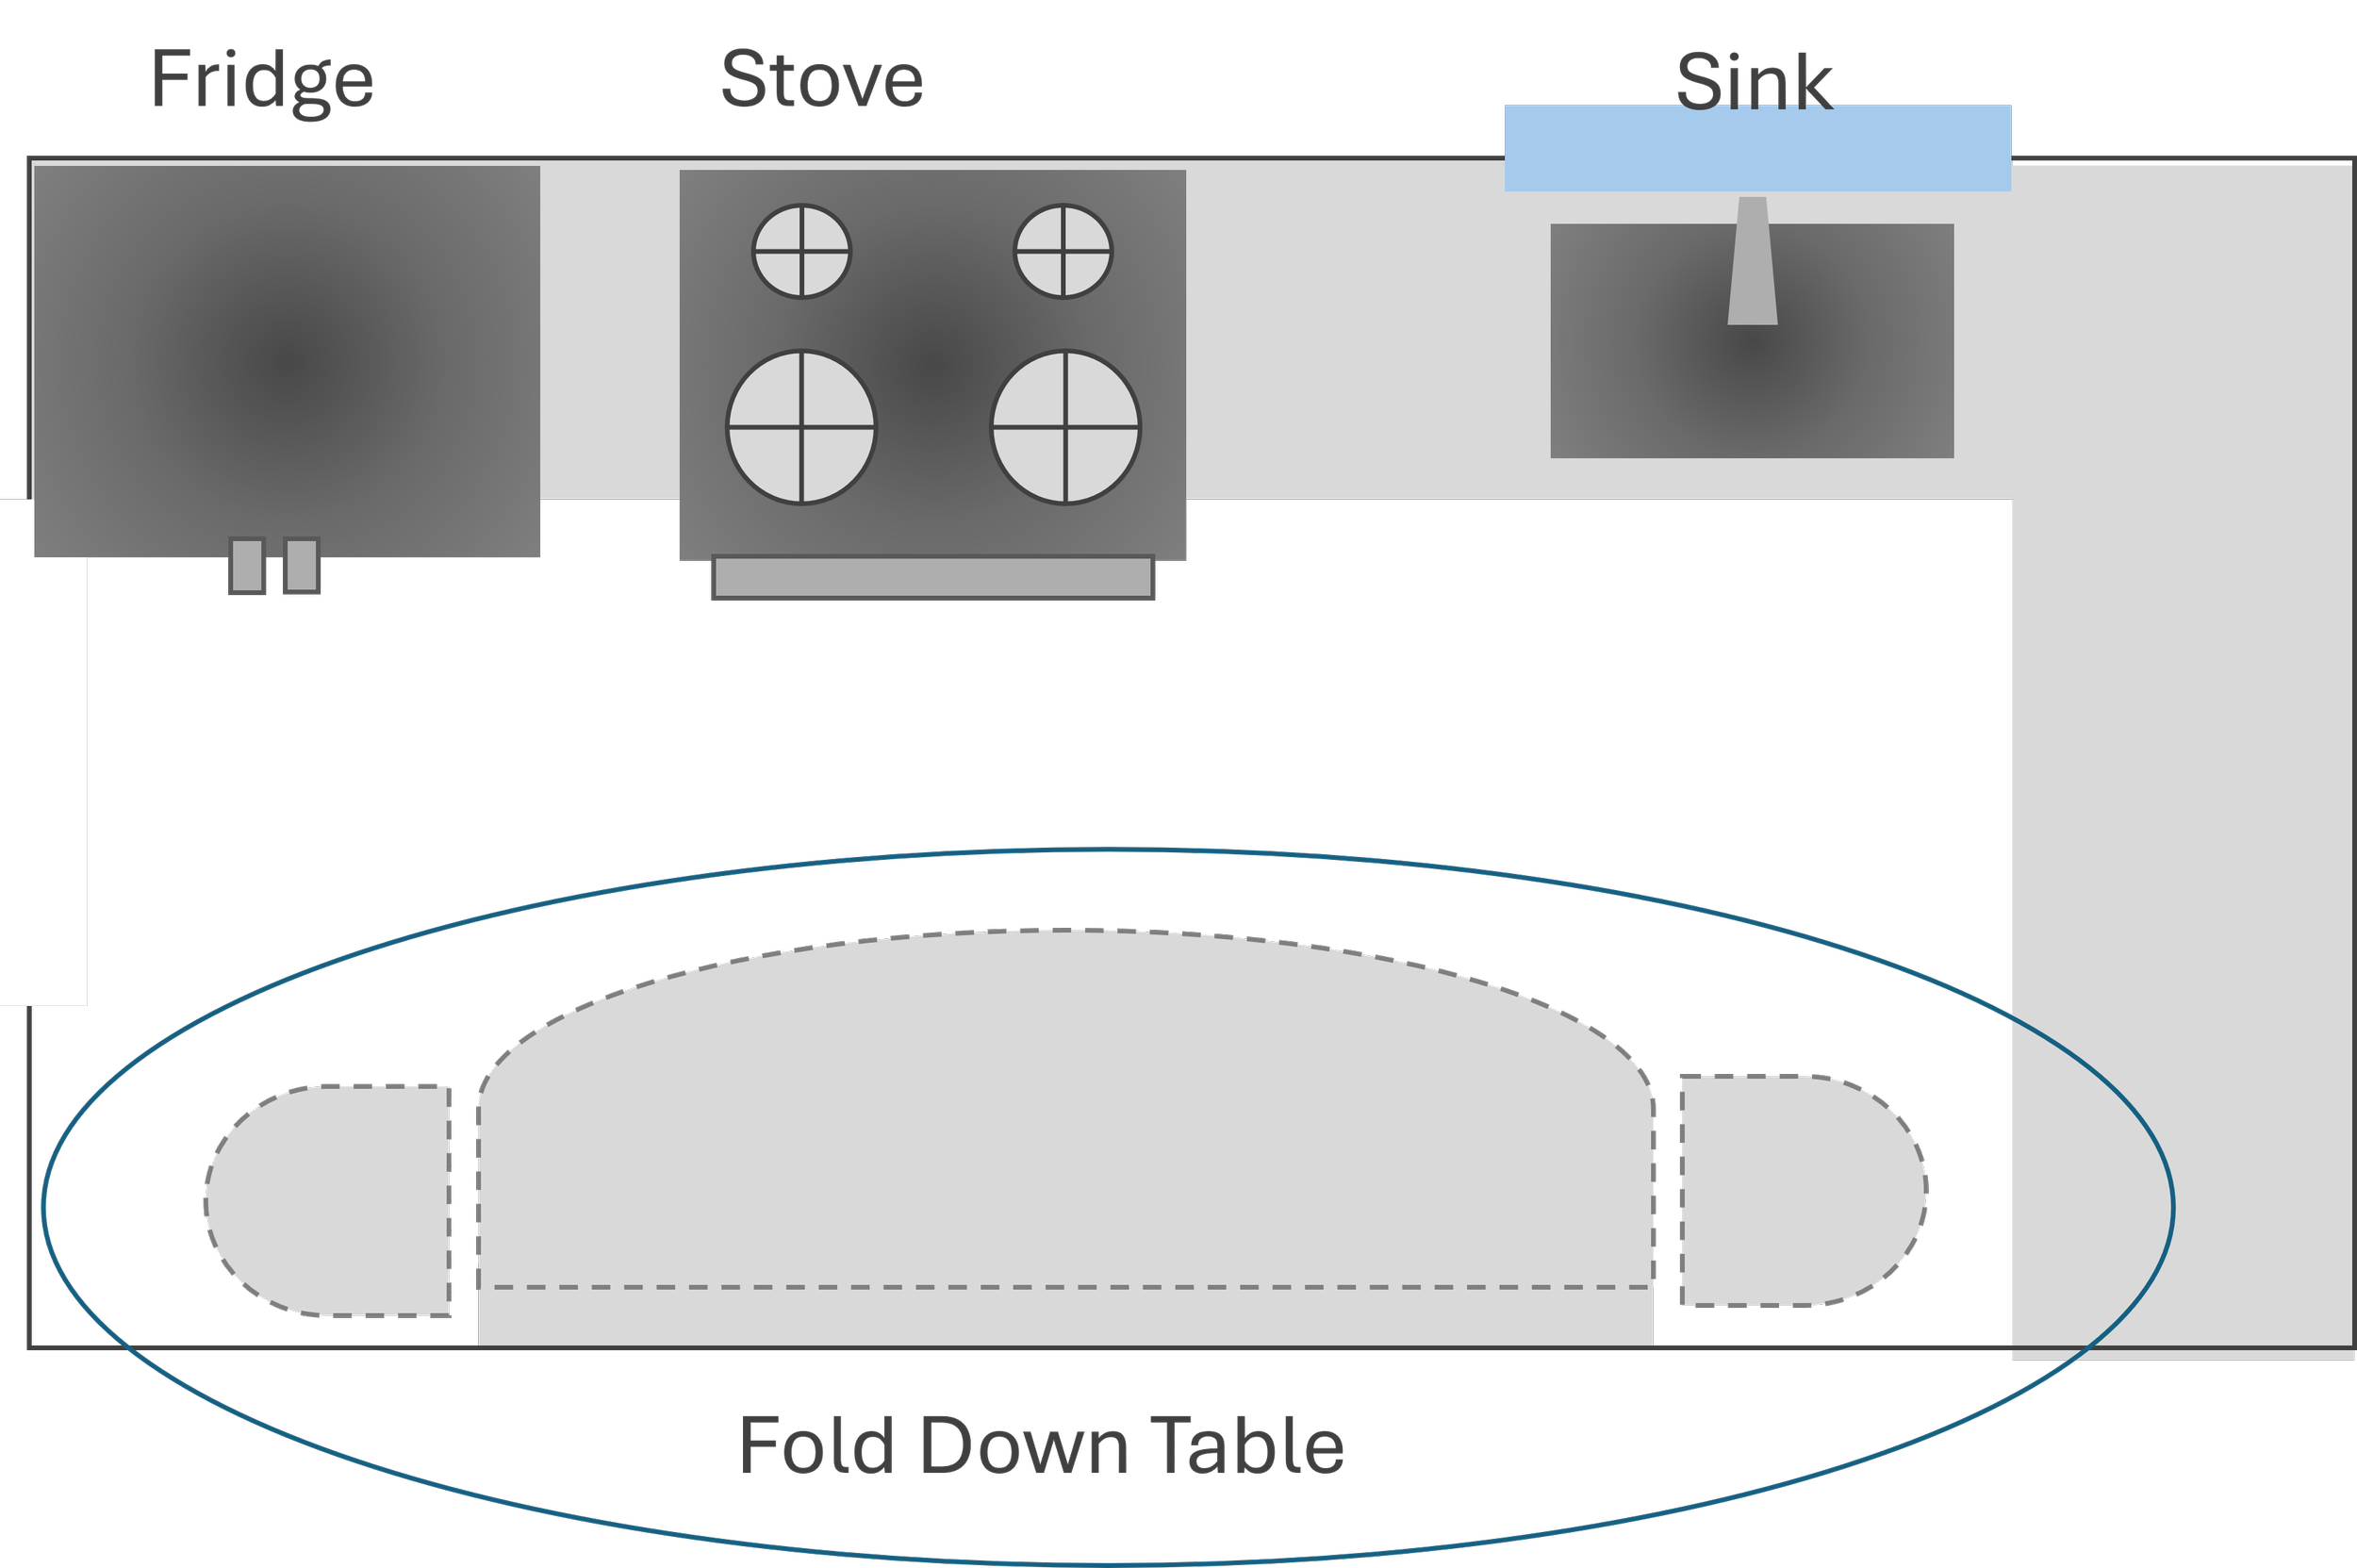
Must be mounted on the wall at the ENTRANCE end of galley
When up, it blocks access to galley (can't cook while eating)
Maximum 24 inches deep when down
Seats 2 people max
Real Talk: Most people who install fold-down tables in galley kitchens end up never using them because the hassle of setting up/taking down outweighs the benefit. Option 1 or 2 works better long-term.
When Your Galley Has Too Much Stuff: The Brutal Edit You Need to Make
Sometimes the layout isn't the “real” problem—you just own too much kitchen stuff for the space you have. Here's how to fix that.
The Galley Kitchen Capacity Formula
A standard galley kitchen (8-10 feet long, 42-48 inches wide) has approximately 20-25 linear feet of cabinet space. That's less than half what a U-shaped or L-shaped kitchen has.
You need to keep:
Dishes for 4-6 people (no more)
One set of pots/pans (8-10 pieces total)
5-7 most-used small appliances (coffee maker, toaster, blender, mixer, etc.)
Food storage for one week of cooking
Pantry items for 2-3 weeks
You need to relocate or eliminate:
Specialty appliances used less than monthly (bread maker, ice cream maker, waffle iron)
Duplicate tools (you don't need 3 spatulas)
Serving platters, holiday dishes, entertaining items
Bulk pantry items (keep weekly supply only)
Anything you haven't used in 6 months
The Hard Truth: You can have a functional galley kitchen OR you can keep all your kitchen stuff. You can't have both. Choose function.
Your Galley Kitchen Action Plan
You don't need a renovation to make your galley kitchen work. You need these three things:
1. Correct clearances: 42-48 inches between counters, 15-inch landing zones, full door swings
2. Proper sequence: Fridge → Prep → Cook → Clean, in that order along your galley
3. Realistic capacity: Keep only what fits, relocate or eliminate the rest
Start with one fix this week. Test your door swings. Measure your landing zones. Move your dishes closer to the dishwasher. Small changes in a galley kitchen create REAL results because every inch matters.
Your galley kitchen can work. It just needs to follow its own rules, not the rules designed for kitchens twice its size.
Read Next
8 Ways to Maximize a Small Galley Kitchen
With bespoke designer kitchens, you can address these challenges by enhancing storage and creating a layout that feels both open and tailored to your needs.
So, the question becomes, can you take a small galley kitchen and make it feel 5 times bigger with a few key changes?
You bet you can!

Michael is Principal designer and blogger at Michael Helwig Interiors in beautiful Buffalo, New York. Since 2011, he’s a space planning expert, offering online interior e-design services for folks living in small homes, or for those with awkward and tricky layouts. He’s a frequent expert contributor to many National media publications and news outlets on topics related to decorating, interior design, diy projects, and more. Michael happily shares his experience to help folks avoid expensive mistakes and decorating disappointments. You can follow him on Pinterest, Instagram and Facebook @interiorsmh.