It’s Fall and the leaves are beginning to change here in the Northeast. Soon the colors of Autumn will be ablaze with color everywhere the eye can see. For this week’s Sunday diy I thought what better time to get a jump start on all those incredible colors than with a beautiful and SUPER simple wreath for the front door. Let’s honor the season and create a simple picture frame Fall wreath! Fire up the hot glue gun and let’s get started!
Supplies Needed:
11” x 14” Dollar Store Picture Frame
An Assortment Of Silk Flowers – Also from Dollar Store
Twine
Wired Ribbon
Scissors
Hot Glue Gun And Glue
Wire Snips
Pliers

Simple Picture Frame Fall Wreath, Step 1: Take Picture Frame Apart
The first thing to do is to take the plastic wrapping off the picture frame and then flip it over and bend the little metal tabs on the back so you can remove the glass and backing. You won’t need the glass of other frame inserts so just put those aside for an other project.

Simple Picture Frame Fall Wreath, Step 2: Remove Metal Tabs
After that, carefully remove the little metal tabs from all around the frame. It’s best to just pul them straight out with a pair of pliers. When you pull them straight out you won’t damage the frame. If you purchased the same frame I have in the picture, it’s plastic and if you wiggle the tabs out you could crack the frame.

Simple Picture Frame Fall Wreath, Step 3: Glue and Wind Twine
Next, start in the corner of the picture frame and glue and wrap your twine all the aw around the frame. I found it easy to place a dab of hot glue on the back of the frame every few inches of so as I was winding my twine around the frame. I wanted mine to be even all the way around but if you have a large spool of twine, you could wrap it as much as you want. It just gives the frame a nice consistent look all the way around. You can also find lots of different colored twine at the craft store, so use your imagination!

Simple Picture Frame Fall Wreath, Step 4: Snip Silk Flowers
Use your wire snips and cut all of your flowers off the stems. I like to leave a longer stem on my snips. You can always cut it back later. Just get all the flowers or leaves off the stems and make individual piles of all the same flowers. This way you can see what you’re working with.

Simple Picture Frame Fall Wreath, Step 6: Glue Down Layer One
I decided to layer some silk Fall leaves as my background of the wreath. I layered one on top of the other adjusting the direction the leaves faced around one half of the wreath.
Lay the flowers or leaves down where you want them before gluing so you can make adjustments as you go.
This is the point that you decide if you want your flowers to go all the way around the frame or not. I liked the asymmetrical look so I left the color to one side. Get creative and see what you like best!
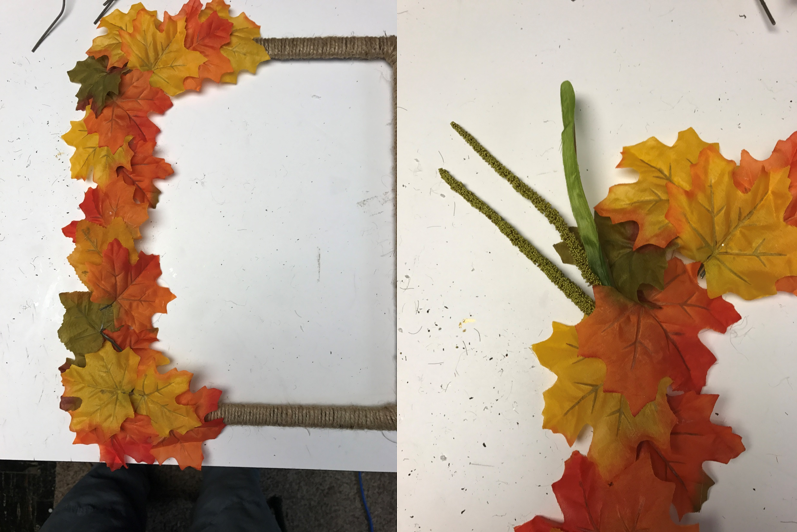
Simple Picture Frame Fall Wreath, Step 7: Create Your Flower Layers
Start adding in the layers of flowers to your arrangement and glue them down where you want them to be.
TIP: When you’re at the store selecting your silk flowers, pick up a few textural pieces. I chose these long green stalks, the small black fuzzy things and berries. Don’t be afraid to add in these bits of texture because that will add dimension to your arrangement. It’s so much more interesting than all flowers.

Simple Picture Frame Fall Wreath, Step 8: Put A Bow On It!
Put a bow on the bottom or on the top and hang it up! I decided to go with a gift package bow but you can do a simple tie bow or leave it off. I like the way the bow finishes off the look, but it’s tottlly up to you.
You could easily add in some plastic mini pumpkins or gourds if you wanted some other embellishment.

That’s it! A super simple and pretty diy Fall wreath for the front door! If you liked this Sunday diy, please give it a thumbs up and pass it along to your friends!
I’d love for you to subscribe. You can do that by clicking the green subscribe button in my signature below. When you subscribe you’ll be the first to know when each of my blog posts goes live including my Sunday diy posts, just like this one here! Trust me, you don’t want to miss those! As an added benefit, you’ll get my monthly newsletter, Home Decorating Simplified. – delivered right to your inbox. You’ll have access to special behind the scenes projects that I’m working on, tips and tricks and simple diy’s that I only share with my subscribers. Don’t wait another minute! Click the green subscribe button and let’s get you inspired to create the home of your dreams!
Thank you so much for reading this week and until next time, stay fabulous!
Michael is Principal designer and blogger at Michael Helwig Interiors in beautiful Buffalo, New York. Since 2011, he’s a space planning expert, offering online interior e-design services for folks living in small homes, or for those with awkward and tricky layouts. He’s a frequent expert contributor to many National media publications and news outlets on topics related to decorating, interior design, diy projects, and more. Michael happily shares his experience to help folks avoid expensive mistakes and decorating disappointments. You can follow him on Pinterest, Instagram and Facebook @interiorsmh.