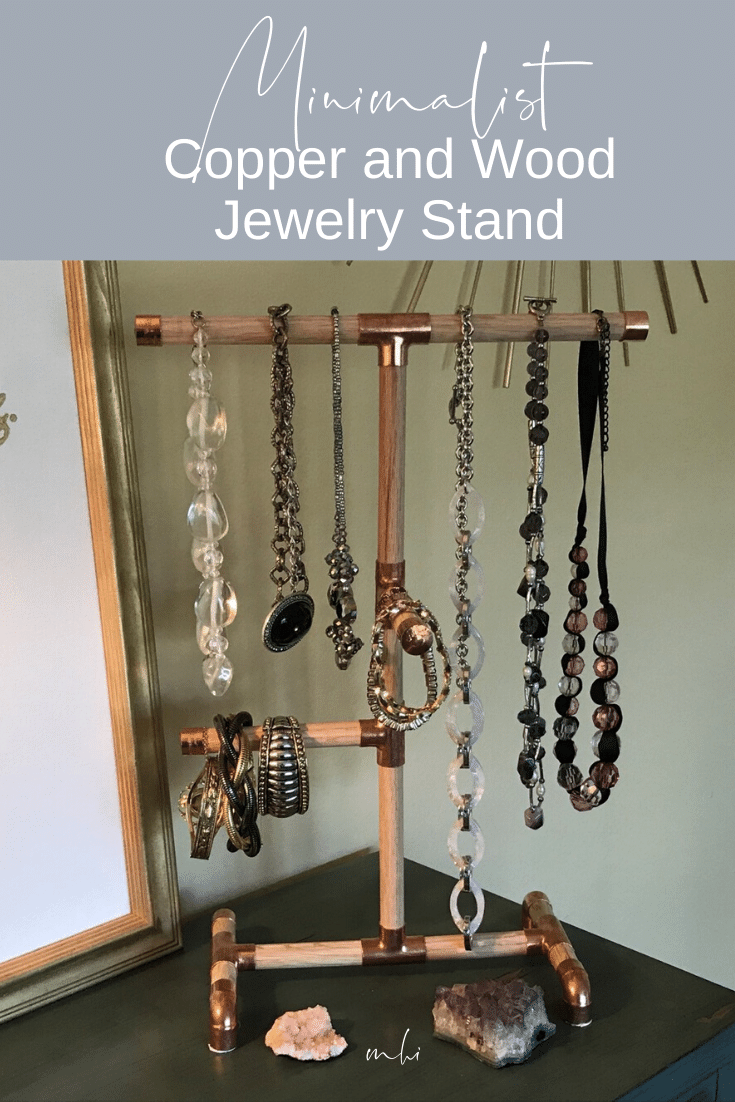
The minimalist look is super hot right now and what better way to display your treasures than with a super simple minimalist jewelry tree? It’s beautiful, functional and easy to make. Plus, you’ll be able to have all your favorite pieces right at hand – total grab and go on those busy mornings! Let’s get into how to make a minimalist copper and wood jewelry stand.
Minimalist Copper And Wood Jewelry Stand, Supplies
All of the supplies for this project are available at your local hardware or big box home improvement store. You will need:
2 – 3’ long x 5/8” round wood dowels
A miter box and hand saw, they are about $12.00 for the set if you don’t have one.
1 bag of ¼” 90° copper elbows (contractor bag is 8-10 count, best value)
1 bag of ¼” copper “T” connectors
4 ¼” Copper Caps
Tape Measure
1 Small Tube of Super Glue

Minimalist Copper And Wood Jewelry Stand, Step 1: Cut Dowels
Measure each length with your tape and use the straight cut slot on your miter box. Super easy and this step should take about 5 minutes. I found it easiest to measure each group one at a time, so start with the 1.5” pieces, then cut the 2.5” pieces and so on. Here’s the break down of what you’ll need to cut:
4 – 1.5” Pieces
1 – 2.5” Piece
3 – 3.5” Pieces
1 – 5” Piece
4 – 5.5” Pieces


Minimalist Copper And Wood Jewelry Stand, Step 2: Construct Base
We’re building this from the ground up, so the first place to begin to construct the jewelry tree is at the base. Take a look at the picture below and build your base with:
4 – 1.5” Dowels
2 – 3.5” Dowels
4 - ¼” 90° copper elbows
3 Copper “T” Connectors
First place a small amount of super glue inside one end of the “T” connector and then stick 1, 1.5” dowel in to that end. Repeat this step on the opposite end.
TIP: It’s best to glue each dowel one at a time into the pipe immediately after applying the glue because super glue dries on contact.
Then glue one 3.5” dowel into the middle opening of each “T” connector.
After that, Position the third “T” connector perpendicular to the other two and glue in the other ends of the 2, 3.5” dowels. Make sure the middle opening of the “T” connector is facing up. (See picture below).
Last, Glue the 4 - 90° copper elbows to the remaining ends of the 1.5” dowels. These will make the feet of the jewelry tree base.

Minimalist Copper And Wood Jewelry Stand, Step 3: Construct First Tier
Let’s move up a bit further on the tree now. This next section is the first tier of the tree. For this section you need:
2 “T” Connectors
1 – 2.5” Dowel
1 – 5.5” Dowel
Glue the 5.5” dowel into one side of the “T” connector and then glue the 2.5” dowel into the other side.
Next glue the second “T” connector to the other side of the 2.5” dowel making sure to turn the “T” connector perpendicular to the first one. See the picture below.

Minimalist Copper And Wood Jewelry Stand, Step 4: Construct Second Tier
This is the step where you really see the jewelry tree take shape. For this step you’ll need:
3 – 5.5” Dowels
1 – 5” Dowel
1 – 3.5” Dowel
1 “T” Connector
First thing to do is glue the 3 remaining 5.5” dowels into each end of the “T” connector ends.
Then Glue the 3.5” dowel into the middle “T” connector’s open end.
Last, Glue the 5” dowel into the bottom “T” connector’s open end so that these two dowels are perpendicular to one another. See the picture below for how this should look.

Minimalist Copper And Wood Jewelry Stand, Step 5: All Together Now
Now that you have the two top tiers built, it’s time to glue the top into the base. When you have it constructed correctly, you should end up with 4 “branches” on your jewelry tree. See the picture below.

Minimalist Copper And Wood Jewelry Stand, Step 6: Finishing Touches
Time to finish up the details on your tree. For this step you’ll need:
4 ¼” Copper Caps
Some small pieces of wood, less then ¼”
A piece of craft foam or thin cork
First, glue all four copper caps to the exposed ends of each remaining dowel.
To really finish this project, I decided to take some wood that I had on hand and I cut 4 pieces of it so that they would fit inside of the bottoms of the 90° copper elbows. I then traced the circumference of one of the elbows onto the thin craft foam and repeated tracing out 3 others.
I hot glued the foam onto each piece of wood and then I glued the wood into the bottom of the copper elbow. The foam prevents the copper from scratching the surface of where ever you decide to place your tree.

That’s it! Now go style your jewelry on your new minimalist copper and wood jewelry tree! I hope you enjoyed this diy? If you did, I’d love for you to give it a thumbs up!
Don’t forget to tag me in if you decide to give this project a whirl. I’d love to see your creation! As always, pass it along to anyone who you think would enjoy this project.


Michael is Principal designer and blogger at Michael Helwig Interiors in beautiful Buffalo, New York. Since 2011, he’s a space planning expert, offering online interior e-design services for folks living in small homes, or for those with awkward and tricky layouts. He’s a frequent expert contributor to many National media publications and news outlets on topics related to decorating, interior design, diy projects, and more. Michael happily shares his experience to help folks avoid expensive mistakes and decorating disappointments. You can follow him on Pinterest, Instagram and Facebook @interiorsmh.