Ahh the dreaded opposite focal point dilemma.
It’s a toughy because you don’t know where to look. That means, you don’t know how to position your furniture.
It’s more challenging than perpendicular focal points, where you have the fireplace on one wall and the TV on the wall right next to it. That’s a competing focal point but you’re still facing the same direction.
If you don’t have some gravitational pull towards something in a room with opposite and competing focal points, you have a room that feels out of place and unfocused.
Opposite focal points are not ideal, and they make a decorator’s job rough because one has to adhere to the architecture of the room and has to make your client happy by finding an attractive layout for the space.
Let’s unpack this, shall we?
First, and most obvious, we have 2 competing, opposite focal points. The Television nook on the right side of the room and the fireplace on the left side of the room.
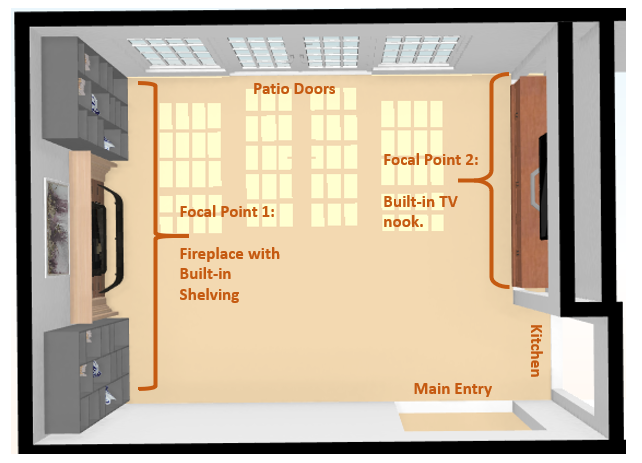
Source: Michael Helwig Interiors
Second, there’s 3 doorways in the space: kitchen, main entry and the patio, which has two French doors that open into the room. Yikes! This is the architectural side of things I was talking about. You can’t block doorways or ignore the door swing directions of actual doors. This also means there will need to be adequate maneuverability to get through the doors and through the room on the way to the doors.

Source: Michael Helwig Interiors
Third, the space is roughly 14’ wide by 19’ long, not huge. What that means is large scale furniture will not fit and every piece brought in better have a purpose or two.

Source: Michael Helwig Interiors
The room is a series of tall orders.
Oh, and I forgot to mention, this is a the only “living room/ family room” in the house, so it needs to serve as the main entertaining area for guests and as the family hang the other 99% of the time.
So, how do you approach a room with opposite focal points? Here’s how to arrange it!
Choose the Focal Point You Want to Feature
Unfortunately, when you have two competing and totally opposite oriented features in the same room, you have to make a decision. In this it’s determining where the focus of the room will be most of the time.

Source: Michael Helwig Interiors
It’s as easy as asking yourself what do I do most in this room?
Here, you have a fireplace at one end and a built-in for the TV at the other end. If you barely watch TV, then the fireplace is the natural focal point. If you love TV and that is what you most of the time, then the TV is your focal point.
Read on because that’s the end of the story for the secondary focal point.
Determine What’s Going in the Space
If you already have furniture, make a list of each piece and write down their dimensions. Include the length, width and height of each piece.

Source: Wayfair and Living Spaces
If you need to buy new furniture, the same rule applies because whether you have it or need to buy it, the size of a sofa, chair, end table or console won’t change. And, the size of the room won’t change either, so take your time planning it out.
There’s nothing worse than guessing that things will fit in your room only to be disappointed by any number of issues like stuff not fitting through the door or in the room itself. Who wants to return things and wait for replacements? Hassel city!
Determine Traffic Flow
Next, you want to pay attention to how you’ll get around in the space before you do anything.
Doors, entryways, patio doors, things you can’t or aren’t changing have to be considered.
Then you need to account for functionality: in this case it’s the swing of the patio doors. Nothing can block those. So, furniture needs to be positioned far enough away so as not to impede the opening and closing.
Also, you must have enough space to walk around furniture so you’re not squeezing between stuff or wedged up against the wall as you’re navigating the room.
Tip: make a paper or cardboard template of each piece so you can see a visual footprint in real life and place the cut outs in the room so you can interact with them. Let me tell you, old newspapers and a roll of masking tape can save you headaches later.

Source: Wayfair
Walk around the cut outs, notice if there’s tight spots where you’re too close to the wall or too close to other pieces. You want a minimum clearance of 12” to 18” between furniture and a minimum of 36” from main entryways or doors that open or close. You may find you need more space than you think you do. One more reason the paper cut outs can come in handy…

Source: Michael Helwig Interiors
If you’re experiencing traffic flow issues, adjust the cut outs so that it feels better. This is a great way to save your back because you’ll run through all the placement options before moving any actual piece into the room.
Draw Attention to the Main Focal Point
Once you’ve got your placement and traffic pattern down, you’ll need to shift your attention to the main focal point in the room.
Use colors, textures, fabrics, wallpaper to highlight that area so that you are directing the attention. Think of it like you’re providing a non-verbal cue to say, “this is where the action is.”

Source: Michael Helwig Interiors
First thing I did was to neutralize the color scheme in the room. I replaced the gold wall color with a color called clouded pearl. It’s a cool gray, very relaxing.

Source: Dulux Paint
All the built-in pieces got a fresh coat of white paint to lower the contrast in the overall space.
Then I focused on a floating furniture layout. It works because the largest piece, the sofa, is opposite the main focal point, the TV. The sofa positioned across from the TV indicates that that is indeed the focal point of the space.

Source: Michael Helwig Interiors
One small scale swivel chair is in the upper left corner of the room out of the way of traffic but still providing an additional seat in the main space.

Source: Michael Helwig Interiors
I anchored the entire room with one 10’ x 12’ rug. It’s big enough to fill the entire seating area on both sides of the room so I didn’t have to finagle two different rugs. In smaller rooms, keep thigs simple.

Source: Michael Helwig Interiors
I kept my upholstery, rug and accessories neutral and similar in hues so I didn’t overwhelm the space with distracting colors or patterns.

Source: Michael Helwig Interiors
I highlighted the wall behind the TV nook with a subtle blue paint to help direct the eye to this area. This is exactly how to non-verbally inform everyone that this is where the action is.

Source: Michael Helwig Interiors
I chose a clear glass coffee table to add functionality to this side but I didn’t want a clunky, solid piece that would eat up the visual openness. It’s important to have as many open sight lines as possible in small spaces because it will help to make the space feel larger.

Source: Michael Helwig Interiors
Last, I made sure that you could walk around the entire room without feeling like you had to squeeze by stuff or crawl over things that were in the way.

Source: Michael Helwig Interiors
There is a clear pathway to the secondary seating in front of the fireplace. There’s a unobstructed path to both the interior passageways and to the left hand patio door to the outside space.
Diminish Attention to the Secondary Focal Point
To do this, you’ll want to use subtle colors, or textures in this area.

Source: Michael Helwig Interiors
That doesn’t mean you’ll have to ignore the secondary focal point. You can still create a small seating area in front of the fireplace, a small conversation area.
I used swivel chairs facing the fireplace and this is a perfect spot for catching up with a friend over coffee or a glass of wine. It’s also ideal for my couple to reset in front of the fire when they just want some quiet time.

Source: Michael Helwig Interiors
Sometimes you have to rip that band-aid off and deal with the reality of the room.
Even with opposite focal points, there’s always a way to make a beautiful and functional furniture arrangement work.
To accomplish the secondary focal point, I kept everything similar in color, texture and hue. This sends the message that this isn’t the main focal point.

Source: Michael Helwig Interiors
The second half of the room still allows for unobstructed access through the space and out to the patio through the right side of the French door.

Source: Michael Helwig Interiors
There you have it, how to arrange a room with opposite focal points:
Choose the Focal Point You Want to Feature
Determine What’s Going in the Space
Determine Traffic Flow
Draw Attention to the Main Focal Point
Diminish Attention to the Secondary Focal Point
I’d love to hear your thoughts.
Do you have a room in your home with opposite or competing focal points?
How did you arrange your furniture to make the space work best?
Are you still struggling to make it work?
Let me know in the comments below and tell me what keeps you up at night about your room.

Join the Fun
If you enjoyed this post and you want to keep seeing my weekly blog, the best way to do that is to subscribe.
You can subscribe by downloading my 11 Secrets Only Designers Know to Make Your Space Rock. If you’re curious about how decorators and designers make a home look magazine ready, you’ll love taking a gander at these 11 secrets. You’ll learn how to style your room from the floor up and it will work for ANY space you have.
I write about small space design and decorating, sustainable furniture options, positive self care and a variety of do-it-yourself home décor.
I’d love to connect with you!
“This man is a plant shaman. He not only designs beautiful rooms, he’s got a green thumb that works like magic! My peace palm never looked better.”
“Michael Helped me to get my home office in magazine ready form. Thank you a million times for helping me figure this room out. It’s now my favorite room!”
Michael is Principal designer and blogger at Michael Helwig Interiors in beautiful Buffalo, New York. Since 2011, he’s a space planning expert, offering online interior e-design services for folks living in small homes, or for those with awkward and tricky layouts. He’s a frequent expert contributor to many National media publications and news outlets on topics related to decorating, interior design, diy projects, and more. Michael happily shares his experience to help folks avoid expensive mistakes and decorating disappointments. You can follow him on Pinterest, Instagram and Facebook @interiorsmh.